


Kaizo Snare
I spent the better part of last year working on a performance that was a strange combination of things. It pulled together turntablism, feedback/friction, machine learning, signal decomposition, 3d printing, robotics…and a snare drum. All of these were ideas I was working on and exploring separately, but as things can sometimes do, they ended forming into something that was much more than the sum of its parts.
///////////////////////////////////////////////////////////////////////////////////////////////////////////////////////////////////////////////////////////////////////
Table of Contents
Background & Context
In The Cut
On The Snare
The Perfect Cut
Onset Descriptors
Of Gongs & Combs
Fabrication & Robotics – Part I
Fabrication & Robotics – Part II
Cloud / confetti
Failed Experiments (the road not travelled)
Putting It All Together
The Future
///////////////////////////////////////////////////////////////////////////////////////////////////////////////////////////////////////////////////////////////////////
Background & Context
A couple of years ago I was asked to take part in a project on machine learning and signal decomposition – The Fluid Corpus Manipulation (FluCoMa) project.
I was one of the “composers” on the project, which meant I had to produce a piece of music that would be performed at a concert. Leading up to the concert were a series of plenaries where all the people involved would meet up, make presentations, discuss ideas, and partake in some group coding time. (You can see my presentations from the first and last plenaries here and here.) Corpus-based music making was something I was fairly familiar with, having created C-C-Combine almost 10 years ago(!), along with a completely rebuilt (and nearly released) Max for Live version, but machine learning and signal decomposition were things I had not messed with very much.
So I went into the project not really sure what to expect, but being excited at what the tools would enable.
I started to make sketches and notes for what I wanted to do in the piece.
- -turntable snare
- -metal sample library -> wavefolder
- -add gamelan samples to library
- -fader mapped to control cutting and descriptor field searching
- -dicer controls different modalities
- -finish diy expression pedal
- -include dadamachines scattered around the hall (all mounted on crotales)
- -3d print a mount/holder for the crotales so the solenoids can hit them cleanly
- -aluminum foil on crotales
- -add bass drum with trigger (gamelan low samples and/or distortion)
- -hihat controlling modular synth via triggers/contact mic?
- –flucoma tools
- –sensory percussion (to MIDI) using silent mesh -> controlling modular synth?
- –boppad instead? of SP?
- -come up with hybrid instrument that will trigger samples and synthesis/CV from
- -acoustic analysis/descriptors
- -sensory percussion mesh
- –ddrum trigger on kick (analysis to tell open and closed hits?)
- -experiment with contact mic trigger on hihat?
- -use ideas from old sampler instrument (thresholds and percentage)
- -incorporate descriptors as well
- -use a running slow envelope to choose file length (so the busier the audio is, the shorter the samples being played are)
- -dictaphone/tape drums?
- -use tabletop-style dictaphone being start/stopped by playing?
- -video/visuals?
- -dadamachines physical solenoids
Since I had no idea what to expect, most of the ideas I had early on were kind of nebulous, speculative, and exploratory. They were general directions I wanted to explore, with no concrete path or order to things.
The first concrete idea that I was excited about was to build a kind of acoustic resynthesis instrument similar to what I’ve been doing with C-C-Combine for years. The main difference would be that in addition to samples being played back based on audio analysis, I would also pre-analyze the acoustic sounds I could make with the dadamachines automat and trigger acoustic playback whenever a corresponding bit of analysis required it. This would, theoretically, create a sound similar to C-C-Combine but with some of the variations and spatial aspects of objects being struck in space.
Even though I was quite excited about this idea, it turned out to be a bit impractical at the start of the project and eventually got back-burnered (for the time being…).
I then started creating tons of different patches, exploring the objects and algorithms available at the time and posting them on the FluCoMa forum to bounce ideas off the other people involved with the project. And although I came up with some interesting ideas (CV splitter, NMF chorus, NMF filter), nothing really grabbed me. Honestly, at the start I wasn’t really sure how I would use the newer aspects of these tools in my creative workflow at all.
But I carried on experimenting, and posting, and testing…
One thing that became clear to me is that since a fundamental aspect of (supervised) machine learning is that you come up with sounds or states that you like, and then use these to feed an algorithm which can then give you more things like that (an oversimplification), it lacked some of the creative surprise or serendipity that normally “inspires” me. This approach, overall, didn’t really line up well with how I worked creatively. I have a very fragile and skittish creative process (and mind) that doesn’t trust what it likes. That is to say, the prospect of making decisions about what I liked before engaging with a creative process was almost the polar opposite of what I wanted to do.
(Or to use a silly childhood memory as a metaphor, when I was younger my mom asked me what I wanted to have for afternoon snacks. I told her I liked apple sauce, which I was into at the time. She went and bought a ton of apple sauce, to the point that I got really tired of it (and don’t really eat it to this day!). So making decisions about what I want and like is a near sure-fire way to make sure I don’t end up liking something…)
That isn’t to say that everything about machine learning works this way, or more specifically with regards to signal decomposition and descriptor analysis, but the paradigms and workflows that were present (particularly at the start of the project) did not initially inspire me.
There were things on the horizon that were exciting, not the least of which being improvements on the descriptor analysis and better onset detection algorithms, which would eventually become my ‘go to’ tools for those tasks, but these were not present at the start of the project.
So I carried on testing, exploring, and posting on the forum with no goal in mind. Quite crucially, through this process I did end up seeding a lot of technical ideas and understanding while I was simultaneously exploring what I thought were completely unrelated ideas and avenues.
Alongside these specific technical explorations were a parallel set of explorations (which I’ll detail below) which eventually ended up fusing together into Kaizo Snare.
///////////////////////////////////////////////////////////////////////////////////////////////////////////////////////////////////////////////////////////////////////
In The Cut
For years (decades really!) I thought to myself “I wish I’d have grown up playing turntables”, as I loved the sound, feel, and aesthetic to experimental turntablism. People like Otomo Yoshihide, Christian Marclay, DJ Sniff, and Kid Koala were inspiring to me in terms of what they were able to do with a turntable. Plus, the physical nature of the turntable, with sampling and the manipulation of time being at the literal center of how the instrument worked, also resonated deeply with me.
After years of wishing this I came to the realization that had I acted on any of those previous impulses, I would have been a fantastic turntablist by now! I had also recently learned about Portablism (using smaller portable turntables to scratch on the go) and happened to own a PT-01 which I bought many years ago, for the sake of having a compact record player for sampling from. So I started watching some YouTube videos, booked a lesson with a turntablist who was open to my more experimental concerns, and started cutting the record back and forth, against the needle. All of this was new and exciting, but sadly a ton of life changes.
One of the things that initially drew me to the turntable was the fact that seemingly endless creativity could be applied to what is a fairly simple object. The record is, in a kind of weird way, an extension of the original wax cylinders. The technology itself, having physical grooves in an object that corresponded with the vibrations in the air, is crazy simple. So everything that has come from turntablism and scratch culture is just building on this simple premise and birthed from materials that happened to be around at the time.
Having spent a large part of my life training and practicing as an instrumentalist in some capacity or another, I had developed a great deal of dexterity, musicianship, and what could be conventionally called virtuosity. Given my mixed background, this virtuosity is quite esoteric and multidimensional, but it also lends itself well to being reapplied to new, unconventional, and DIY instruments. All of that is to say that turntablism, in general, and as it applies to a snare drum, specifically, is chock full of the kind of virtuosity I have spent most of my life preparing for. Detailed, complex, and interlocking movements all working together to create…um… weird sounds.
This is part of the appeal for turntablism for me. There is a depth to the instrument that betrays its simplicity. This virtuosity is also where the term Kaizo from the title comes from. Coming in the form of non-musical inspiration, around the conception and early developments of the piece I got into watching a lot of Super Mario Maker videos that ventured into the insane in terms of complexity (though my favorite sub-genre is Troll levels) in a genre that is known as Kaizo Levels. The term Kaizo originally comes from some incredibly hard Super Mario World rom hacks, but now is more generally used to describe levels that are complex in a very similar way that learning a complex piece of music is difficult. The practice, tenacity, and attention to detail required to even play these levels is mind blowing.
There’s another aspect to turntablism, that although not manifest in Kaizo Snare, is something I draw on for much of my music making. That is the idea of non-linear sampling or looping, where you can have something that was recorded and then played back in a manner (speed, direction, order, etc…) that never actually happened. karma~ is in large part built around this idea, and generally speaking, when I’m using some kind of pre-recorded audio in a performance, it is manipulated in some way or another before we hear it back (this specific kind of non-linear sampling and thinking also forms a big part of Rhythm Wish).
If you’re into podcasts, you can hear me talk about some of these ideas starting at 24:46 in this podcast with Sound + Process:
There’s also an aspect of turntablism that reminds me very much of circuit bending, which formed a big part of my early electronics explorations and developments. I found the “misuse” of the turntable kind of transgressive and liberating in the same way that circuit bending was (and CD players would later be). The turntable wasn’t, originally, intended to do any of this. And although some early turntable-based experimentation came from none other than John Cage, the direct lineage of scratch and DJ turntablism doesn’t come from that tradition at all.
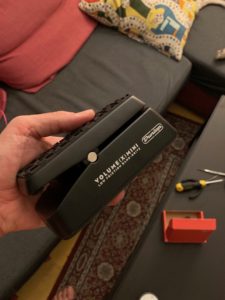
All of this was new and exciting, but sadly a ton of life changes hit me like a sack of bricks and all the turntable interest got back-burnered. However, my explorations did produce a physical artefact which ended up being critical in the development of Kaizo Snare: a high-resolution DIY crossfader.
Even though my practical explorations with turntables got sidetracked, it did produce a physical artefact which ended up being critical in the development of Kaizo Snare. A high-resolution DIY crossfader.

Not really having a clue about faders, and what goes into a good crossfader, I made a post on Digital Vertigo and none other than Rasteri (who designed (the open source) SC1000) responded with a specific fader model I should try out. With that and a trusty Teensy I set off to build a 14-bit fader that had some fancy features built in (smoothing, calibration). It took me a bit to figure out all the details of implementation, but I managed to create an Arduino sketch that did everything I wanted.
I’ll go more into the specifics of the fader, its code, and modifications in the next section, but for now I just wanted to say that I built this thing, and it, like the rest of my turntable stuff, just sat unused in a box, unused for several years.
///////////////////////////////////////////////////////////////////////////////////////////////////////////////////////////////////////////////////////////////////////
On The Snare

It wasn’t until some time later that it even occurred to me that I could use the crossfader with my (peculiar approach to) snare playing. I actually wrote the code (with some help from a friend) for the crossfader while in Montreal for the Black Box project residency and even did a tiny amount of testing with it while there, but it sadly did not amount to much at the time.
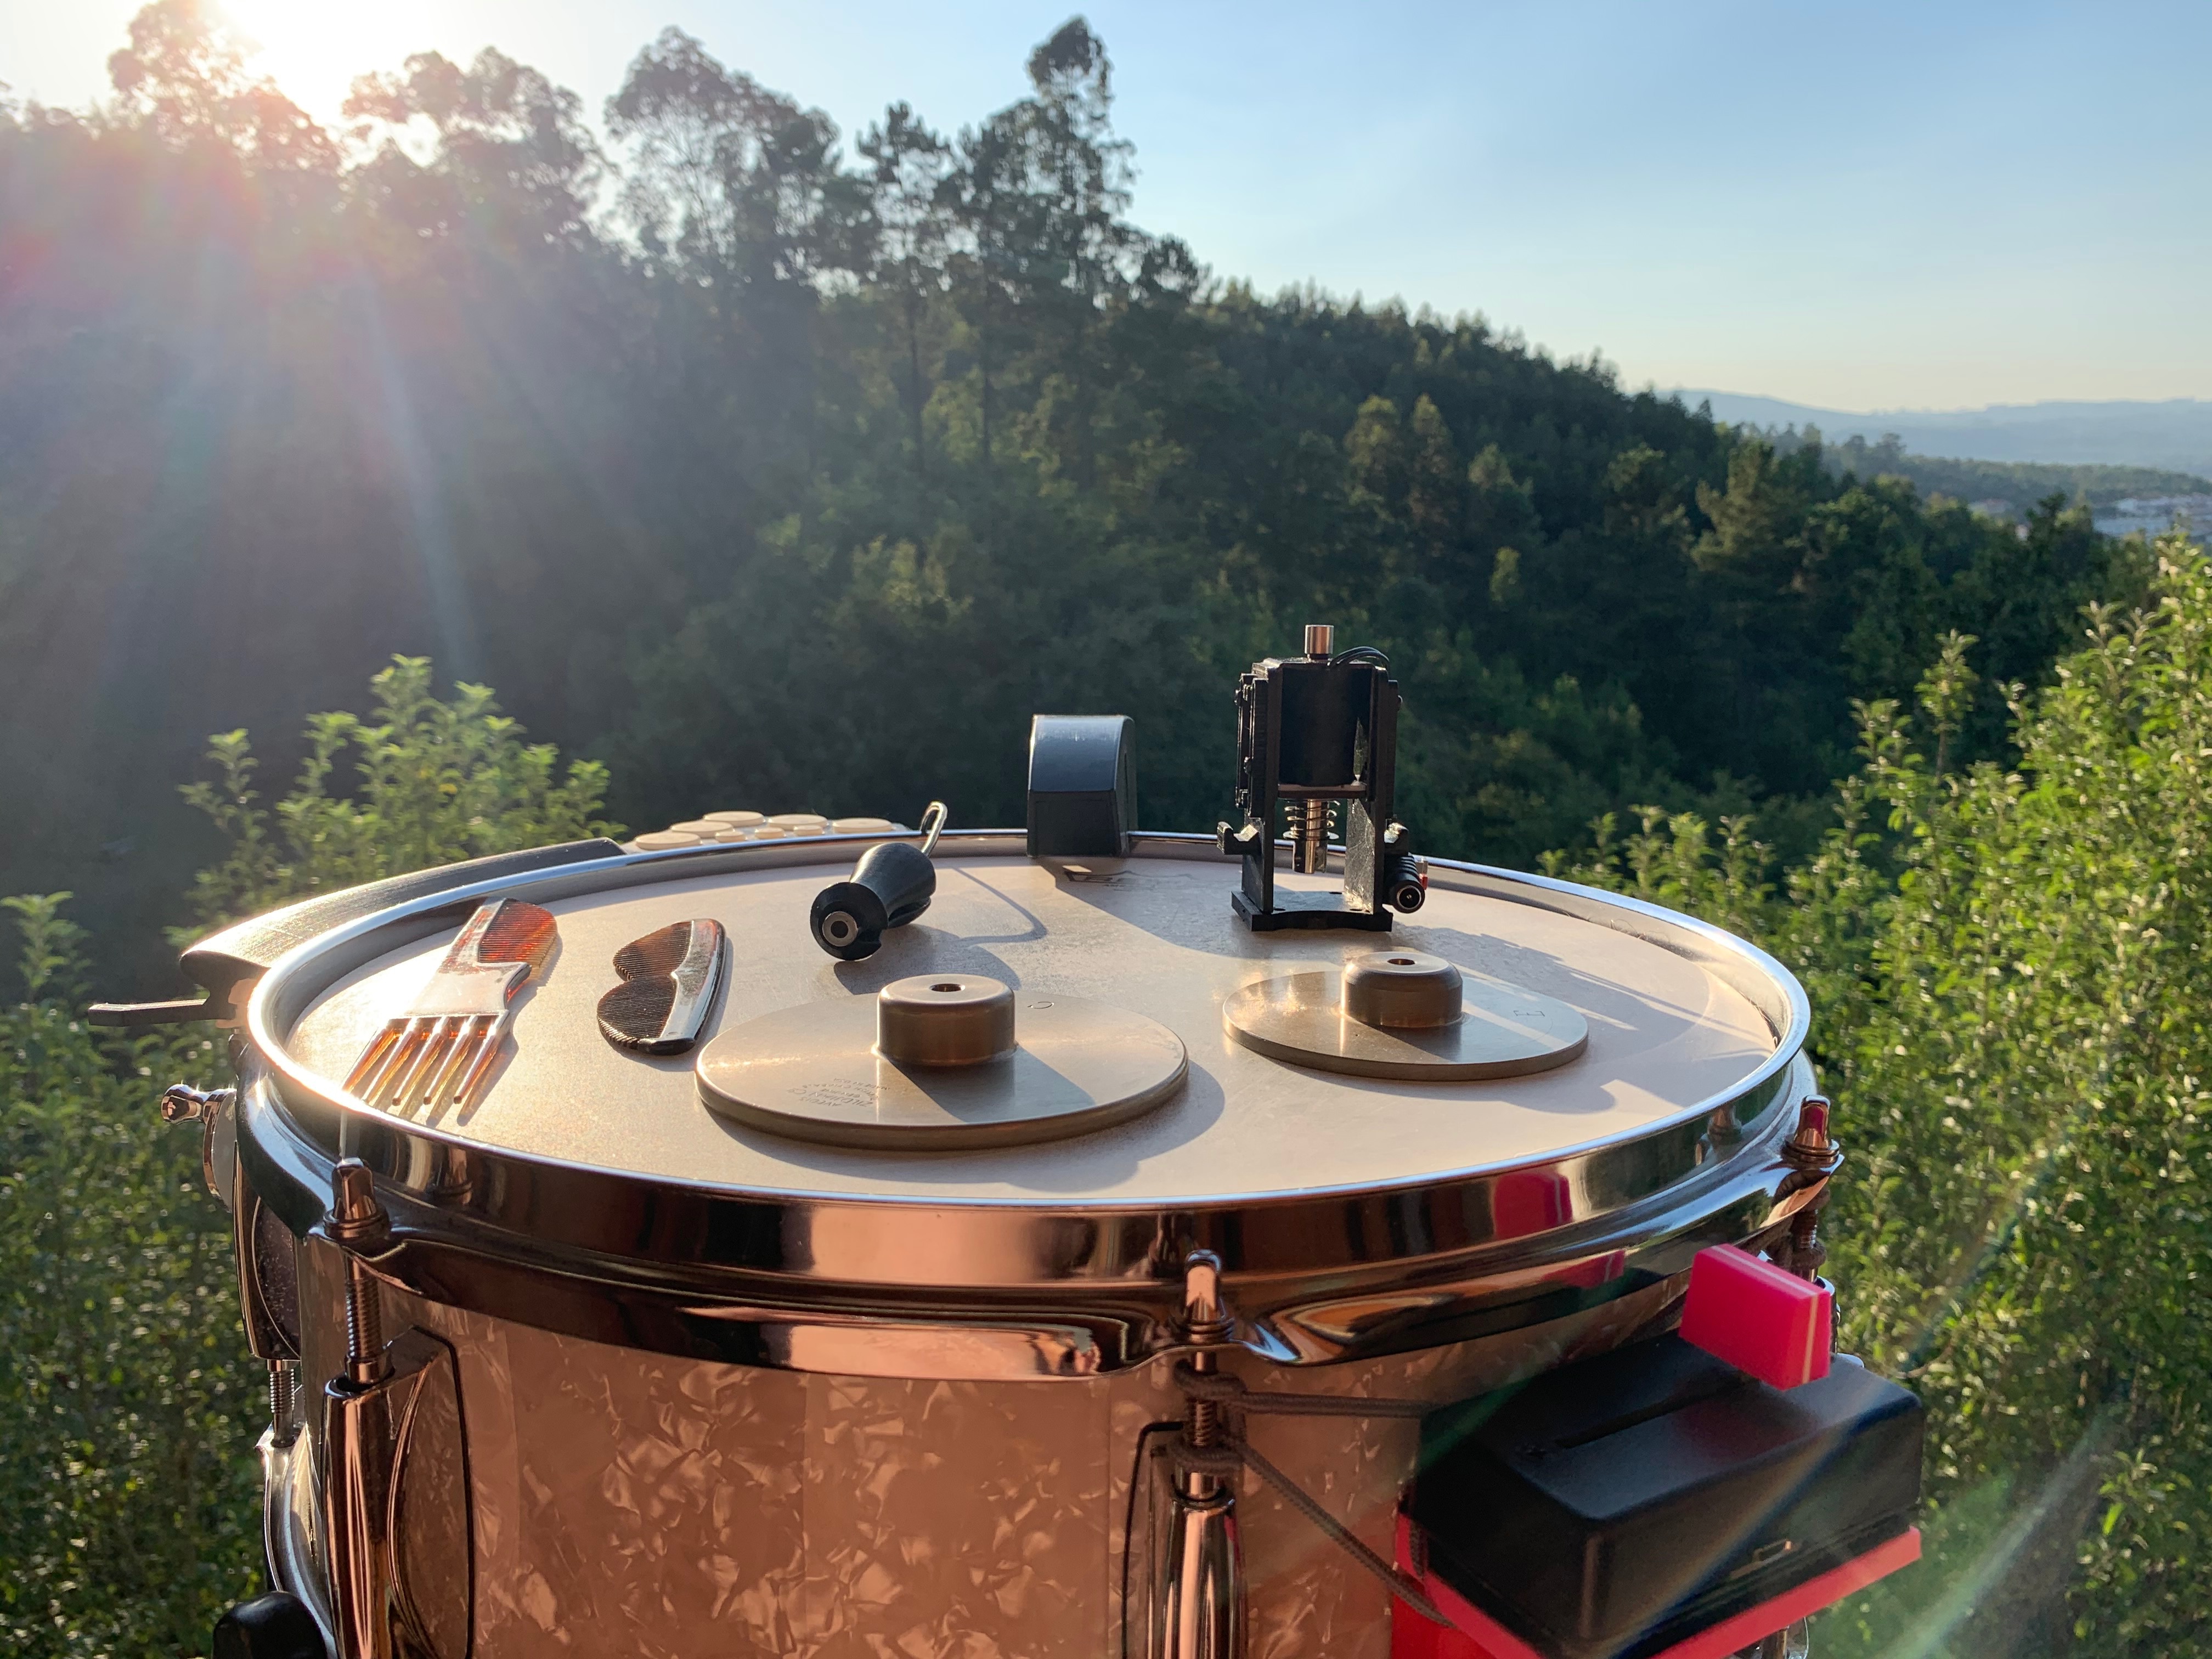
What actually enabled me to use the crossfader with the snare drum was getting a 3d printer and being able to design something that let me physically mount the fader on the snare itself. I’ll go into more details on the technical side of this further down, but once I managed to get the crossfader mounted on the snare I tried applying the metaphor of scratching to the snare, where moving my left hand on the snare (“record”) would control the pitch or timbre of the scratch, while my right hand did the cutting (as normal). So essentially I treated the snare as a large static “record”.
I quickly found out that although the speed at which I moved the microphone across the surface of the drum had an impact on the timbre of the sound, it wasn’t nearly as impactful as the angle at which I moved the microphone. (The reasons for this are quite niche, but it has to do with the fact that the microphone I use has a recessed area where the capsule sits, so by changing the angle of the microphone I am creating a resonant filter between the capsule and the surface it is on.) So I started learning some scratches and patterns/combos and applying the techniques with the physical attributes of my setup in mind. I still moved my left hand forwards and backwards because it still made sense to do so as it keeps things flowing and in constant motion, but I would subtly change the angle of my “record” hand depending on the sound I wanted.
Once I started getting a handle on the techniques I started getting more fluid and natural feeling with the approach and general musical language of it all:
I still had access to the world of sounds that I’d been exploring with the snare, but I gained the addition of a strong gestural interface and language which I could superimpose on top of it. My broad and sweeping strokes could become tight and pointillistic. There were now more possible surfaces and facets for my playing to explore.
And here’s a video explanation of what’s going on:
My technique has come a long way since these videos and I’m still learning new scratches and combos even now. By contrast, here is the first video I filmed, super excitedly, when I managed to mount the crossfader onto the snare and was able to hear what this playing technique could sound like.
The core idea and mechanisms are there already, but I didn’t know much about how the hands should work together, or the kind of timbre control I could have with my left hand etc… I’m literally thrashing my hands around randomly, but these sounds floored me! By this point I’ve been playing feedback/friction snare for almost eight years, and even though it has proven to be an endless fountain of new ideas, this was a gigantic leap in what I could do with this technique.
Just to put into context what I mean, here is an interactive player where you can hear and see the impact the crossfader has on the friction playing.
By default you see the sound coming from the snare, Pre-Fader. So you can hear the changes in timbre and dynamics that come from just moving my left (“record”) hand on the snare. You can also toggle to see/hear the sound Post-Fader, along with an overlay of the movement from the fader itself (represented by the white line).
When you play the Pre-Fader audio, you can hear that there are some interesting timbral changes happening, but they come across as fairly subtle. When you add in the crossfader you can hear how that articulation really brings those changes out, and how the subtle movements of both of my hands create something that is much more than what either can do individually. I find it quite interesting to listen to because where the inflections seem to happen in the raw snare sounds is typically not where the inflects are in the Post-Fader version. I think this comes from the fact that, when moving both hands in concert, the changes in direction are not where the actual “cuts” come.
On top of the “conventional” scratching techniques I was developing and applying to the snare (by simply adjusting the volume of the snare with the fader), I started exploring some other control paradigms and approaches. A big turning point was direction-based crossfading between sources. This makes up a large part of the more glitchy and jump-cut sounding parts of the performance (2:43 as an example). I initially got the idea for this when trying a delay-based version of a similar approach (somewhat inspired by Jeremy Bell‘s DoubleStop Rocker) and other than remembering the fact that I hate delay, I realized that the contrast in timbre between the now and past of the noise/friction I was getting from the microphone wasn’t great enough to be musically useful or interesting in this context.
I instead gravitated towards having the direction I’m moving (and not the position of) the fader select between the live microphone input, and sample playback (more on this below) running through an aggressive wavefolder (more on that below too). In earlier versions of this, the wavefolded samples were also delayed, but I later dropped delay altogether. Here’s a video of my first explorations with the idea:
And here’s an explanation filmed around the same time:
This literal cross-fading approach allowed me to re-purpose some of the gestural language of scratching but with a much glitchier and harsher sound world. Ironically, the core function of a crossfader is to do this very thing, to switch between sources. I’m just doing it with a direction (rather than position) in a way that makes these changes much more extreme than they were originally intended to be.
Alongside this, I also realized that I could harvest more gestural information from the physical movements of the fader, kind of like what I was doing with the direction/schmitt idea. Even though it is a single fader, there are multiple streams of data that it can put out.
I have a messy test patch where I’m still working all of this out, but from a single fader I can extract:
- -raw position of fader
- -three levels of smoothing (light, medium, slow)
- -overall speed of movement
- -raw direction of movement (regardless of position)
- -schmitt trigger (direction but with low and high thresholds)
- -distance travelled before changing direction
- -time between changes in direction
- -time between positive changes in direction
- -velocity (as in, the formula “distance / time”)
- -bpm of direction changes
- -distance travelled (computed before turning around)
- -time between changes in direction (before turning around)
- -time between positive changes in direction (before turning around)
- -velocity (distance / time) (before turning around)
- -three flavors of integrators (moving towards a value in a non-linear way)
All of this data is coming from a single fader. A continuous multidimensional stream of controller data that I can map to various things throughout the patch. I incorporate some of this into the Kaizo Snare performance, but in a bit more of a subtle way. So depending on how quickly I’m moving the fader (an overall speed control), there are a few parameters on the Cloud fx module that get adjusted. I did some testing incorporating the direction and velocity control streams, but nothing stuck. (There is definitely more that can be done with all that data, and I expand on this in another section below.)
These were the sonic ideas that started forming the foundation of Kaizo Snare. But of course it wouldn’t be that simple…
///////////////////////////////////////////////////////////////////////////////////////////////////////////////////////////////////////////////////////////////////////
The Perfect Cut
So back when I was initially coming up with the idea for the DIY fader, I knew I wanted some specific features. I wanted it to be high resolution, meaning more than MIDI’s shitty 7-bit (0-127) resolution, while still having it be compatible with regular MIDI. I wanted to be able to calibrate it, to get the maximum range possible, and I wanted to be able to store and recall those settings.
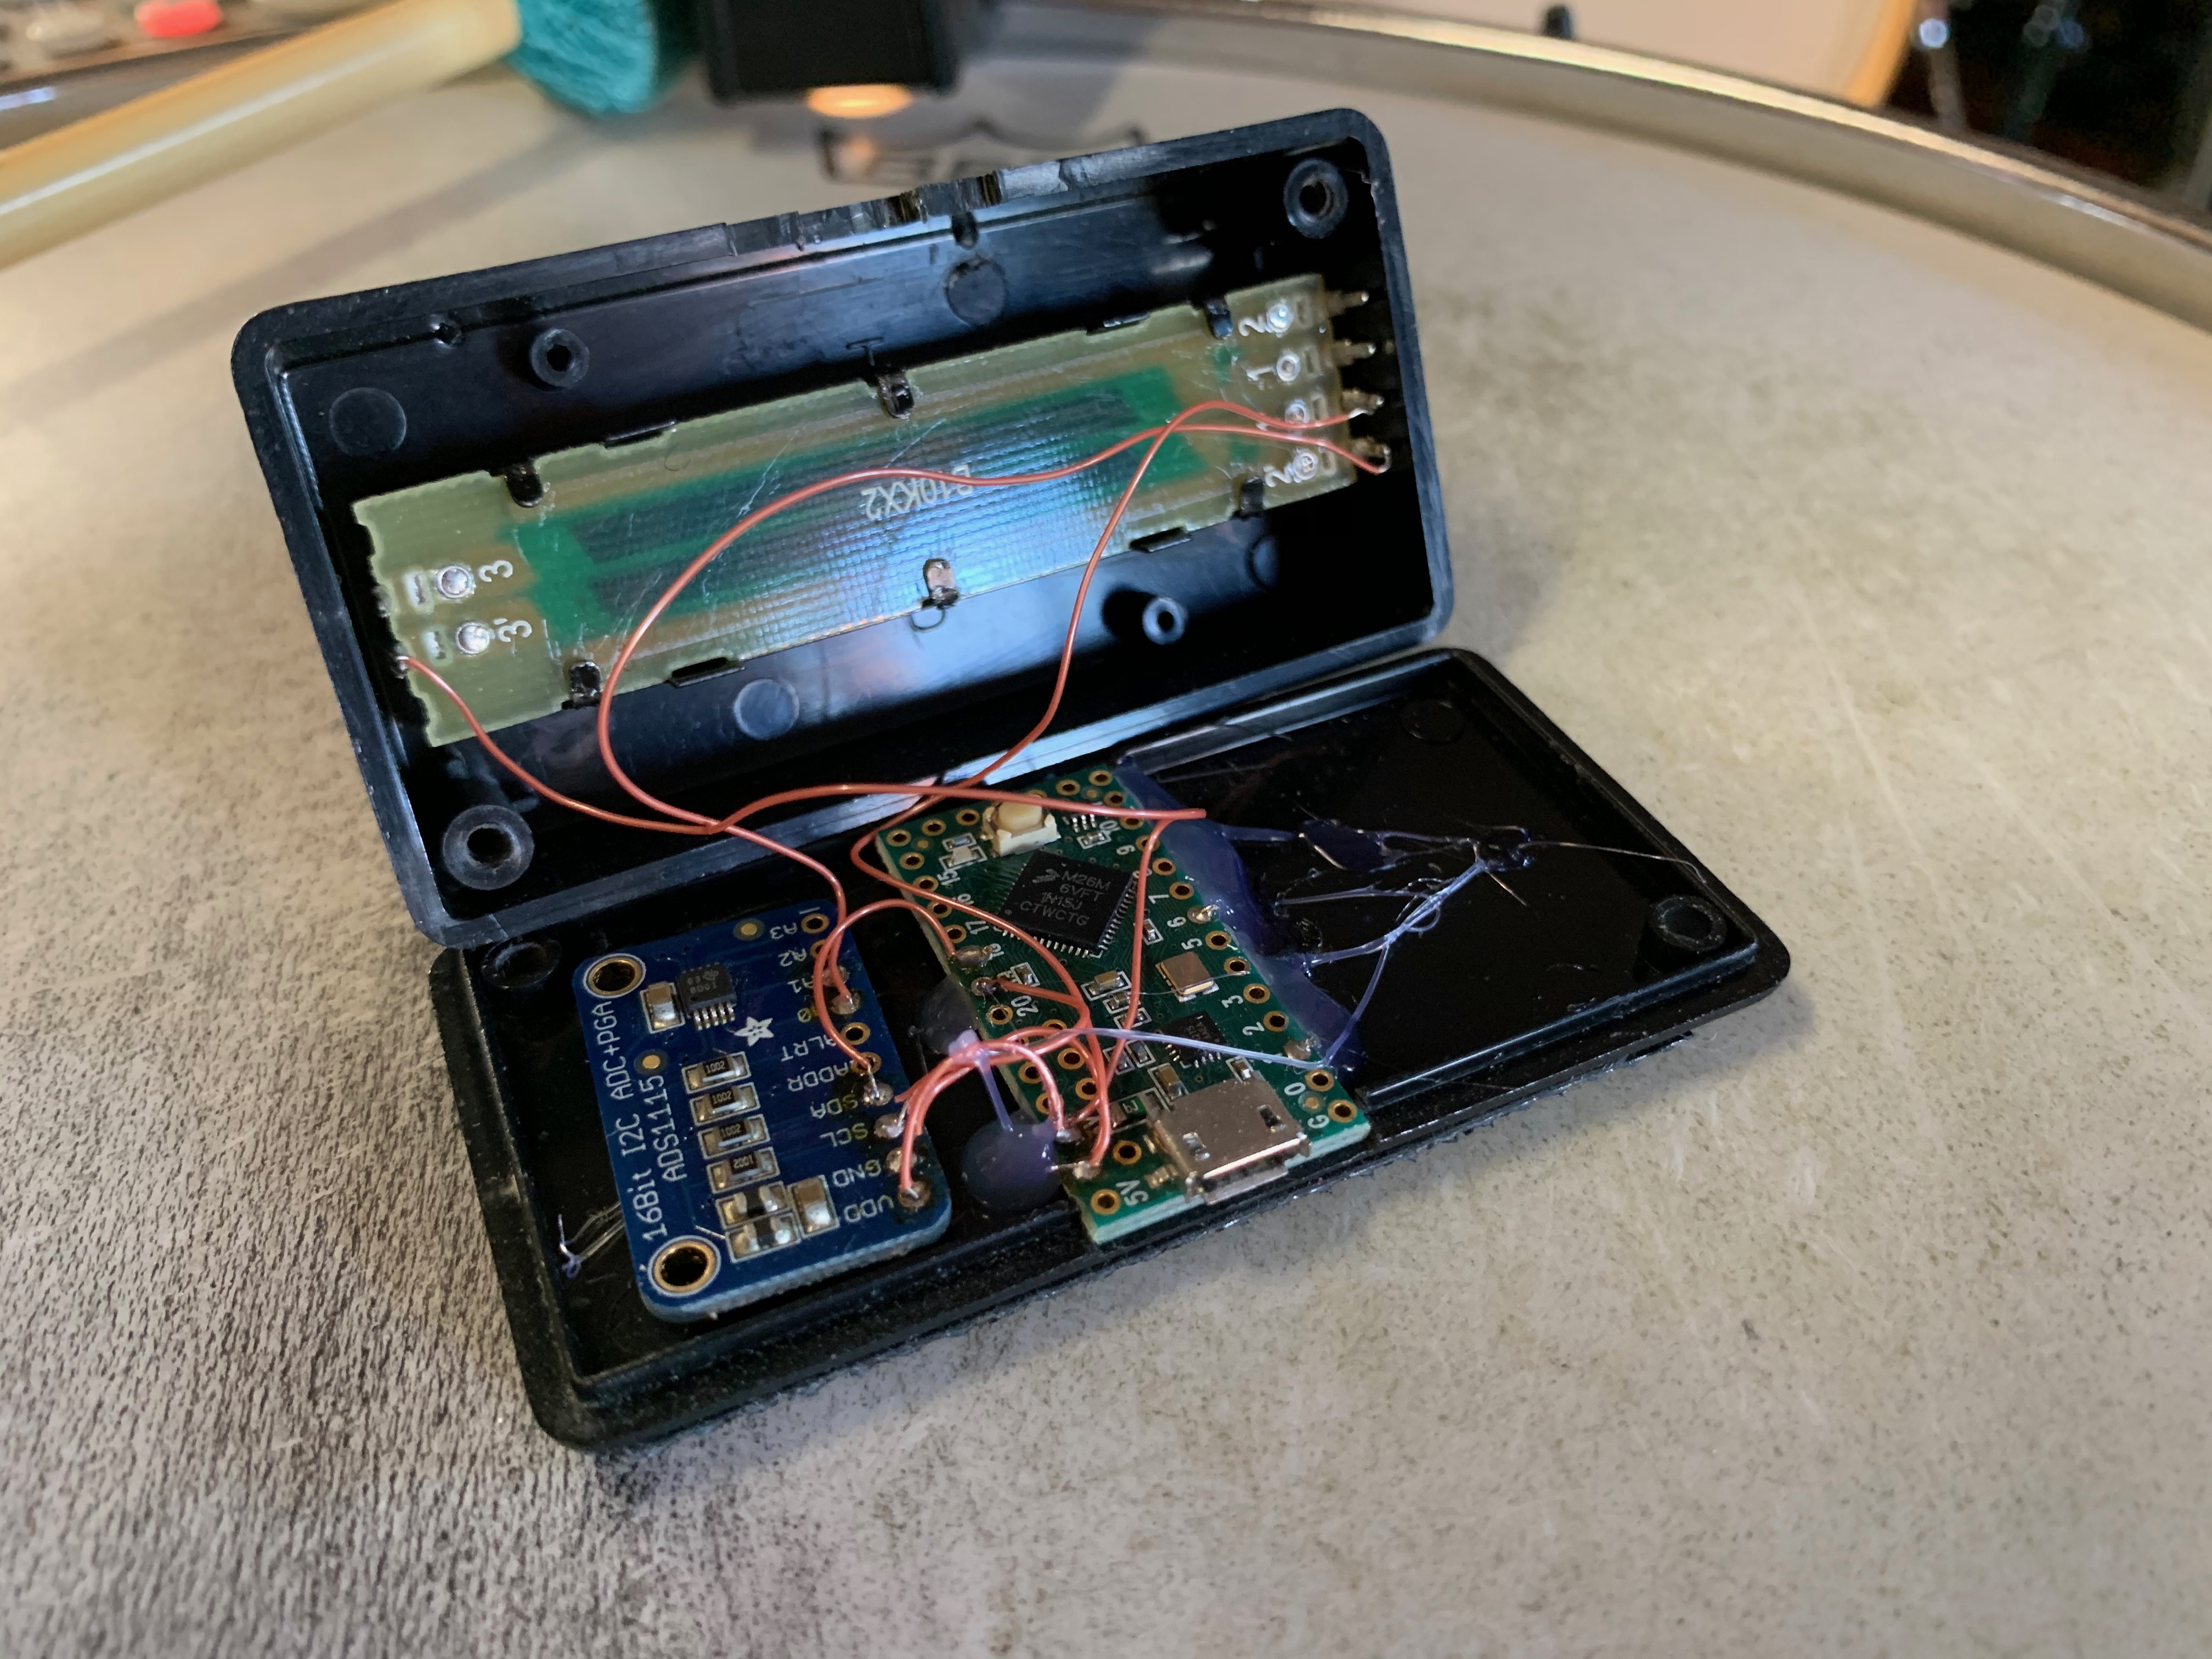
The core of the controller is a Teensy, which is an Arduino variant which I’ve used on a ton of different projects because it’s compact, inexpensive, and powerful. The Teensy also has a better onboard ADC (12-bit) than a vanilla Arduino (10-bit), which means I could get a maximum resolution of 0-4095, which is four times better than an Arduino (0-1023), which itself is 8 times better than MIDI (0-127). This makes it a solid platform to base everything on, but because I was going to be using the fader in a context where audio feedback was involved, I wanted as much physical resolution as possible. The main reason for this is so that every single position I stopped the fader would be (fairly) unique, and offer the most variety and response in a feedback-based circuit. This is where analog circuits excel in that a potentiometer in a feedback circuit has literally infinite resolution, a luxury which sadly isn’t possible in a digital context.
Because I wanted to get as much resolution as possible, I looked into using an external ADC with the Teensy, something I had never needed before. I ended up using an Adafruit ADS1115 ADC which can do up to 16-bit conversion and communicates using a simple protocol known as i2c. So by having two boards instead of a single Teensy, I could have a much greater resolution (theoretically up to 0-65536!).
Now, one of the things that’s a bit funky about DIY controllers is that your options for communicating with a computer are fairly limited. You can use MIDI, which is easy, plug-and-play, works with anything, but is generally limited to 7-bit resolution. You can use raw serial communication, which comes with a host of potential pitfalls, which for me in the past have included kernel panics and crashes so hard that I was physically unable to even restart my laptop… or you can work out an OSC implementation, which requires a bit more faff on the computer side of things. So basically, you can go easy and low resolution, or complicated and higher resolution. But what if there was a third option?
Even though generic MIDI is 0-127, there are ways around this. For example, the pitch bend on most keyboards is actually 14-bit (0-16383) because otherwise pitch bend would sound really step-y and artificial. There are also provisions in the MIDI protocol to send NRPN values, which are also 14-bit. The way this works is that two separate 7-bit values are sent and then bit-shifted into a single 14-bit number. So you get an MSB (most significant bit), which is basically normal MIDI, and then an LSB (least significant bit), which you can think of as being a “fine tune” control for each step of the regular MIDI. The beauty of 14-bit MIDI is that you can always just use the MSB and it operates as a vanilla MIDI controller.
Hopefully the MIDI 2.0 spec will mitigate some of these problems in the future, but either way, since it is meant to be fully backwards compatible, this approach should work on all MIDI devices.
Once the controller was built and I started to get a “feel” for the fader as part of the overall instrument, I did like I often do, and tried to optimize the shit out of it.
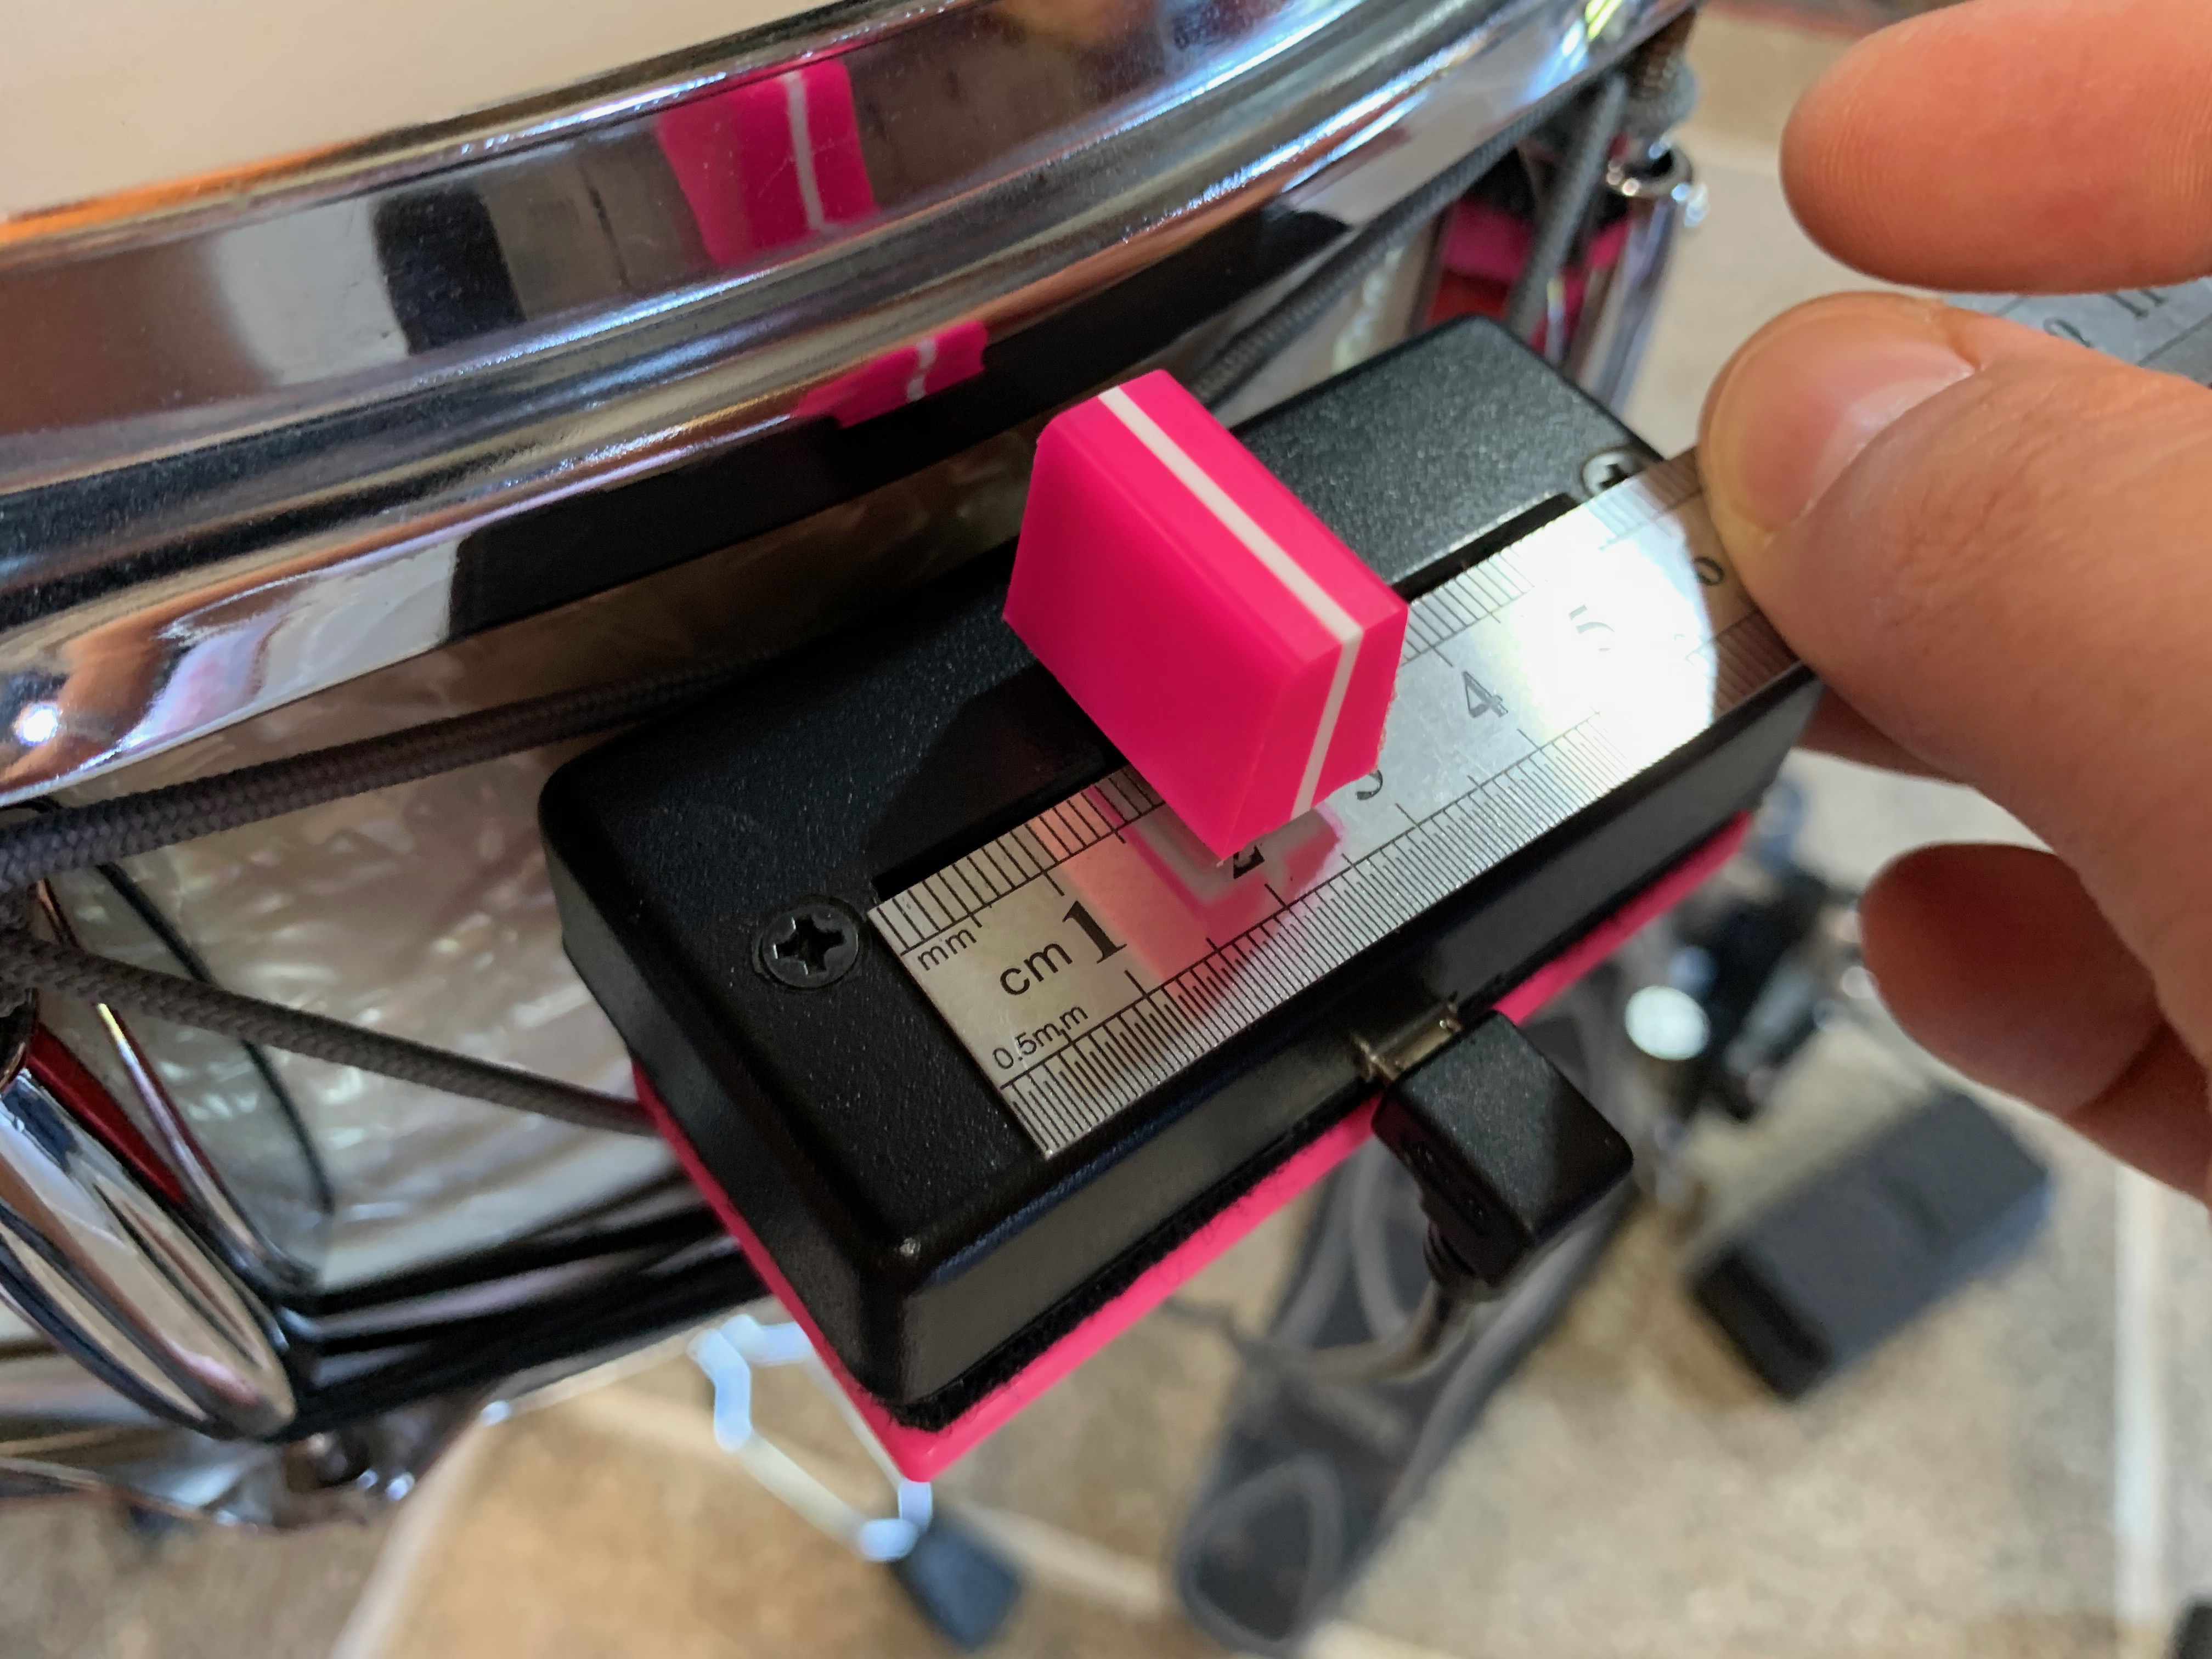
In addition to the circuit-based optimizations I just explained, I learned some painful but valuable lessons about passive components. Most potentiometers aren’t perfect. Far from it. Even high spec pots have a bit of manufacturing tolerance to them. So if I have a potentiometer that is rated at 10k Ω and it has a 10-20% tolerance, that means it can have an actual maximum value of anywhere between 8k and 12k (!!). As I later found out, with fader-based potentiometers the “zero” is not really zero either, which further complicates things. To compensate for this, most MIDI controllers have deadspots at the start and end of their movement. Plug in your controller and take a look. See where the numbers start and stop moving relative to where you physically start moving the knob. Probably around 10% of the range of movement isn’t used at the end right? That’s a bit of a bummer when you’re chasing down every bit of detail and tightness.
What further complicates things is that crossfader technique generally relies on that first couple of millimetres to do the “cutting” out (to the point that many “pro” faders advertise adjustability and precision at the scale of +/- 0.05mm). So if that takes 10% of the total movement of the fader before even registering a change at all, that’s a pretty big problem.
What you may find in more professional or exacting controllers is the ability to calibrate the knob/fader. That is, to put it in a mode where it takes readings of the lowest and highest values, and then scales the output of the controller to that range. This gives you the maximum possible resolution with that specific pot (usually +/- a little bit of slop “just in case”). I incorporated this idea into the firmware for the crossfader, and even minmax-ed the code to make sure I got every tiny drop of resolution I could out of it.
// clamp and slightly limit reading values and write new min/max values to EEPROM
EEPROM.write(0, (constrain(calibrate_min, 0, sensor_range / 5)) >> 8);
EEPROM.write(1, (constrain(calibrate_min, 0, sensor_range / 5)) & 255);
EEPROM.write(2, (constrain(calibrate_max, sensor_range - sensor_range / 5, sensor_range) - 10) >> 8);
EEPROM.write(3, (constrain(calibrate_max, sensor_range - sensor_range / 5, sensor_range) - 10) & 255);
What I did not account for, nor did I know was a thing at all, is that with faders, the readings you get at the edges are a bit more unpredictable and complicated. More precisely, that the resistance can move in the opposite direction at the very extremes of the movement. Meaning that even though my calibration routine was working properly, I was actually taking a measurement that wasn’t the actual minimum and maximum values for the fader. Even if I did somehow figure out the value where the fader physically stopped moving, I couldn’t scale to that point because I would end up back at square one and have a dreaded deadspot at the start and end of my fader. There was nothing I could do in the code to fix this problem. This was a physical property of the fader itself.
I didn’t know this at the time, but this is a common enough problem in DJ mixers that people would fix this by cutting up old credit cards and using them to shim the extremes of the fader. For reasons that will become apparent further down this post, I decided to solve this problem with 3d printing (“when all you have is a hammer, every problem is a nail”), and printed several shims with difference thicknesses to find one that gave me the maximum physical range inside the fader, which then went along with the fancy-pants code to get “the perfect cut”.
Here are some of the different shims I printed:
![]()
And here is the final shim installed:
![]()
I also did some other subtle improvements and modifications: things like removing one channel of the stereo fader to reduce overall friction, as well as cleaning and lubing everything with special fader lubricant (F100) for a silky fast feel.
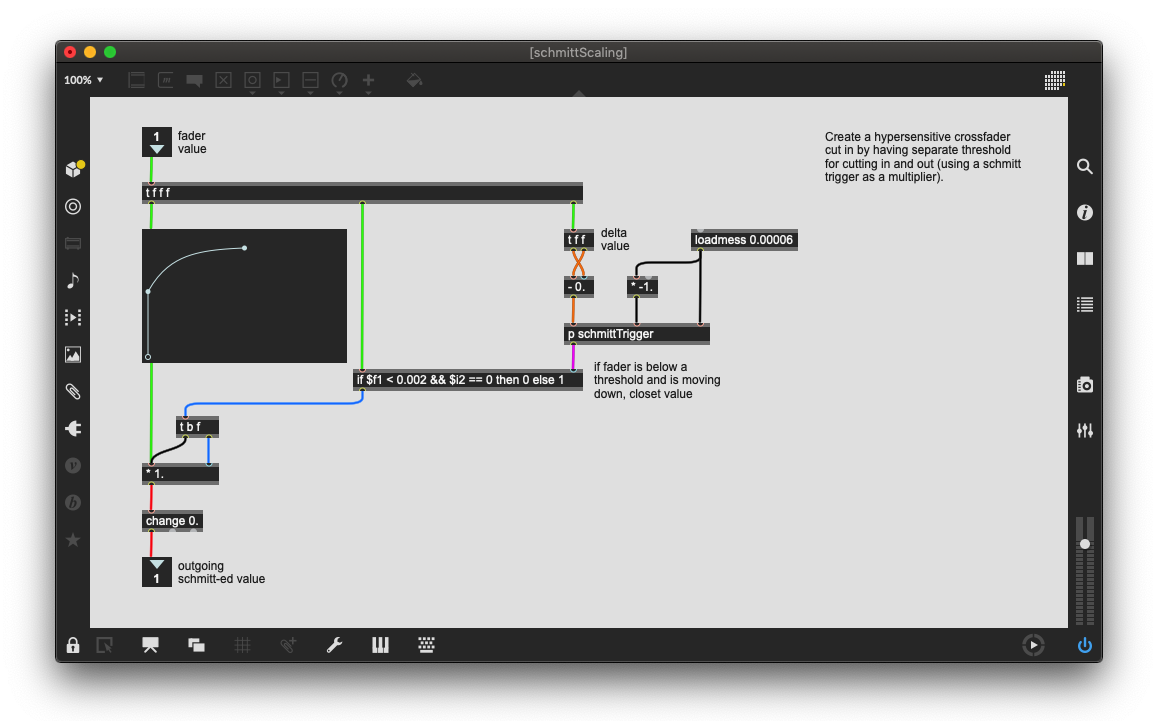
On top of the physical optimizations, I did the most I could in code to improve and tighten the response. In addition to making the tolerances as tight as I could as shown in the code above (not wanting to give up 1/26400 of resolution more than I had to!), I had to revisit the Max code due to the physical optimizations I had made. Because I had gotten the physical resolution so tight, I was actually getting worse tracking in Max. Essentially, the crossfader would go from the lowest possible value to zero within fractions of a millimeter, which is fantastic, but because the Teensy code (and Max) can only read data so quickly, it meant that I could easily miss that tiny slice of time where the value would actually read zero.
What I did was implement my trusty schmitt trigger again, but I combined it with the fader scaling code. So on the way up, the value cuts on instantly, providing a very sensitive low threshold. On the way down, I set the high threshold so that it will cut off at a higher value. In effect this makes it hypersensitive to both cutting on and off because those are in different physical places on the fader.
All of these great lengths were just to get barely perceivable improvements to the physical and digital resolutions of the fader. But I really wanted to optimize that level of control – that level of touch – as it formed the foundation for much of the sonic material in the piece.
///////////////////////////////////////////////////////////////////////////////////////////////////////////////////////////////////////////////////////////////////////
Onset Descriptors
Onset detection. Fucking onset detection…
The other day I had a pretty big breakthrough with my hunt for the perfect onset detection algorithm, and after having Angie film a short video demoing it, she even commented, “Finally!”.
In looking back at it, I’ve been looking for a solid onset detection algorithm for almost a decade.
I’ve come a long way since then, and with the help of PA Tremblay I’ve had a fairly decent solution for the last few years that was based on the amplitude differential between two envelope followers. This works really (really) fast, and is fairly robust to overall changes in dynamic (since it’s a relative threshold). With the addition of an absolute noise floor, it also responds really well in complete silence, say, when feeding it files with digital silence before/after them.
It could be improved (and boy did it ever…), but the trade-off for being fast, was that it was dumb. Using this algorithm I knew when an onset was detected…. and that was it. This is super useful for a ton of stuff, and I’ve used that approach and algorithm quite successfully over the years, in situations where I just wanted to have an onset trigger an event (dsp, samples, lights, etc…).
I also incorporated the option to get a “velocity” output from the algorithm, but it wasn’t super accurate and also added a bit of latency. So for the most part I would use the “dumb” version of the algorithm. And this was good enough for many years.
But eventually, good enough isn’t enough anymore. I wanted more information than I was getting from my existing approach. I wanted something similar to the audio descriptor analysis I was using elsewhere in my patches (including being the core of C-C-Combine). I wanted to be able to have a fast onset detection algorithm that also gave me some information about the onset that was detected.
This is not as trivial as it seems because there are lots of trade-offs. With a purely amplitude-based onset detection algorithm like I was using, the latency is next to nothing. It is however long it takes for your fast envelope follower to move away from your slow one, which can be down to 2-3 samples in total. So that’s super tight. However, if you want to know how loud something was, you have to wait until that sound has reached its peak. But how long does that take? Is it different for different sounds? Etc…
Now, if you want to know something more complex, say the pitch, or spectral shape of a sound, then you need to analyze a chunk of time all at once, and there is a pretty solid relationship here between latency and accuracy (though it’s more complicated than that). So fundamentally, the longer you wait, the better your data will be (again, a slight oversimplification).
There is also the issue of accuracy and precision with regards to the window of time you are analyzing. With percussive sounds there is a lot of energy in the first few milliseconds, so if your algorithm takes too long to respond or your analysis window doesn’t line up perfectly with the detected onset, you will not only get an inaccurate analysis window, but it can potentially vary from hit to hit as well as result in a form of jitter, which can further skew your analysis.
This was something I was working on prior to the start of the FluCoMa project, largely using Alex Harker’s descriptors objects, but it was a difficult problem to solve. As mentioned above there are fundamental trade-off between accuracy and latency, and something I struggled with early on was making sure the analysis window was tightly synced to the onset detection, and that the FFT analysis also made the best use of that analysis window.
Well with the help of the folks on the FluCoMa forum I was able to get something that solved a lot of these problems, including a game changing threading option that was introduced to all the FluCoMa objects (‘@blocking’ modes) that was first introduced to me as “Rod mode”. CPU threading is a complicated subject that is so beyond my understanding I hesitate to mention it at all other than to point out it is super complicated, but allowed me to make everything faster and tighter.
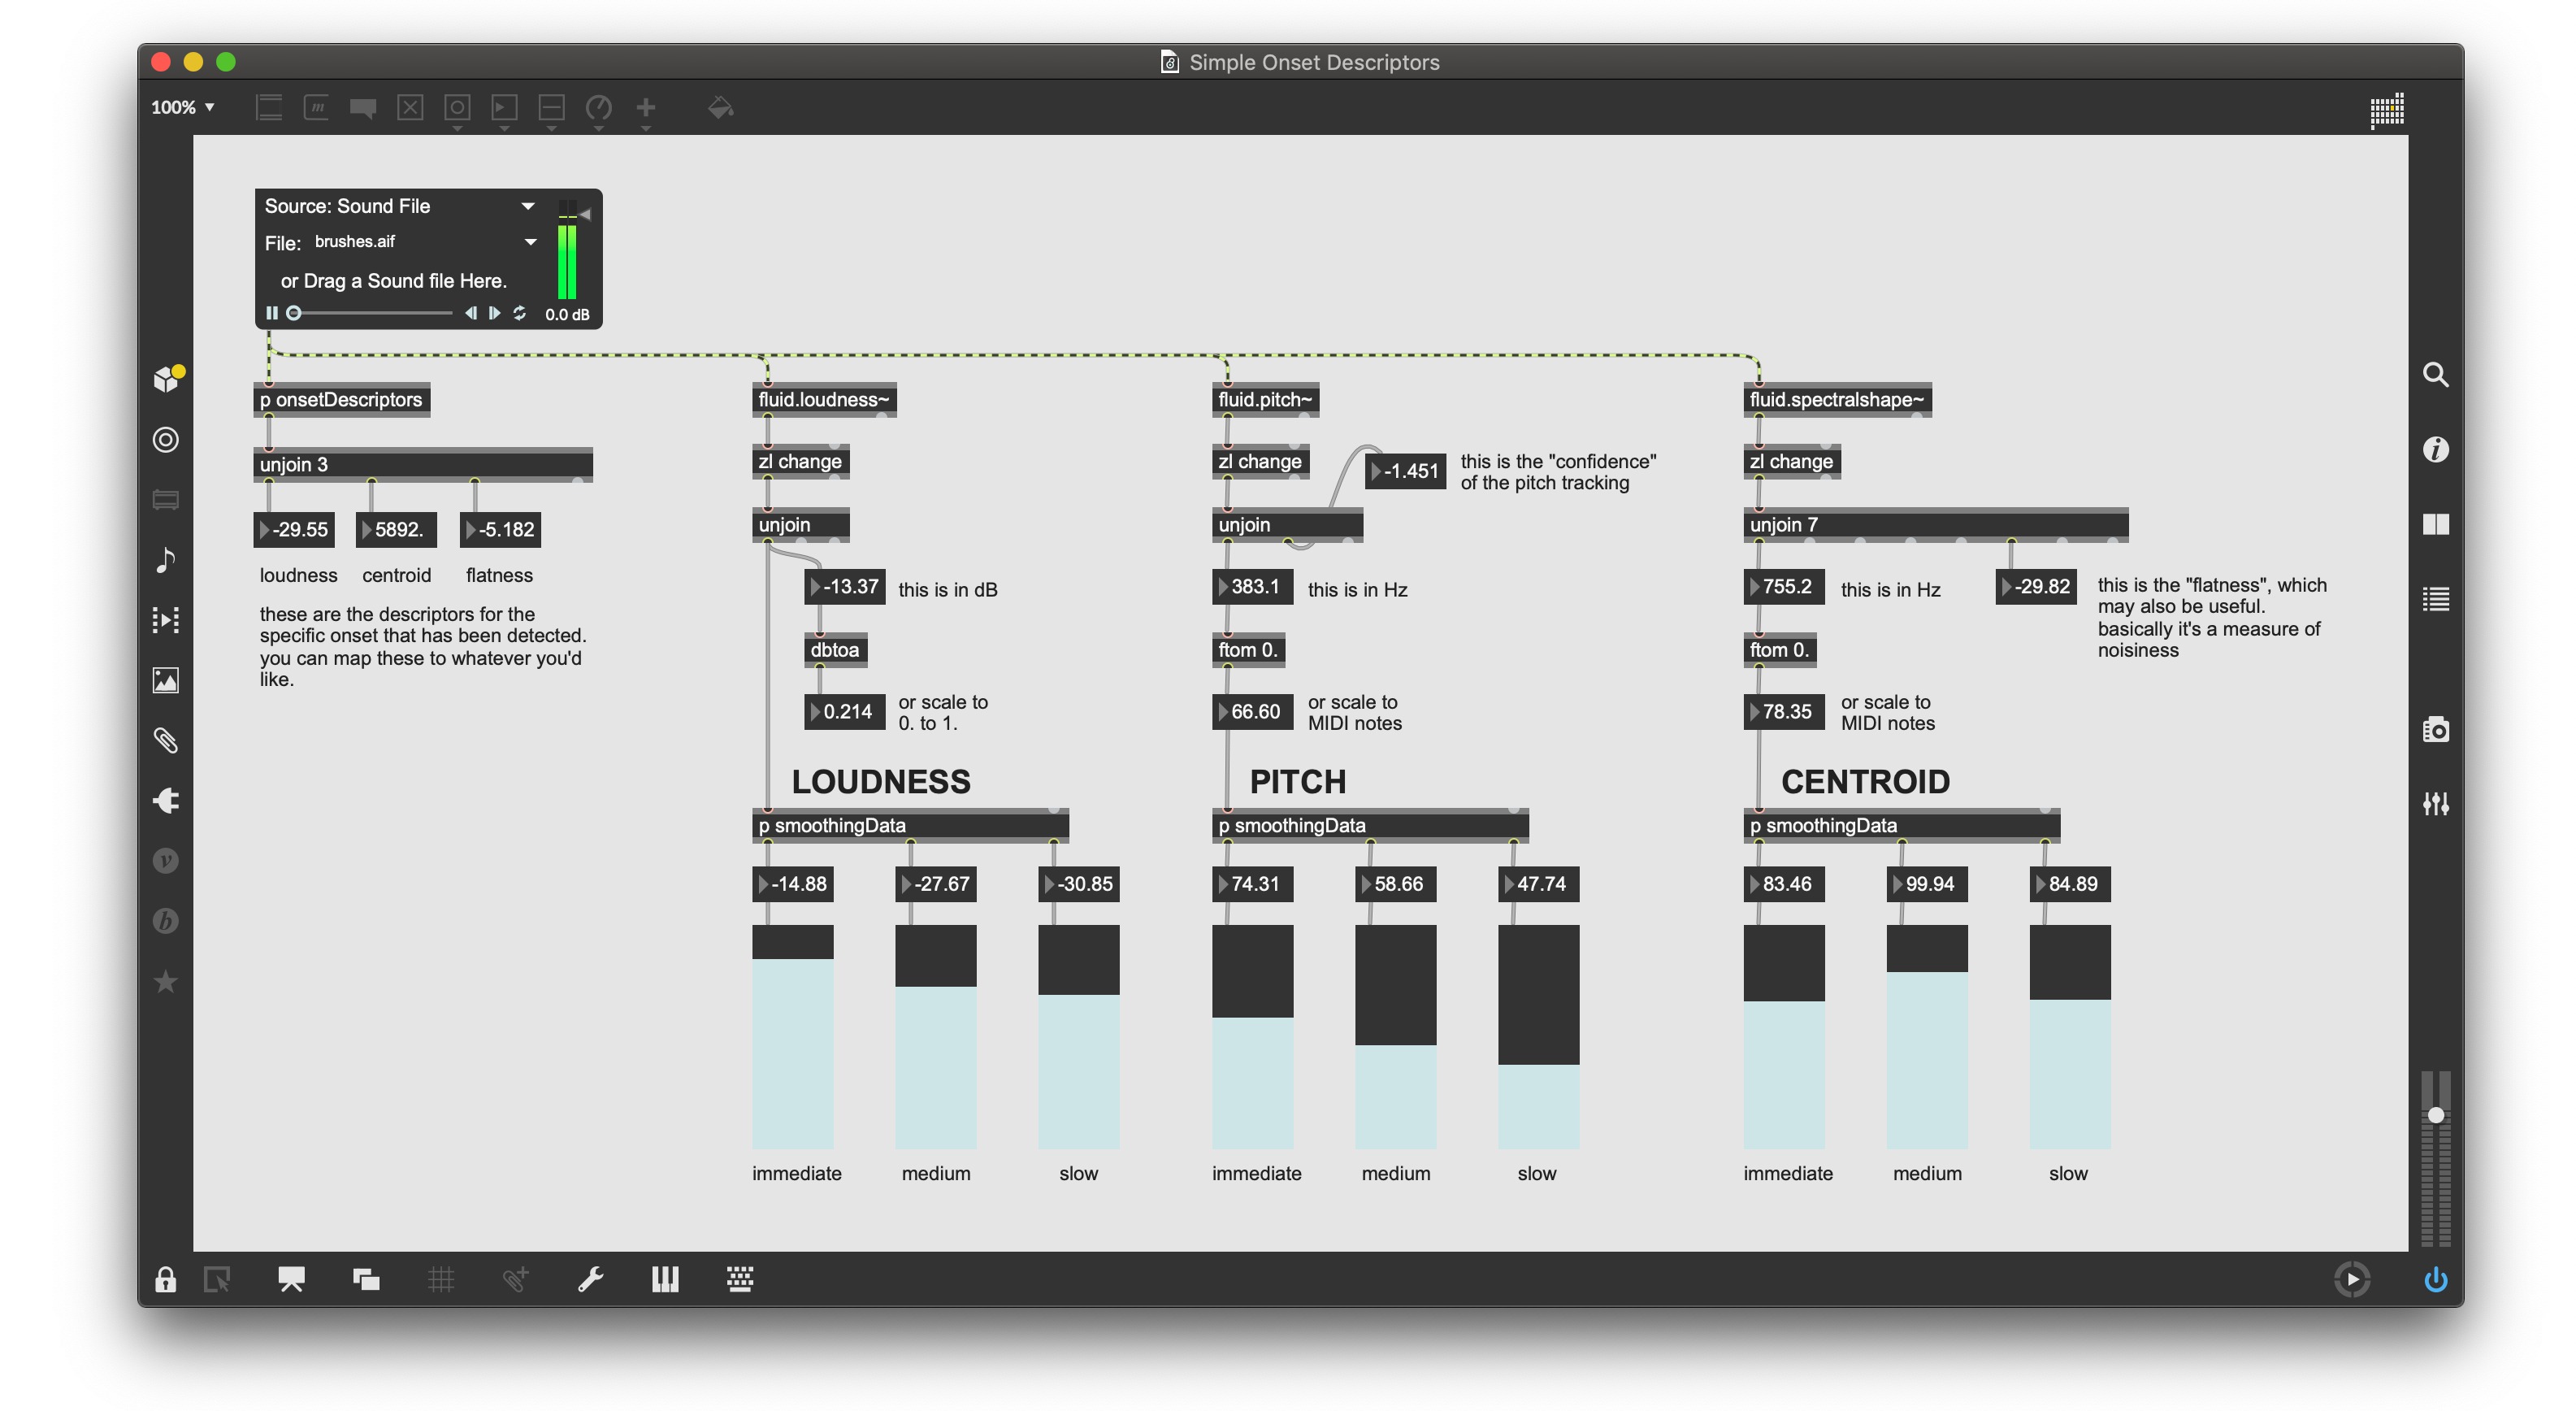
With regards to the analysis window, I found I got very usable results with a 512 sample window (~11.6ms latency). This appeared to be a sweet spot where I would get useful descriptor data and pitch resolution (down to 86Hz (theoretically)) without too much latency. One of the things that my approach has going for it is that since I would often be using an acoustic sound source to trigger the analysis, there is a small window of time where the latency isn’t really audible due to temporal masking. (I’ve now gotten this analysis window down to 256 samples (~5.8ms), but that’s a story for another time.)
Another big problem was making the analysis window sample accurate with the onset detection. As mentioned above, this is pretty important as it means the analysis is more accurate (since you capture that initial transient) as well as being more consistent. Sprinkle in the more accurate and improved descriptor analysis capabilities of the FluCoMa tools and I had something very potent.
click to download
Once I had this up and running I wanted to use it to query and trigger samples like I was doing in C-C-Combine, but this proved to be problematic for a couple of different reasons. The first one was that all of my existing corpora would not work very well with this approach. They were created as long continuous samples due to how the analysis and matching works in C-C-Combine, since there is not really a representation of linear time in the corpus as such. So if I queried one of my existing corpora using the onset descriptors approach, I would more-than-likely have a tiny fragment of audio that cut in and out fairly abruptly. In C-C-Combine this isn’t so much a problem (and is really a feature of the software) because you are doing this querying/matching/playing process very quickly (~10ms). So the overlap of these samples is what creates the overall granular mosaic-y sound to the process.
What I instead needed were loads of samples that were more along the lines of a “traditional” sample library. A single sample per file, often with a bit of a fade out at the end. This was something I had already been thinking about since one of the perks of this approach is that it could be fed any sample library which you could browse by the sonic characteristics of your playing, rather than by individually mapping specific samples to specific sounds or regions on a drum (or controller). Plus, that would be incredibly tedious with the amount of samples I wanted to use this system with.
I was aware of HISSandaROAR, from seeing his great videos demoing all the interesting sample libraries, but I had no immediate use for any of them. That being said, in order to test what I was building, I needed a fairly big library of well-recorded samples to test things with. I found his Metal Resonance library and thought, “Perfect!”. My initial thinking was that I would just use these to develop and test with and then eventually replace them with samples of my fairly sizeable collection of metallic objects.
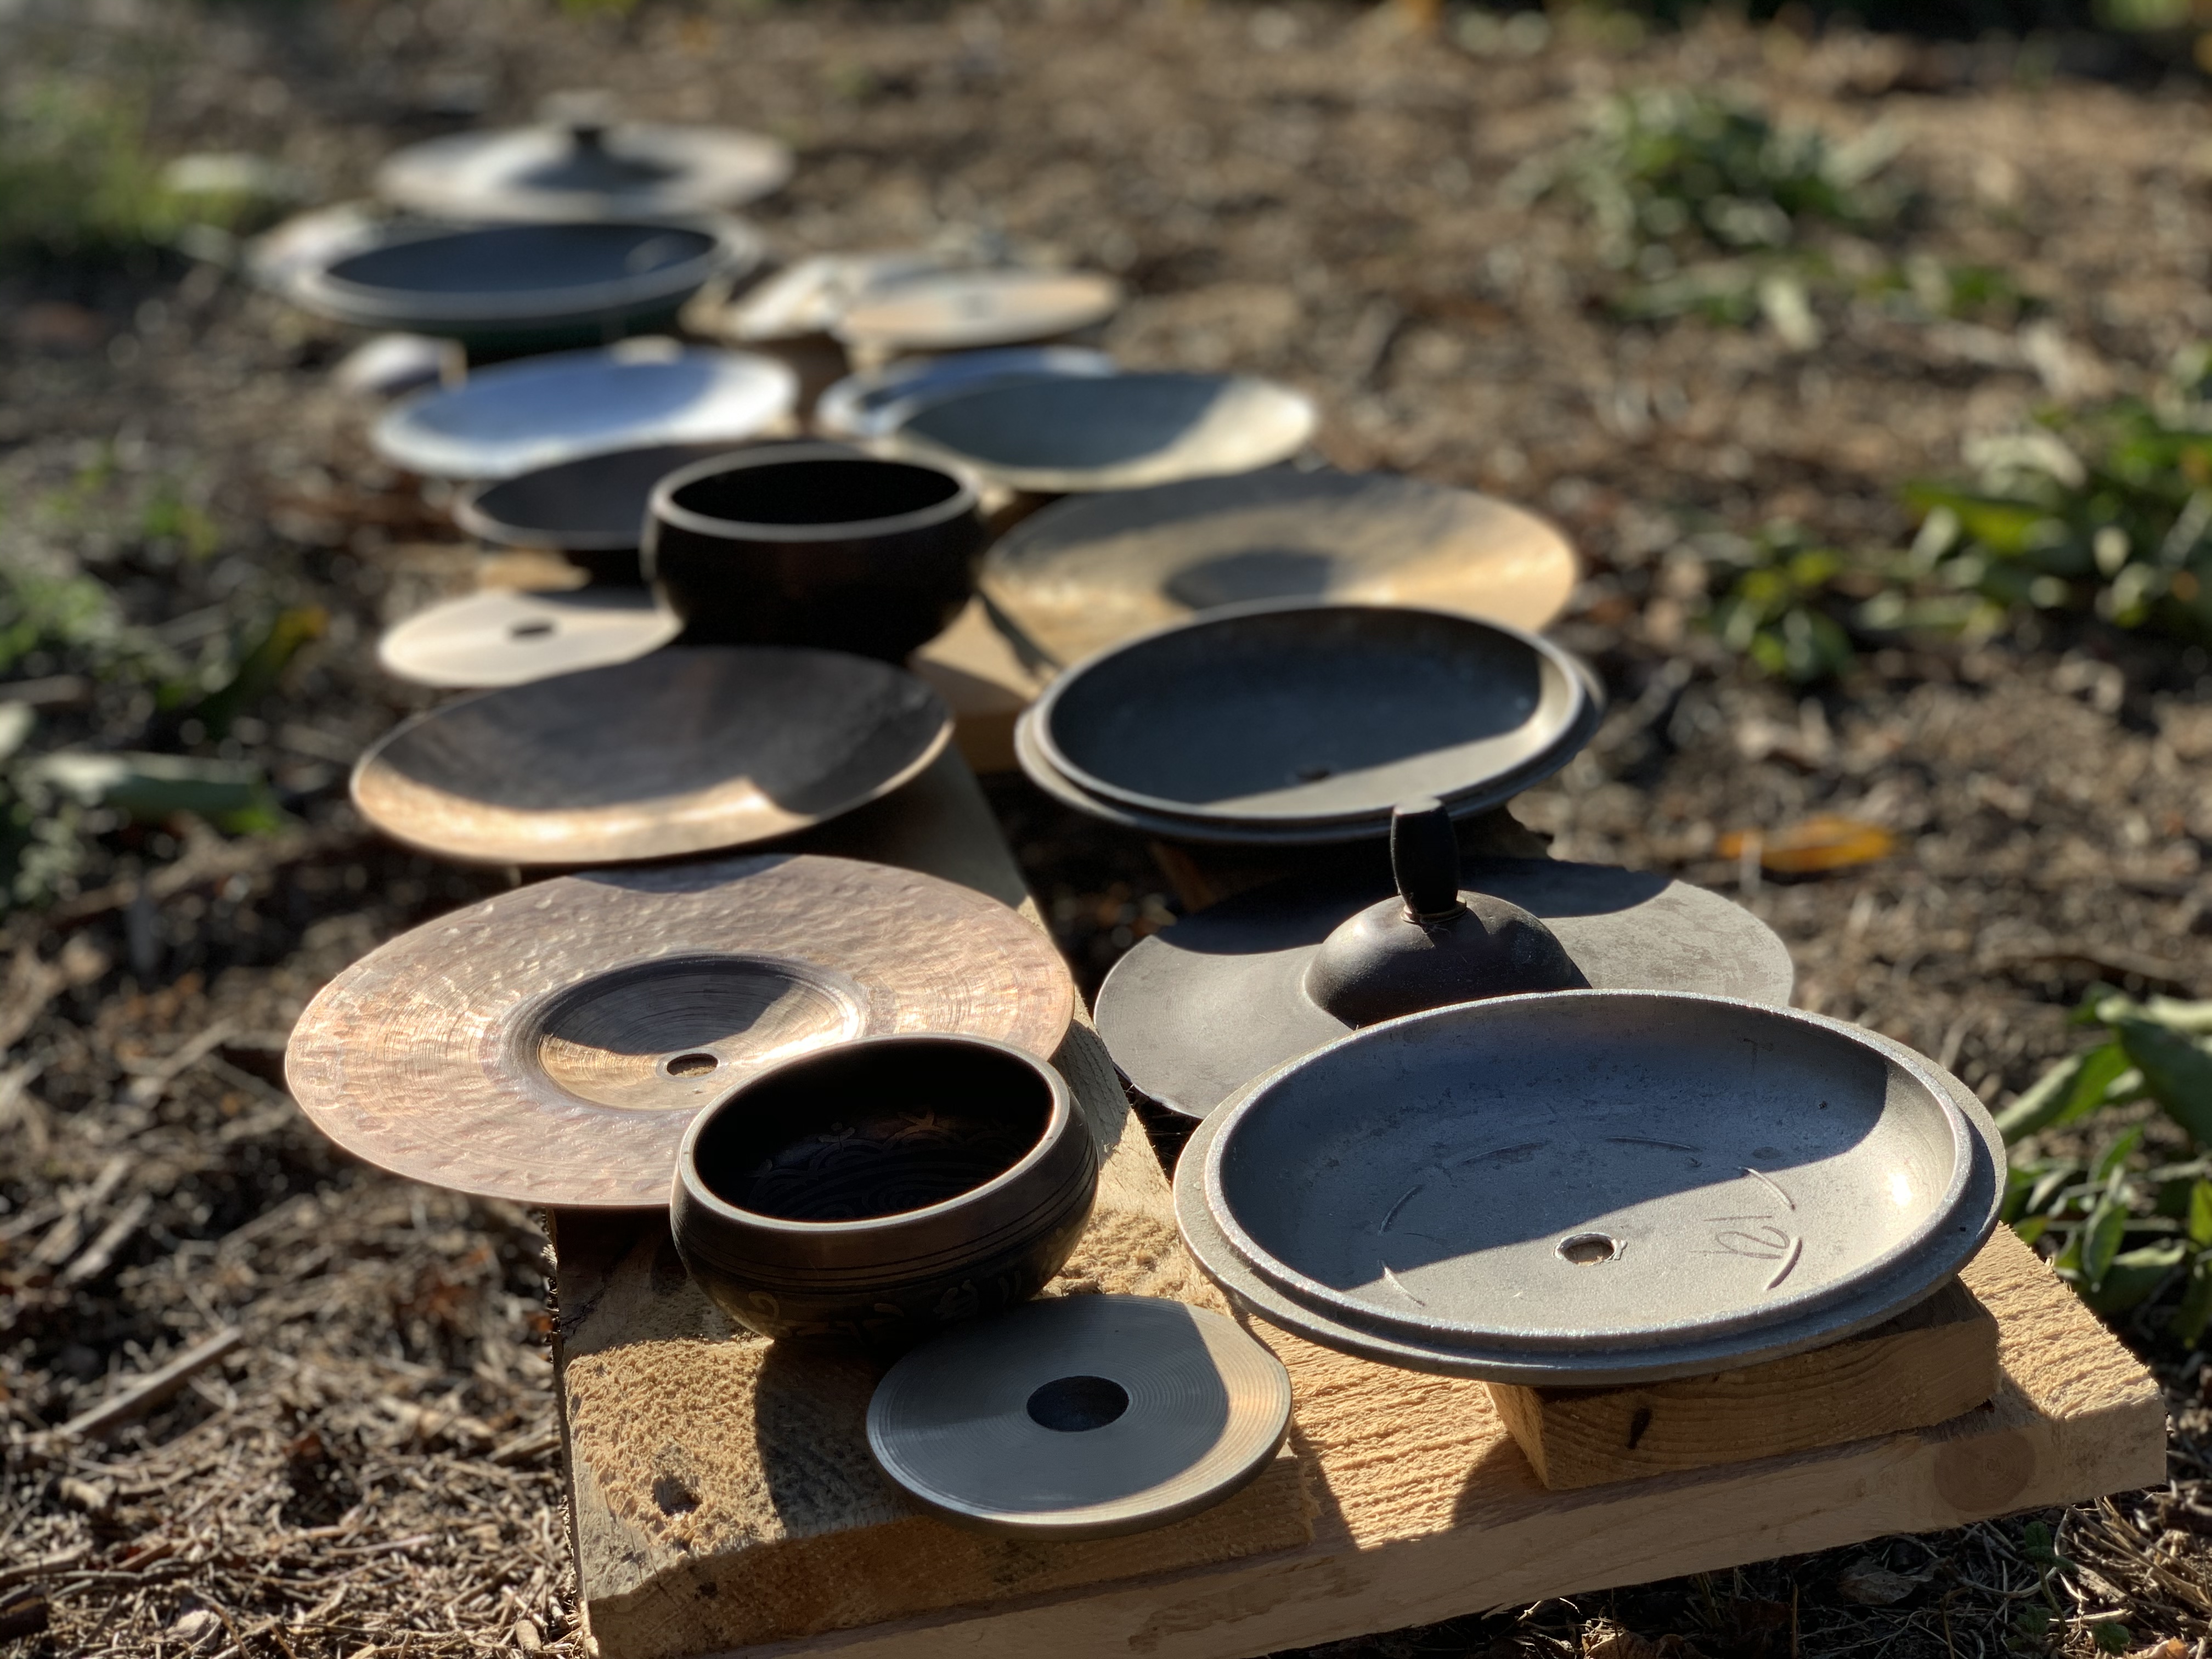
Sadly it wasn’t as plug-and-play as I hoped, as the library comes with multiple hits per file, so even though there were over 3000 individual samples, they were spread across 388 files. So I had to (tediously!) trim all the samples using Reaper‘s native slicing tools (This was sadly before James Bradbury‘s incredibly useful ReaCoMa extensions for Reaper). Even though it was time consuming, in the end I had a nicely put together sample library consisting of 3095 individual hits.
As the performance neared I decided I was going to finally record my own metallic objects and use them alongside the Metal Resonance ones. I had gotten so used to those samples that by this point they had become part of the sonic identity of the piece, so I didn’t want to get rid of them completely.
Unfortunately, I learned another valuable lesson. My recording gear is pretty good (DPA 4060, Modded MOTU Traveller), but it is a few rungs shittier than what the HISSandaROAR samples are recorded with, so the sound of my samples were a bit shit by comparison. One day I’ll buy or borrow better gear and make a comprehensive sample library of my objects, but for now, I’ll just hit them with sticks every now and again.
I did, however, want to include some additional samples to the performance, in addition to the Metal Resonance ones. Perhaps something a bit chunkier…
///////////////////////////////////////////////////////////////////////////////////////////////////////////////////////////////////////////////////////////////////////
Of Gongs & Combs
Fairly early on in the creative process I thought about incorporating a bass drum into the setup, just to be able to trigger some additional sounds while my hands were otherwise occupied. So a bass drum had been part of my studio setup in testing and developing ideas for the piece, but beyond knowing I wanted to trigger some bassy sounds, I didn’t have a clear idea of what I wanted.
I took some gong samples from a Gamelan sample library and ran them through a harmonic percussive source separation (HPSS) algorithm, one of the signal decomposition algorithms that I knew would work well these kinds of sounds. These samples were then run through a separate decomposition algorithm to extract the transients from the percussive layer of the HPSS algorithm, which in the end gave me three separate signals for each gong sample (I’ll go into more detail about this ‘three way split’ in another section). I had a harmonic component, a percussive component, and a short transient. I then ran each run through a separate bit of processing (mainly distortion and wavefolding) along with separate amplitude envelopes for each to create some really interesting kick-ish sounds.
Here is what one of the gong samples sounds like on its own:
Throughout the piece I use a couple different overall durations. For most of the performance when I use the kick the sounds are short and subtle, sounding more like the resonance of the bass drum itself.
Here is what the short kick-ish versions sound like (4:39 in the video):
Towards the end of the performance I extend the overall duration (closer to the original sustain of the gong samples), so you can hear more of the wavefolding and distortion shaping the timbre as it evolves.
Here are the longer versions I use towards the end of the performance (9:14 in the video):
Since the core mechanism triggering these samples was the onset descriptors approach I discuss above, it meant that I also had information about loudness and other timbral characteristics of each bass drum trigger. I used these descriptors to further shape each individual sample when it was played back, to give it a bit of character and nuance. This was done primarily by changing the loudness of the matched gong sample (in addition to querying for the nearest match in loudness with what I was striking), the overall duration of the sample, and some of the brightness settings for the Waveshaper. Nothing too dramatic, but just enough to add some variety and “liveness” each time a sample was triggered.
After playing with this for a while I realized that I did not like the native pitches of the gong samples as they were originally recorded. In the context of an actual gamelan these pitches would correspond with the overall tuning system of that particular gamelan and would be used accordingly, but when removed from that context I overwhelmingly heard the pitches as a “bass line”. And even though there were over 20 samples (each gong at different velocities) it got boring and predictable. My first simple and brutal solution to this was to just zero out the pitch, so regardless of what sample was selected for playback, it would get transposed to a single pitch. This kind of worked in that it didn’t give me a shitty bassline. But that, too, became boring after a while.
Enter the combs.
While cruising YouTube I had come across an old video of Tom Nunn demonstrating his Skatchboxes, which are essentially “prepared” cardboard boxes with contact mics on them. The sounds were fantastic, and I really loved the variety he was able to get out of these modified combs. It was so fluid, gestural, and natural sounding. I wanted to experiment with this some and after realizing that the single comb I have in my house didn’t sound good at all, I went to buy some more.
It turns out it’s hard to find combs that sound good… I’ve gone to so many hair supply shops and $/£/€ stores that I’ve learned the shittier the comb, the better. That is, the kind of plastic they tend to make shit combs out of is more acoustically resonant. I guess it makes sense that you don’t need (or want) something firm and “clacky” while you are combing your hair (well, most people). Go figure!
So after a lot of hunting, and some good luck, I built up a collection of decent sounding combs, many of which I modified with a slight curvature along the lines of Tom Nunn’s combs.
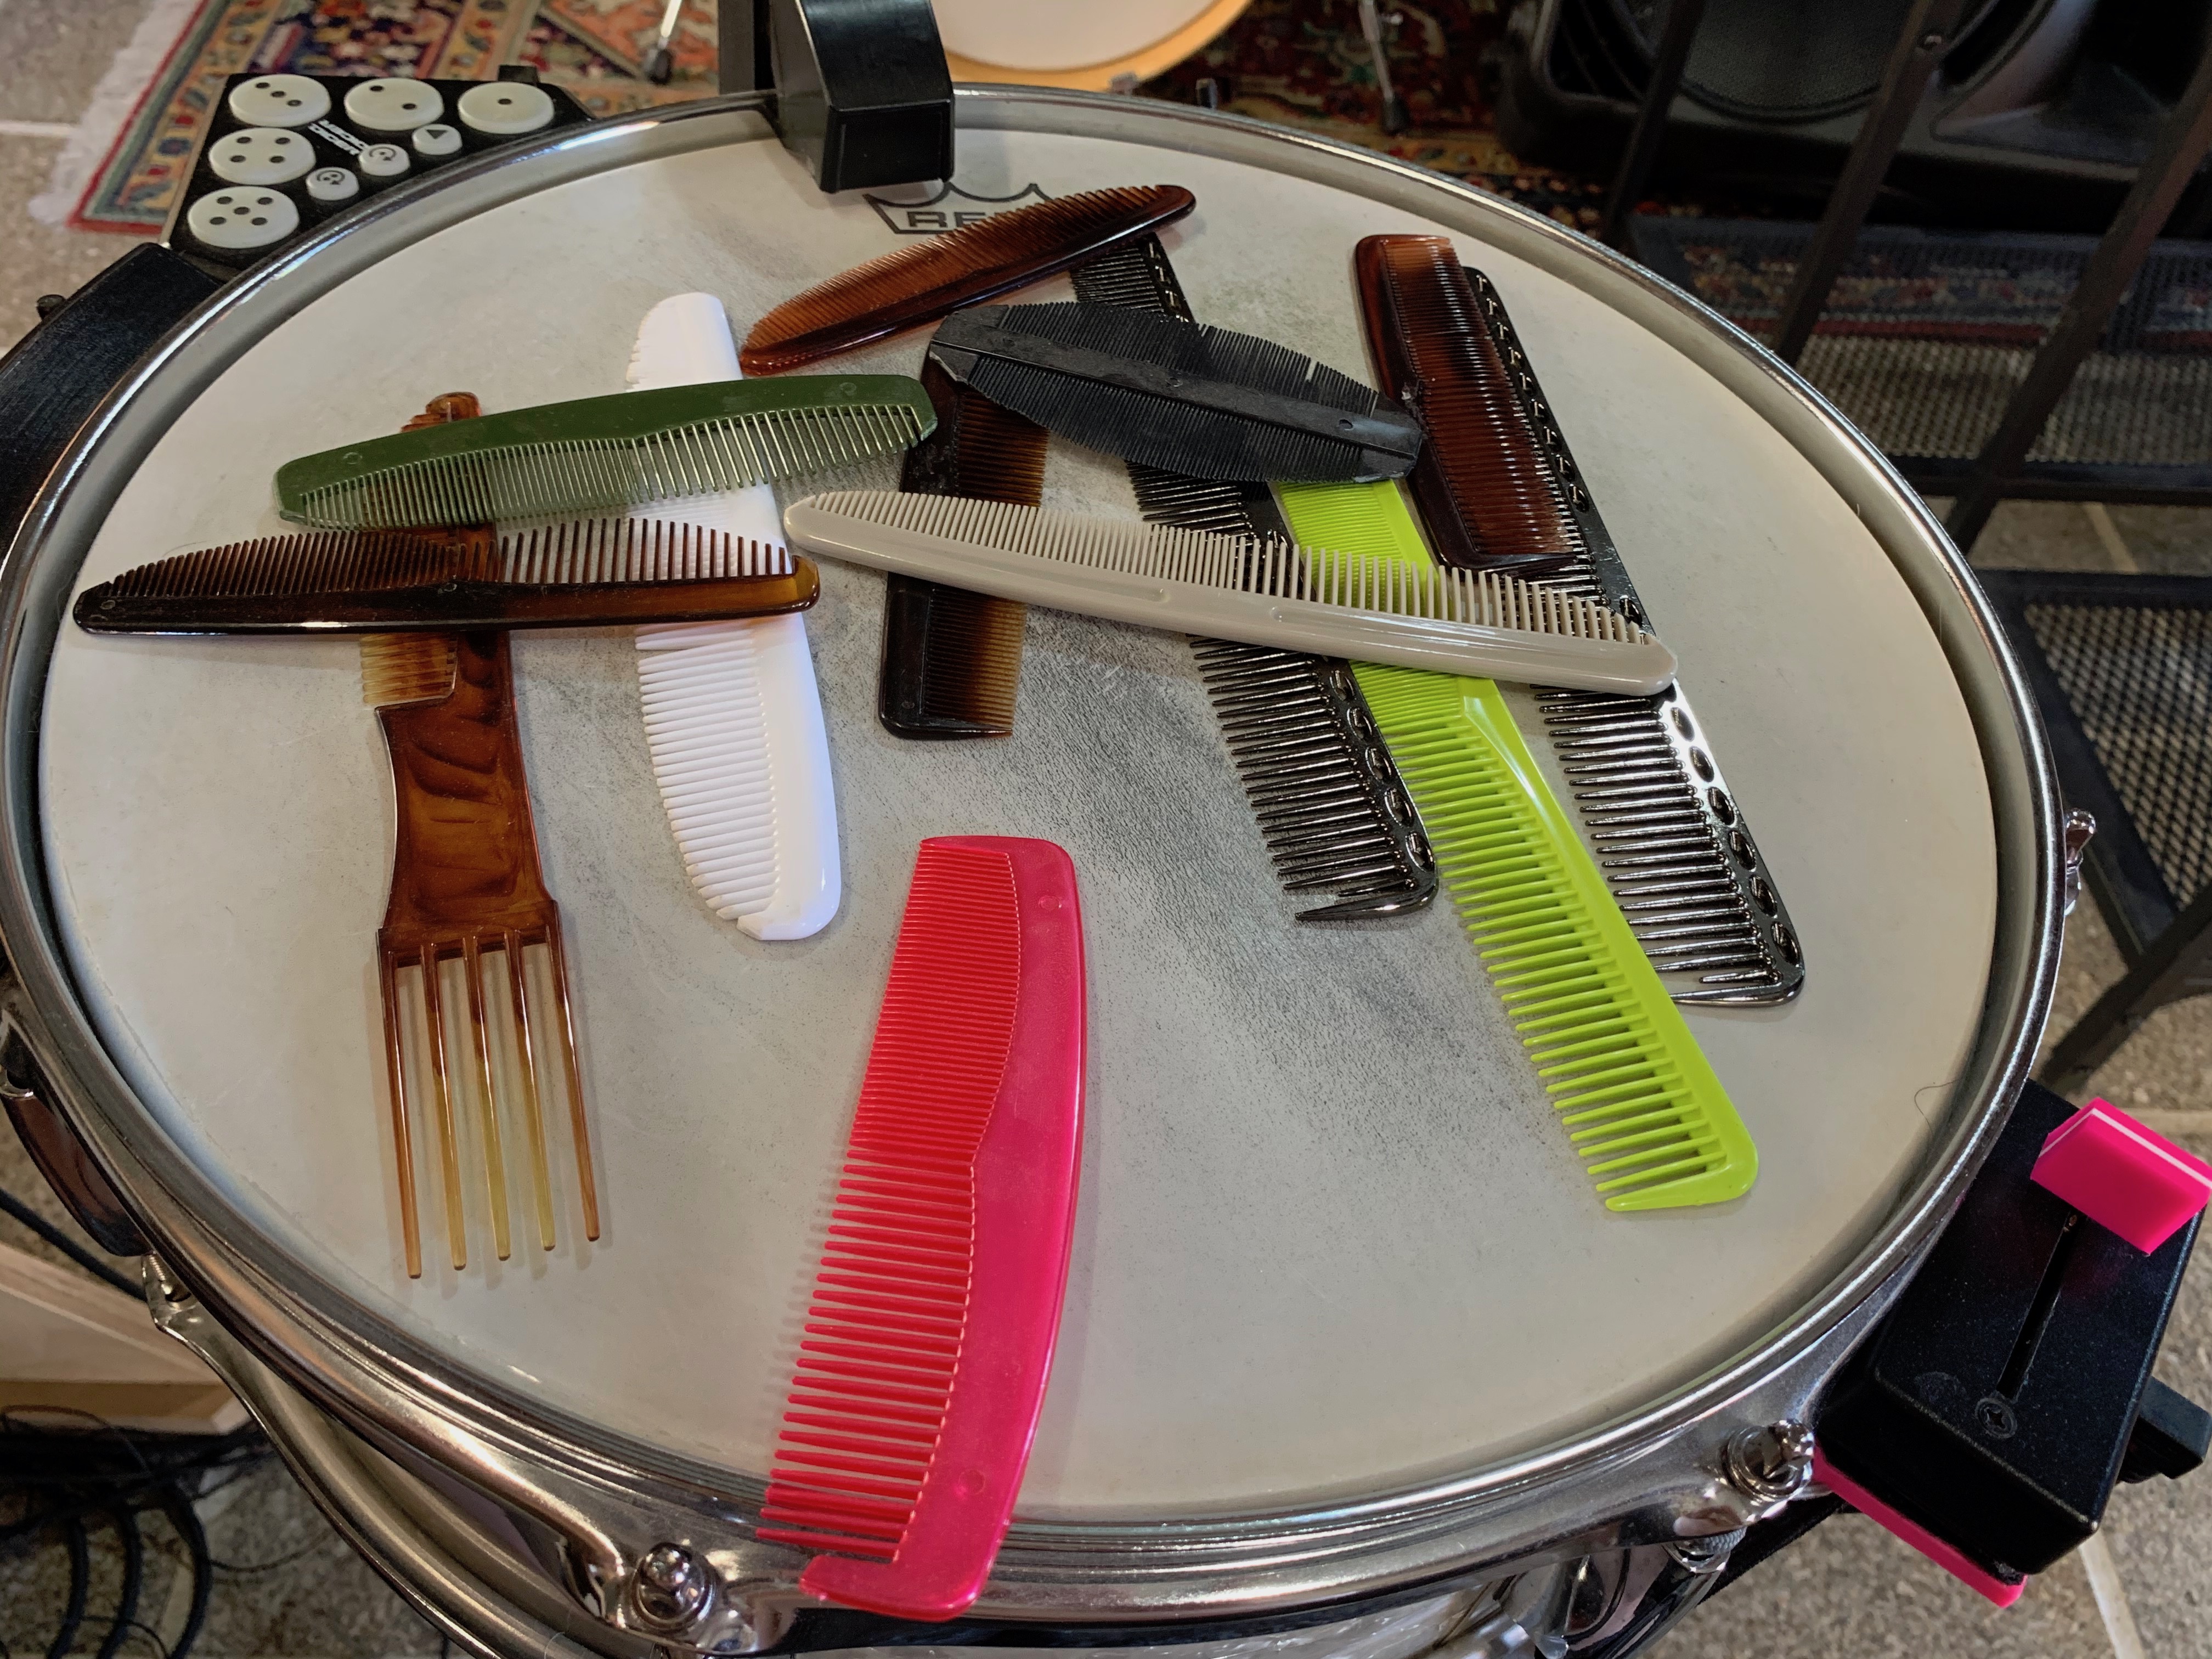
After playing with the assorted combs for a while, I realized they produced a lot of interesting pitches. They were obviously quite high, but they were still interesting nonetheless. What I found most interesting about the pitches was that they had this microtonal clustering, which comes from cutting the tines(?) into a curved shape. And since they wouldn’t all ‘clack’ all the time, you would get these interesting variations and patterns forming from the microtonal plunks.
So I built a patch that would analyze the pitches coming from the comb and would transpose them down into a lower register so that I could use them as the pitches for the gong samples to be transposed to. In the performance this happens during a few key sections, where the pitches are stored in a pool of available notes, which are then drawn upon in the subsequent bass drum sections.
What you hear in those audio examples above (and in the performance itself) is exactly that. The pitches that the gong samples are tuned to are randomly selected from a pool of pitches created by analyzing the individual plunks of the combs from earlier in the performance.
You also hear a lot of little clanky metallic sounds too. And if you were there in person, you would have heard them coming from all around you in the hall. That leads me to…
///////////////////////////////////////////////////////////////////////////////////////////////////////////////////////////////////////////////////////////////////////
Fabrication & Robotics – Part I
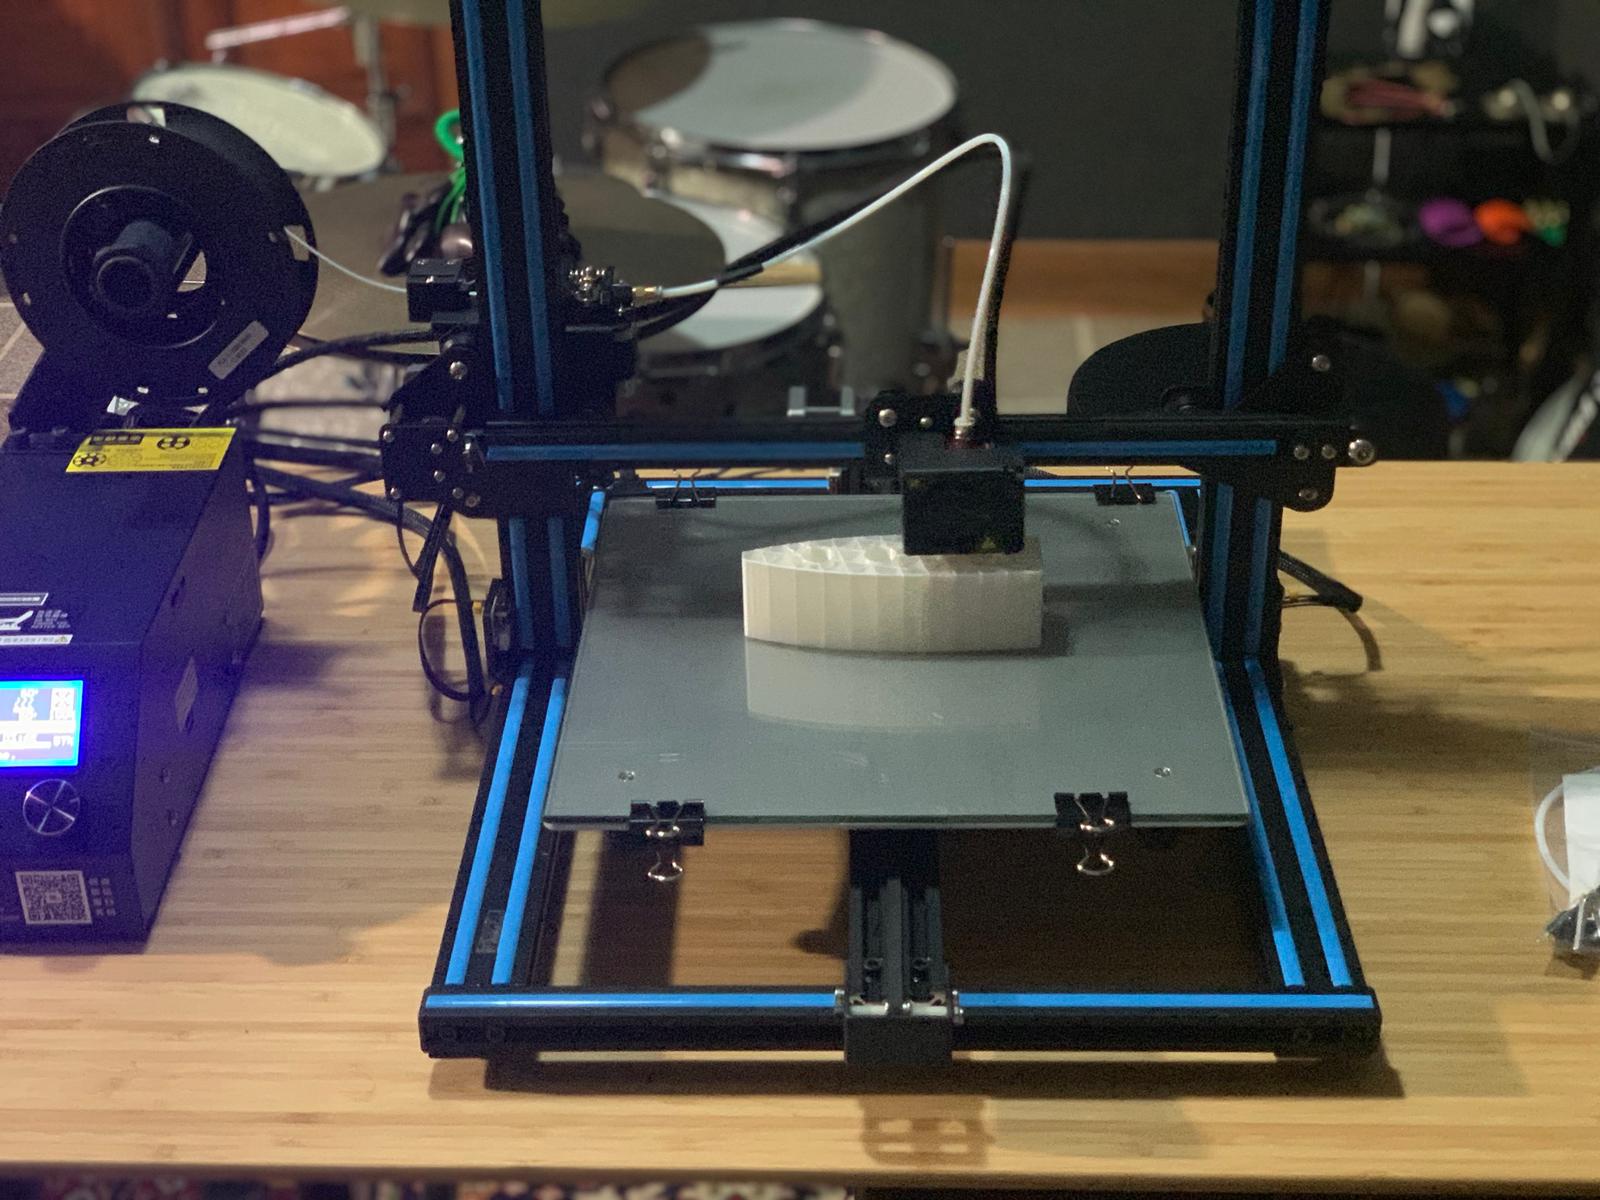
DIY has been a big part of my life for many years. From when I first encountered circuit bending in the 90s, to all the software I write today. So the advent of 3d printing is something that was always on my periphery. For a long time these machines were very expensive, fiddly, and not of immediate use to anything I needed or wanted. A 3d printer always fell into that “eh, that would be nice I guess” category of things, but with a cost that far exceeded that level of interest and usability.
All of that changed when I came across the Creality CR-10. At the time that this printer came out, I was not following the technology, but it was a pretty big breakthrough in terms of cost, functionality, and ease of use.
So after some “research” (loads of YouTube review watching…) I decided to bite the bullet and get a CR-10s, the slightly upgraded version of the original CR-10.
…rewind a bit though. Prior to this, even though I had no person experience designing or 3d printing something, I did have some experience with how useful this technology could be for music making and controllers.
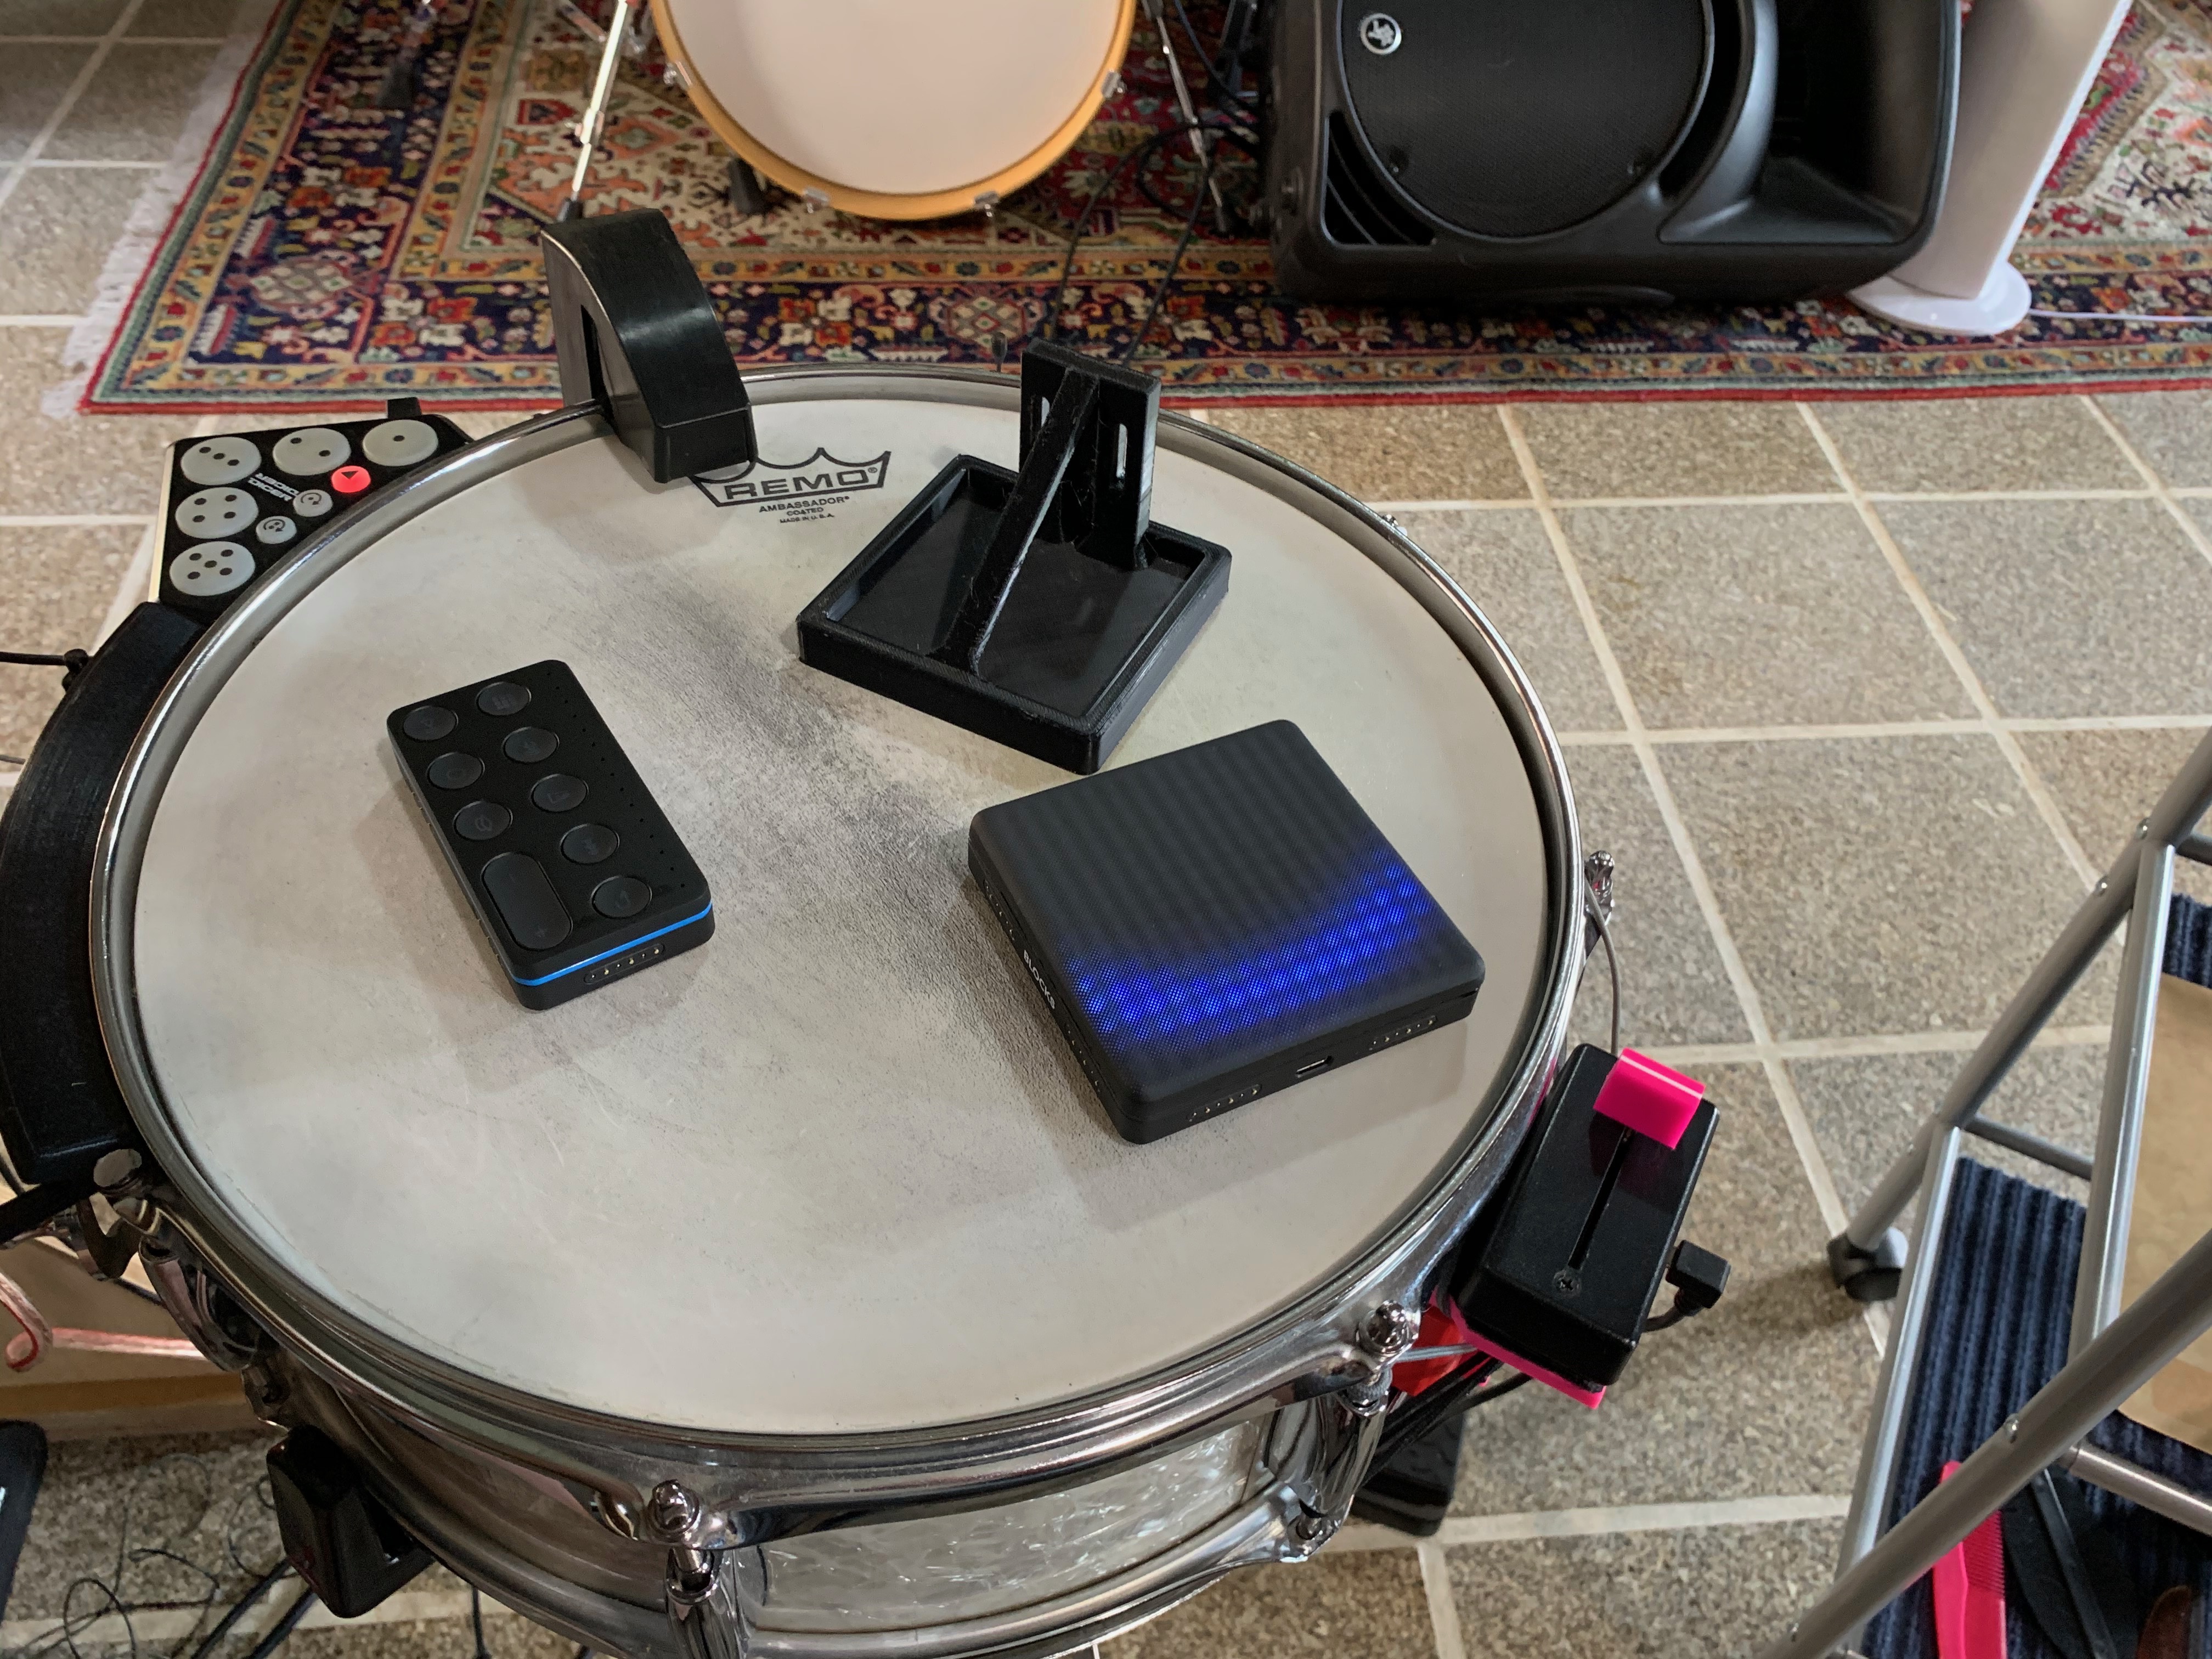
I had purchased a pair of Novation Dicers some years back with the hope that I could attach them to the side of my snare drum as a supplemental controller to my trusty monome controllers. Something for quick and easy access to the most important controls in any given patch. I had no idea of how that would work, but luckily I was able to find someone via a local hackspace who was willing to work with me to design a mount for the Dicer.
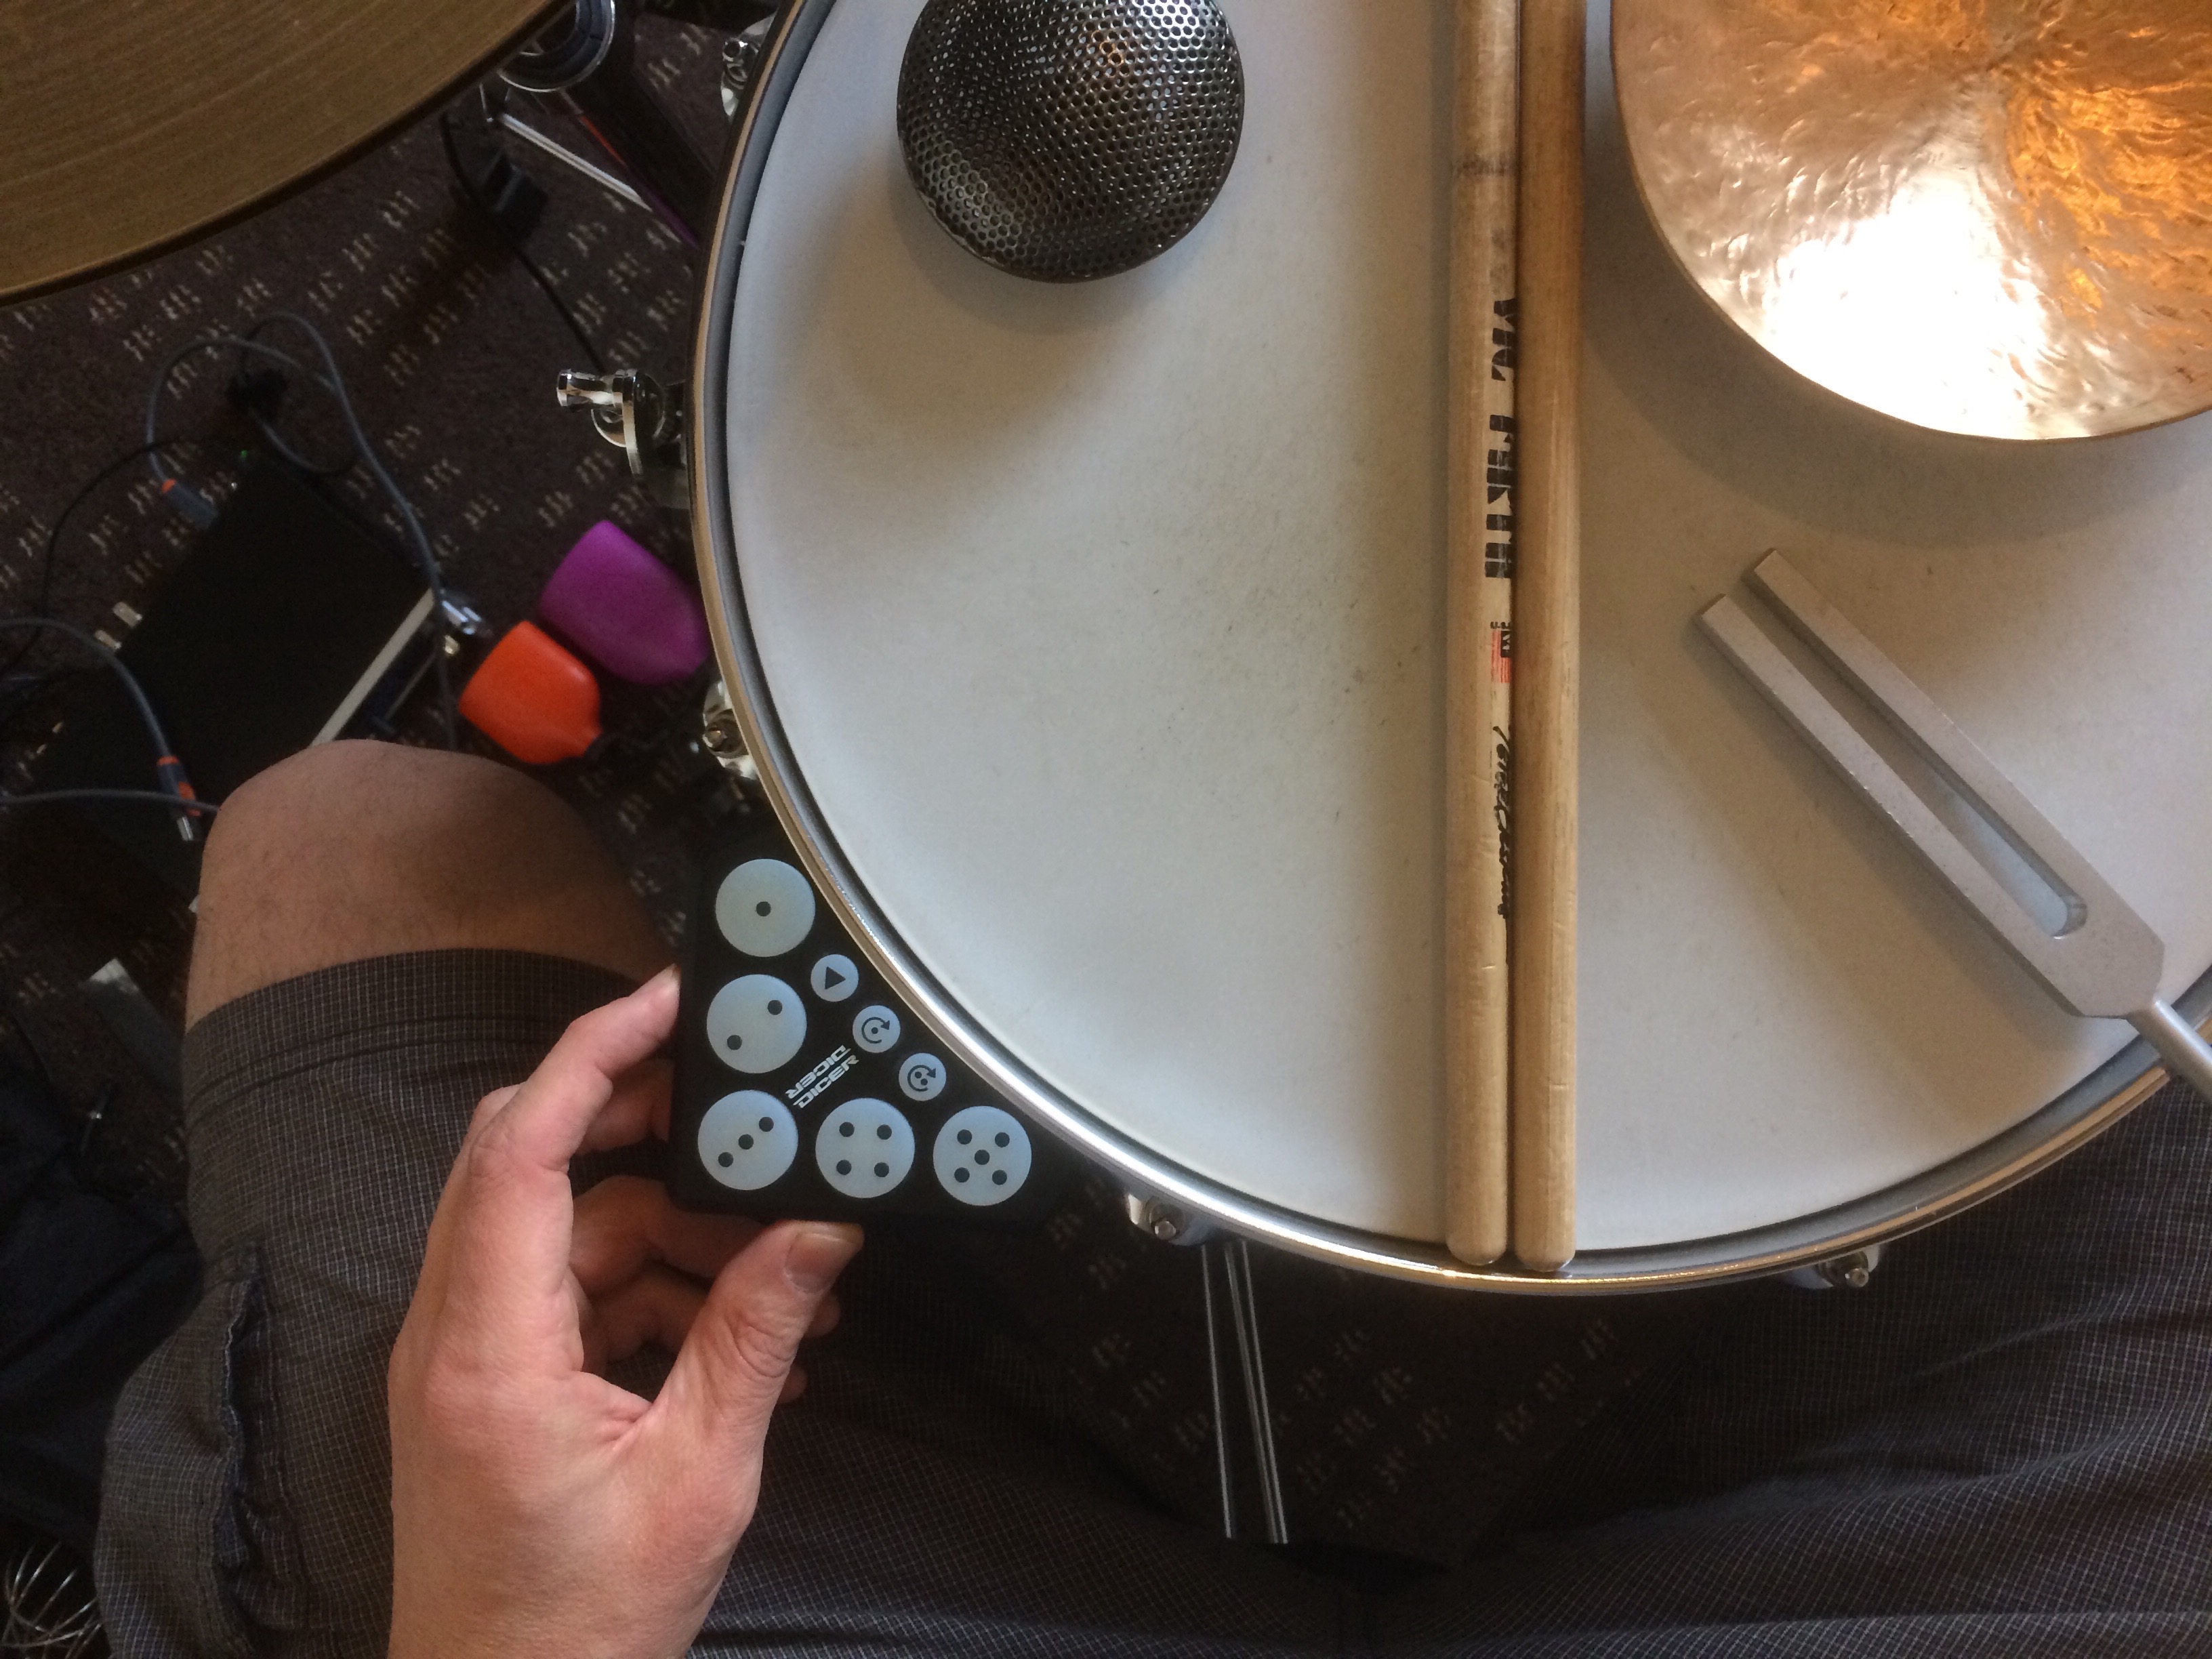
It took a bit of trial and error primarily because Mark (Airtripper) didn’t have a snare to actually test the printed mounts on, and there are loads of variables that make up a snare drum. I could be using the mount on a 12″, 13″, or 14″ drum, that can have a depth of anywhere between 3″ and 8″. Not to mention the amount of lugs can vary per drum too, so finding something that works across all those limitations was tricky.
After a couple of iterations we got it somewhere very functional:
-

- First prototype mounted
-
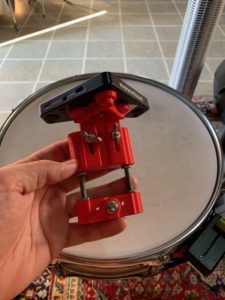
- Close-up of design
Since these initial pictures I’ve figured out a better way to mount the hair scrunchies and have compression springs on the long bolts to keep it pressed up against the rims of the drum. I eventually want to redesign the mount altogether now that I have a few years of experience with it, but figuring out the mechanical aspects of how it would physically attach to the drum is still a bit beyond knowledge and ability (if you have any thoughts, get in touch!).
Jumping forward again, seeing how useful this 3d printed mount was really opened my eyes to the power of 3d printing and got me thinking about the potential of owning my own 3d printer.
It turns out having a 3d printer and creating your own designs for 3d printing are very different things… There are plenty of webpages out there that have endless amounts of designs that you can download and print, so it’s entirely feasible to own a 3d printer and never design something yourself. But for what I wanted to do, I was going to need to create my own designs. I knew literally nothing about CAD and although I’ve seen mention of programs like Fusion 360 and Tinkercad I had no experience with them at all. So I once again turned to YouTube for some tutorials.
After some initial testing and exploring I settled on Fusion 360 since it’s super powerful, fairly ‘industry standard’, and quite importantly, has a free Educational License. It does have a fairly steep learning curve, but it’s pretty rewarding if you put a bit of time in.
One thing I soon discovered is that importing an existing design into Fusion 360 is not only not straight forward, it is a somewhat convoluted process which leaves you with a weird representation of the object which is complicated to modify and edit. This sadly meant that I was unable to import the Dicer mount design into Fusion and modify it to work mount the DIY crossfader, which was one of the first things I wanted to do with the printer.
I did print out a spare Dicer mount and literally sawed off the corner of it for my initial setup and testing, and that worked fine for a while. It didn’t fully support the crossfader in the corners since the Dicer is triangular and the design had support points for that shape, but since I wasn’t really applying much weight on it (quite the opposite really, since most of the fader movements were fairly light), it held put just fine. It was just… a bit ugly.
After a while I (re)discovered that you can import complex .stl files into Tinkercad and edit them there. Tinkercad is great for making fairly simple geometries that intersect a bit. For as simple looking as the Dicer mount is, it has some fairly complex geometries in it. What’s that saying about when all you have is a hammer, every problem is a nail? Well, this is the opposite of that. Trying to modify and extend the Dicer mount in Tinkercad was like trying to hammer a hammer into a wall…with a nail.
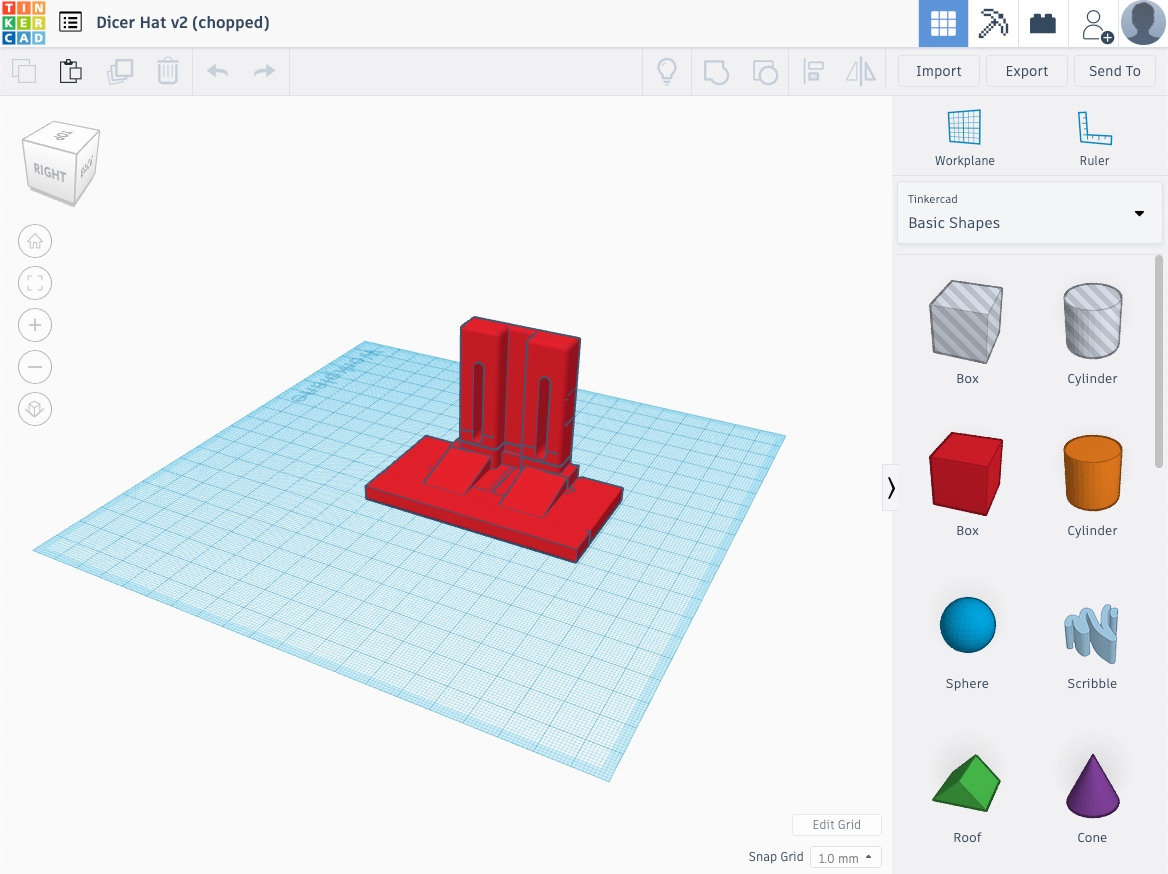
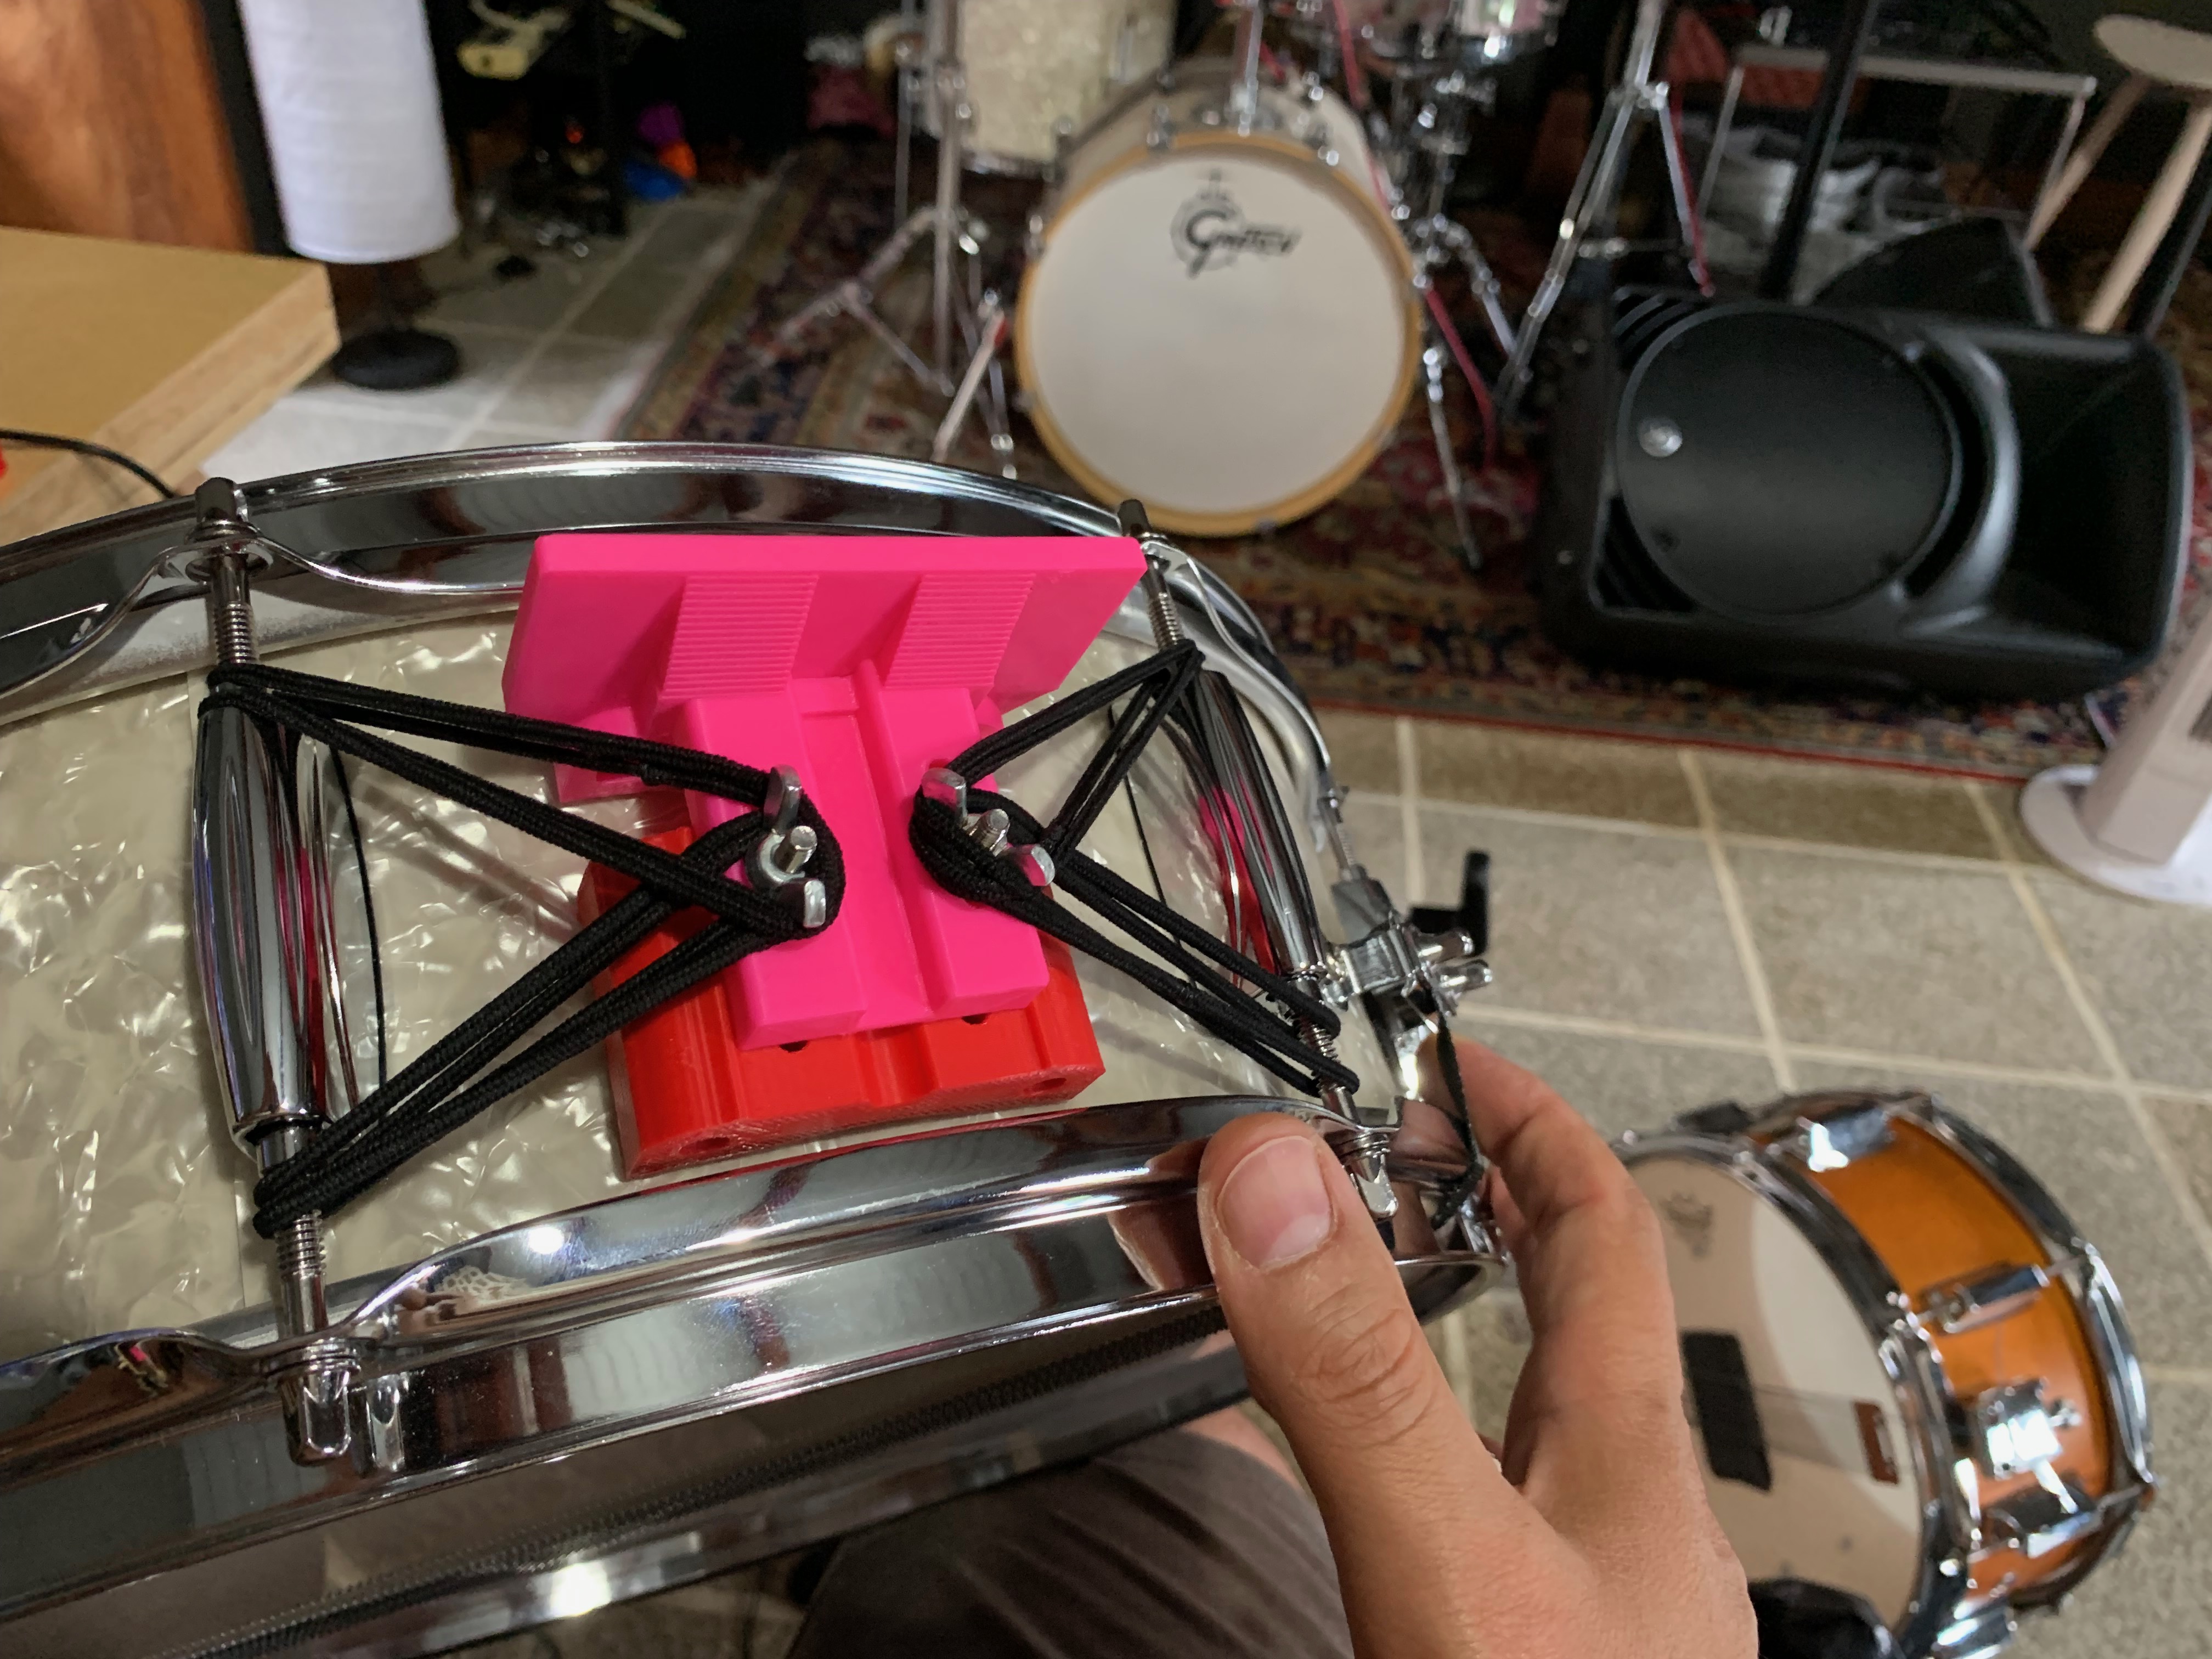
After many iterations and adjustments I was able to modify the design into something that, although not perfect, works. That gives me this brightly colored thing:
And here is the file, posted as a “remix” on Thingiverse.
By the time I got this far into making an updated crossfader mount I had already started exploring more complex scratching movements with my “record” (left) hand. I quickly found out that holding the microphone between the tips of my fingers was starting to get a bit uncomfortable after long periods of time. I hadn’t really encountered this as a problem before as these specific kinds of movements formed only a small part of the overall playing techniques used when playing my snare in this way.
What I wanted was something a more ergonomic and chunkier, almost like those oldschool things that you would slide onto a pencil when you were a kid. I checked a bunch of local stationary stores, and even printed a few out from Thingiverse, but none felt good, or worked in the way I wanted. I did find, quite surprisingly, that having something larger to hold on to felt better than having something that simply extended the sides of the microphone.
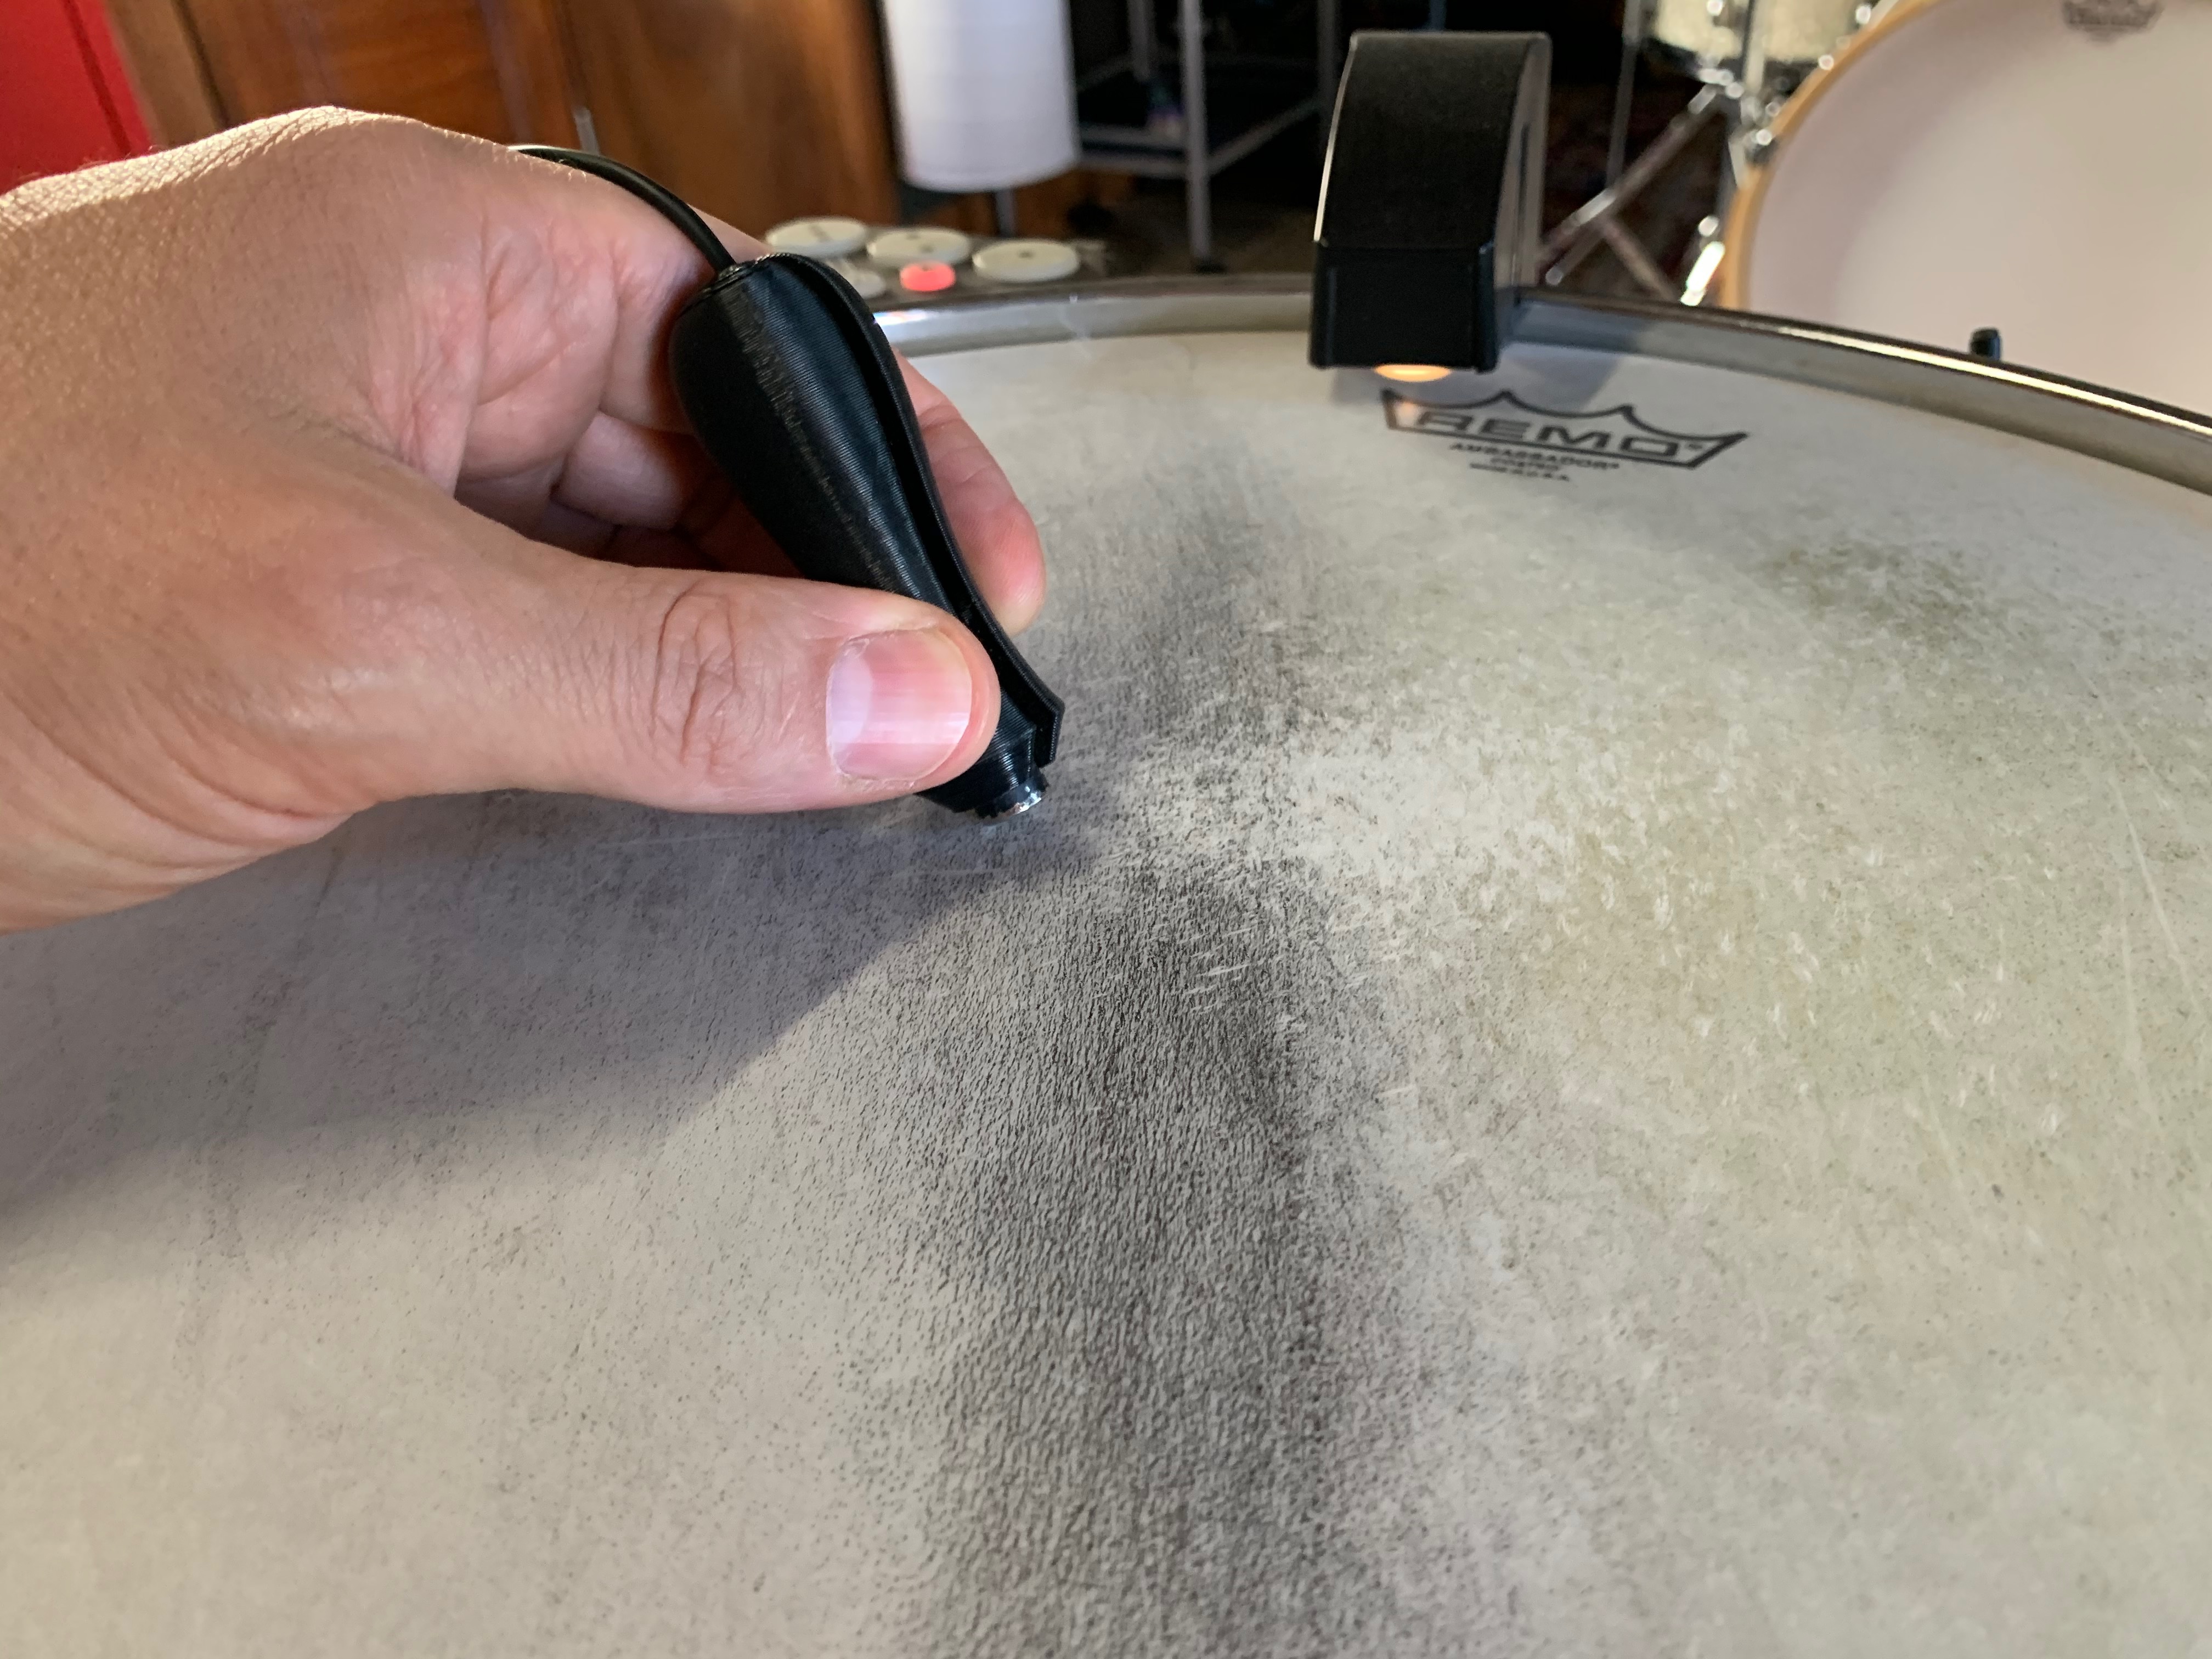
After a lot of prototypes I managed to print out something that felt good and was able to hold the microphone in place using only friction.
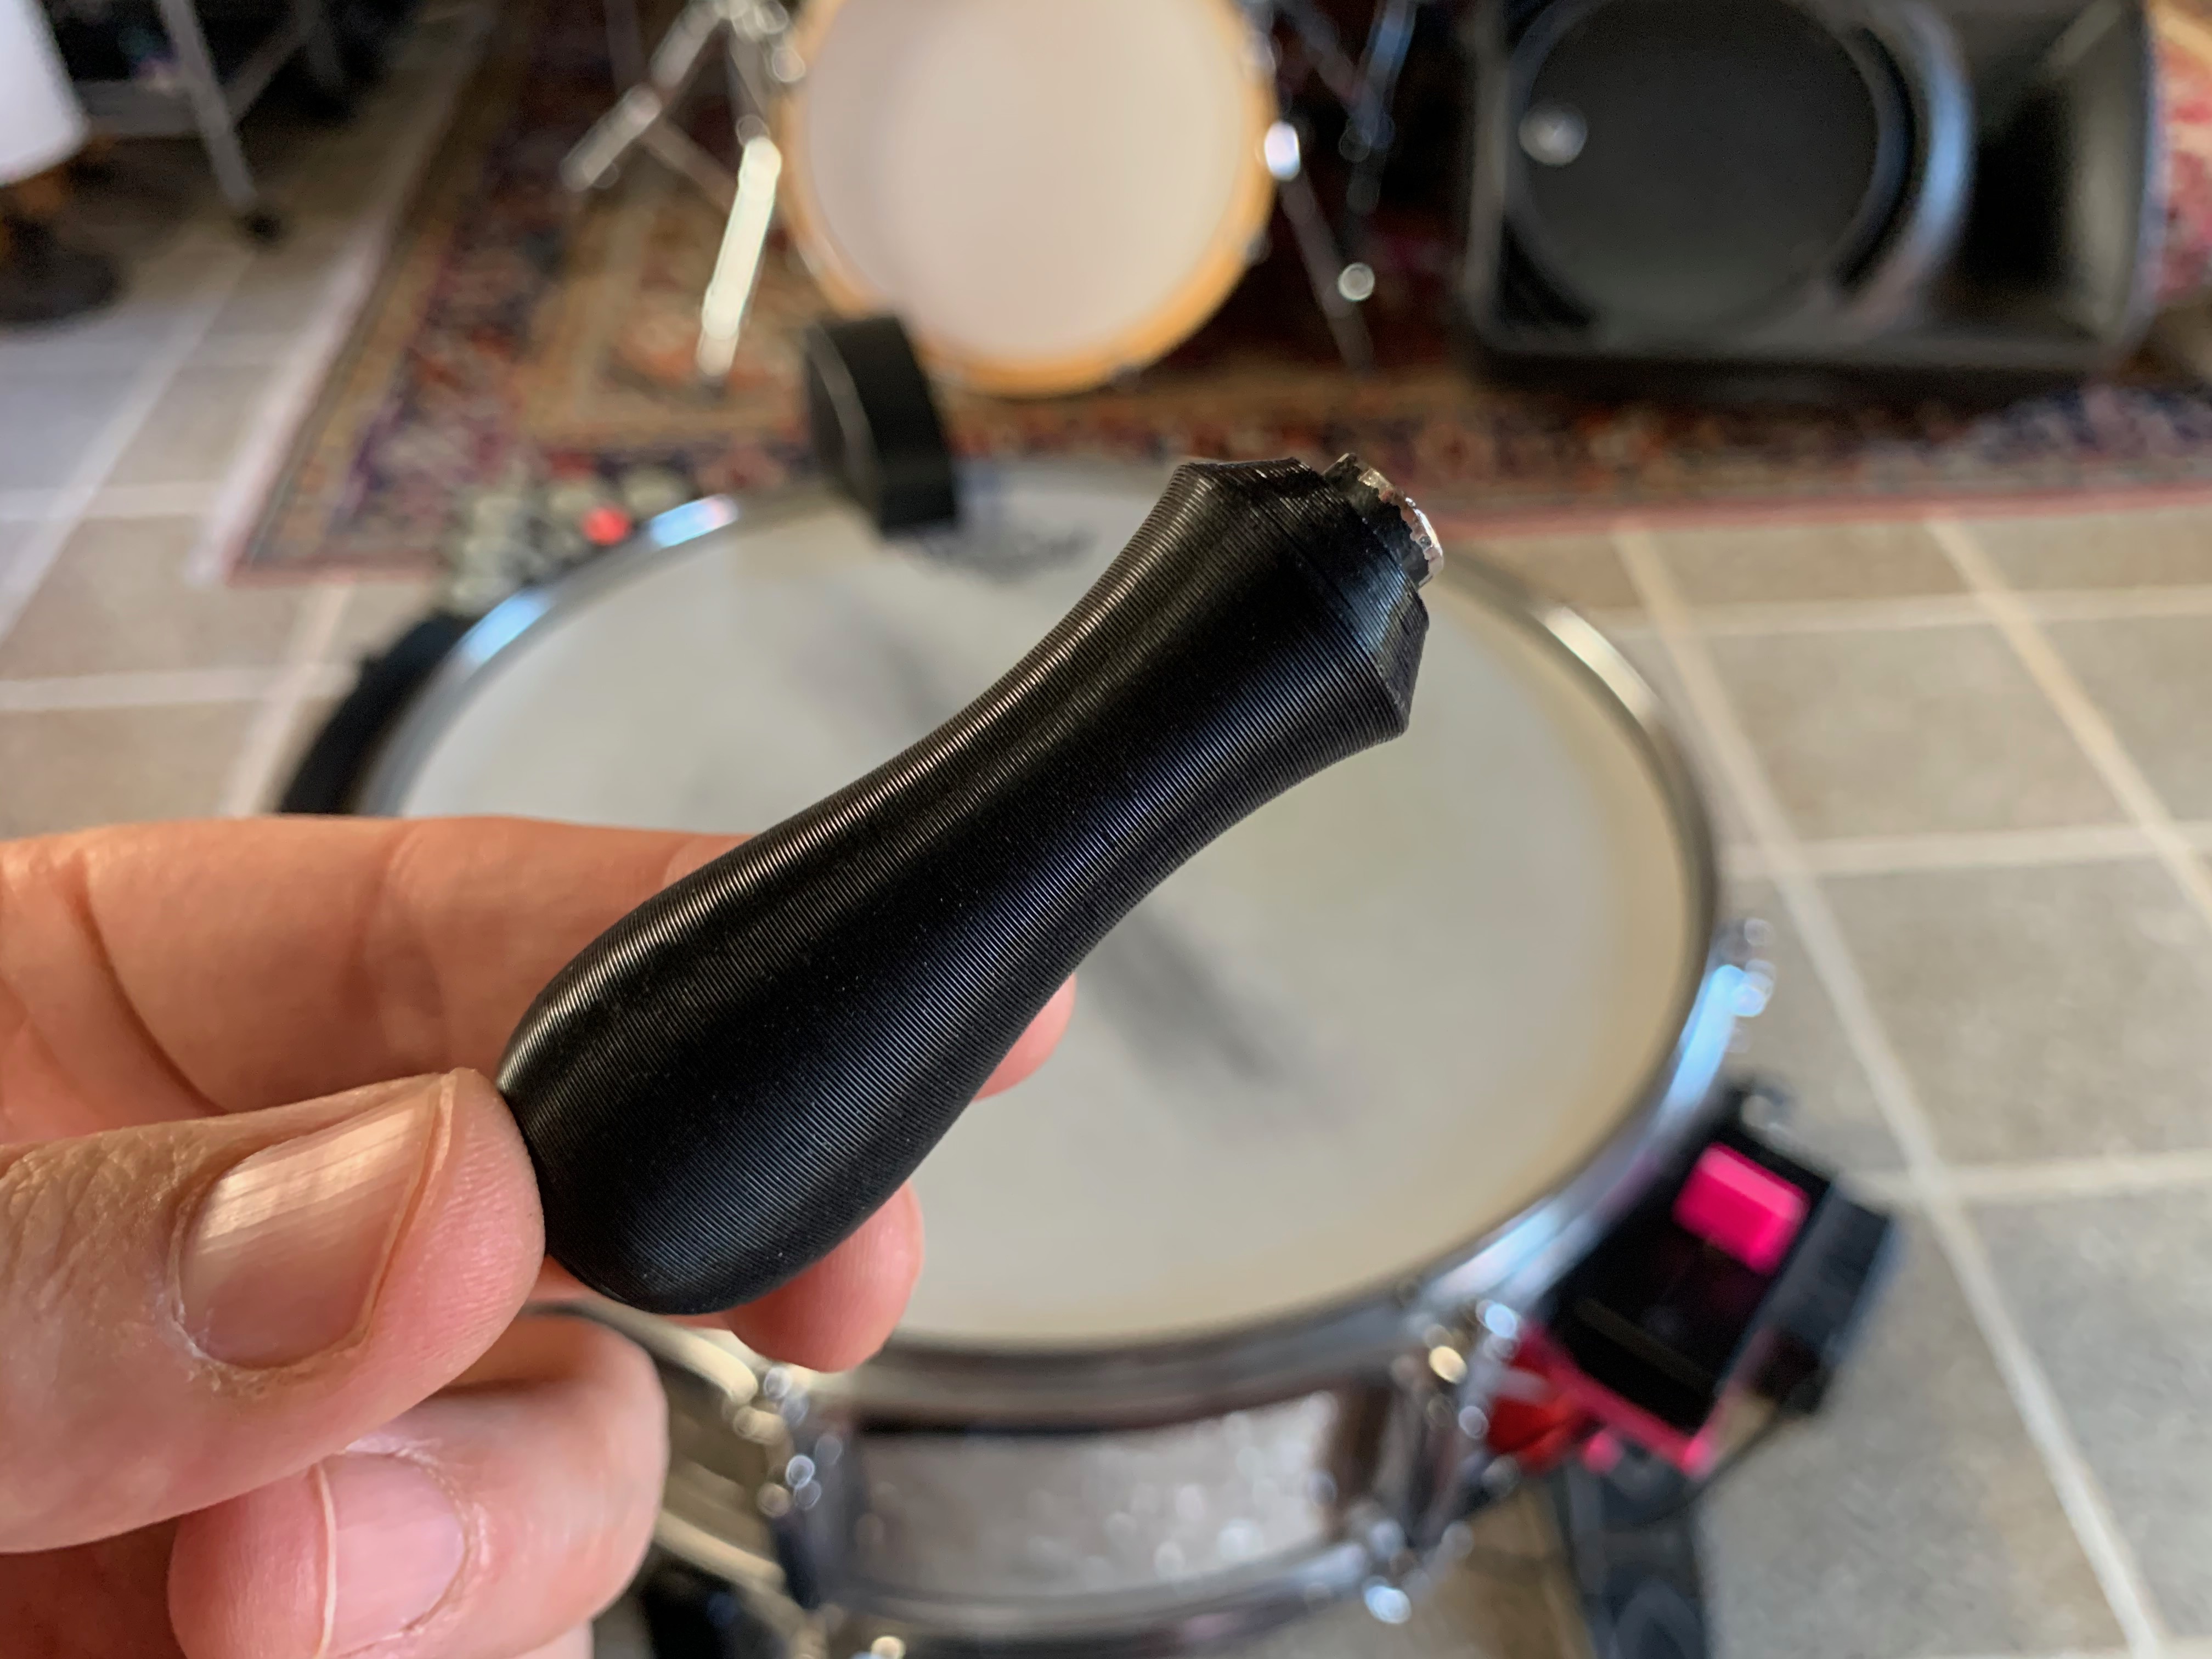
I wasn’t fully satisfied with the design since it has a slot that runs the whole way down the body so the cable can slide in without having to create any kind of complicated clamp or holder. This doesn’t look great, but more importantly, I can feel it while I hold it, so whenever I grab the grip it always takes me a moment to orient it in my hand so that slot is pointing away from me. I did try to create another grip which had more parts that avoided this slot, but I never got it it working in a satisfactory way.
This 3d printed grip ended up being pretty central to the overall “turntable snare” approach as I had a larger area to hold the microphone, allowing for more subtle and detailed control and changes in angles and direction.
You can download this design here if you would like to print one yourself.
///////////////////////////////////////////////////////////////////////////////////////////////////////////////////////////////////////////////////////////////////////
Fabrication & Robotics – Part II
One of the initial ideas I had for the project (which I briefly mentioned at the start of this post) was to use the dadamachines automat toolkit to trigger “acoustic samples” based on audio analysis, in a similar way that I’ve been doing with C-C-Combine for years. The idea would be to pre-analyze a whole bunch of acoustic strikes from the automat on various objects and surfaces and have those included in a database of available samples along with pre-recorded audio samples. When the nearest match happened to be from the acoustic objects, instead of triggering audio playback, it would instead trigger the acoustic playback of that sample with the automat.
Even though I abandoned this idea early on, it did return when I started working with the onset descriptors and metal samples mentioned above. I decided that I wanted to bring back that “acoustic” component to the sample playback while figuring out a way to integrate it into the overall sound world and aesthetic of the piece.
Given the crazy clanky/clacky sounds I was getting with the combs on the snare drum, I figured that this would be a good point of entry for the solenoid-triggered sounds. It would add another layer of interest and complexity to those sections of the performance.
By this point I also narrowed down the things I wanted to hit with the automat solenoids to just crotales. I only own three crotales, but thankfully I was able to borrow some more from the University of Huddersfield. With the automat I have a total of 12 individual outputs, which I can use to drive 12 completely independent solenoids. But rather than having 12 separate crotales I conceived of an approach which would have two beaters per crotale, each with a different striking surface, to get a broader range of timbres, rather than individual notes.
But where and how would I have the solenoids mounted?
One of the nice things about the automat toolkit, particular the large (L) version I ordered, is that it comes with oodles of mounts, stands, and holders for the solenoids. These are quite compact and well designed, but sadly aren’t ideal for holding or striking crotales. I could use the mic stand adaptors and such, but that would look pretty shitty, and take up a lot of space.
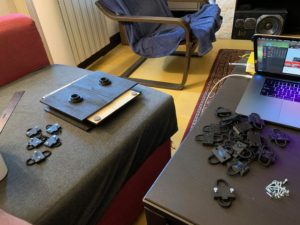
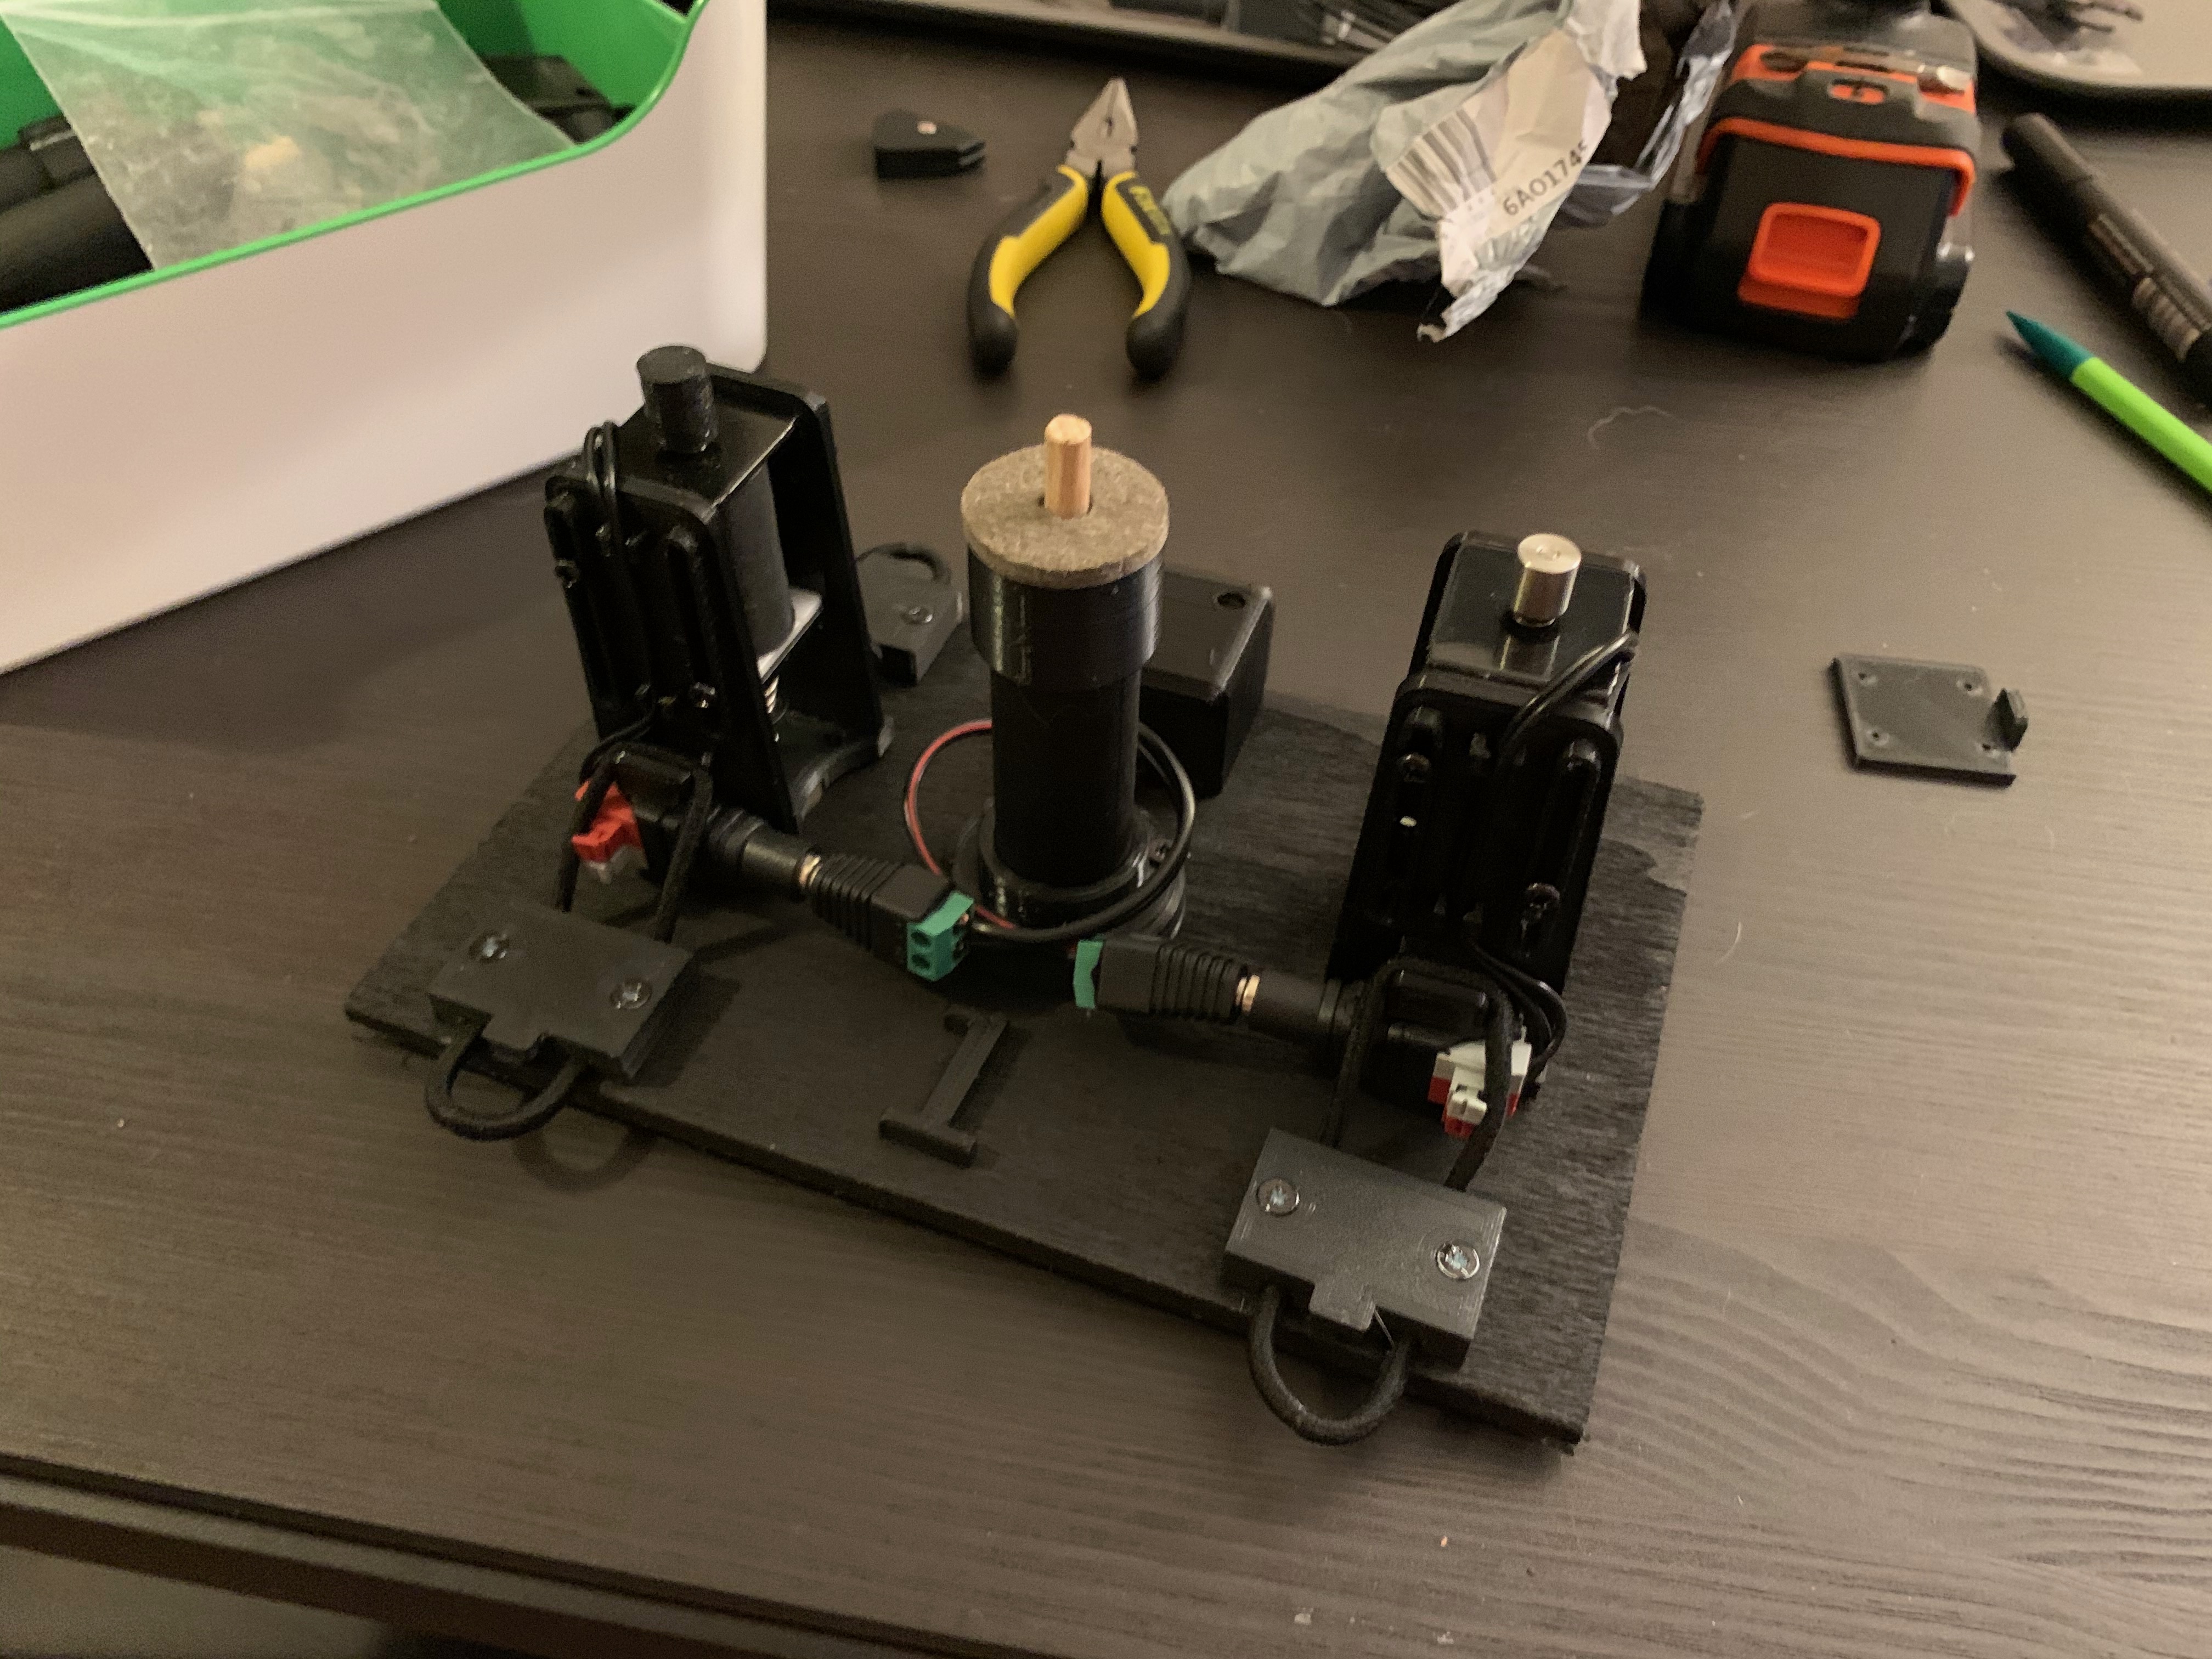
I created some sketches and decided that making something compact that held the crotales and struck them from underneath would be the best solution. So I came up with some simple designs that leveraged as many non-printed materials as possible (i.e. various dowels, felts, etc..). After a few size and tolerance-based iterations I came up with something pretty functional.
-
- Initial sketches and size tests
-

- Checking heights and fits
-
- Printing the parts
-
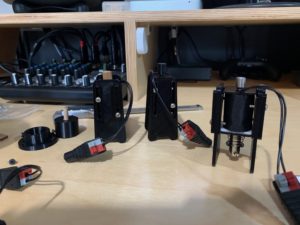
- Parts mounted
It was not quite as stripped back and elegant as the final design would end up being, but the broad strokes were there. The method of holding the crotales, the rough shape for holding the solenoids, and the overall small footprint were there from the start.
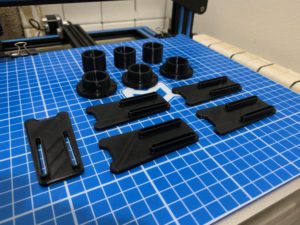
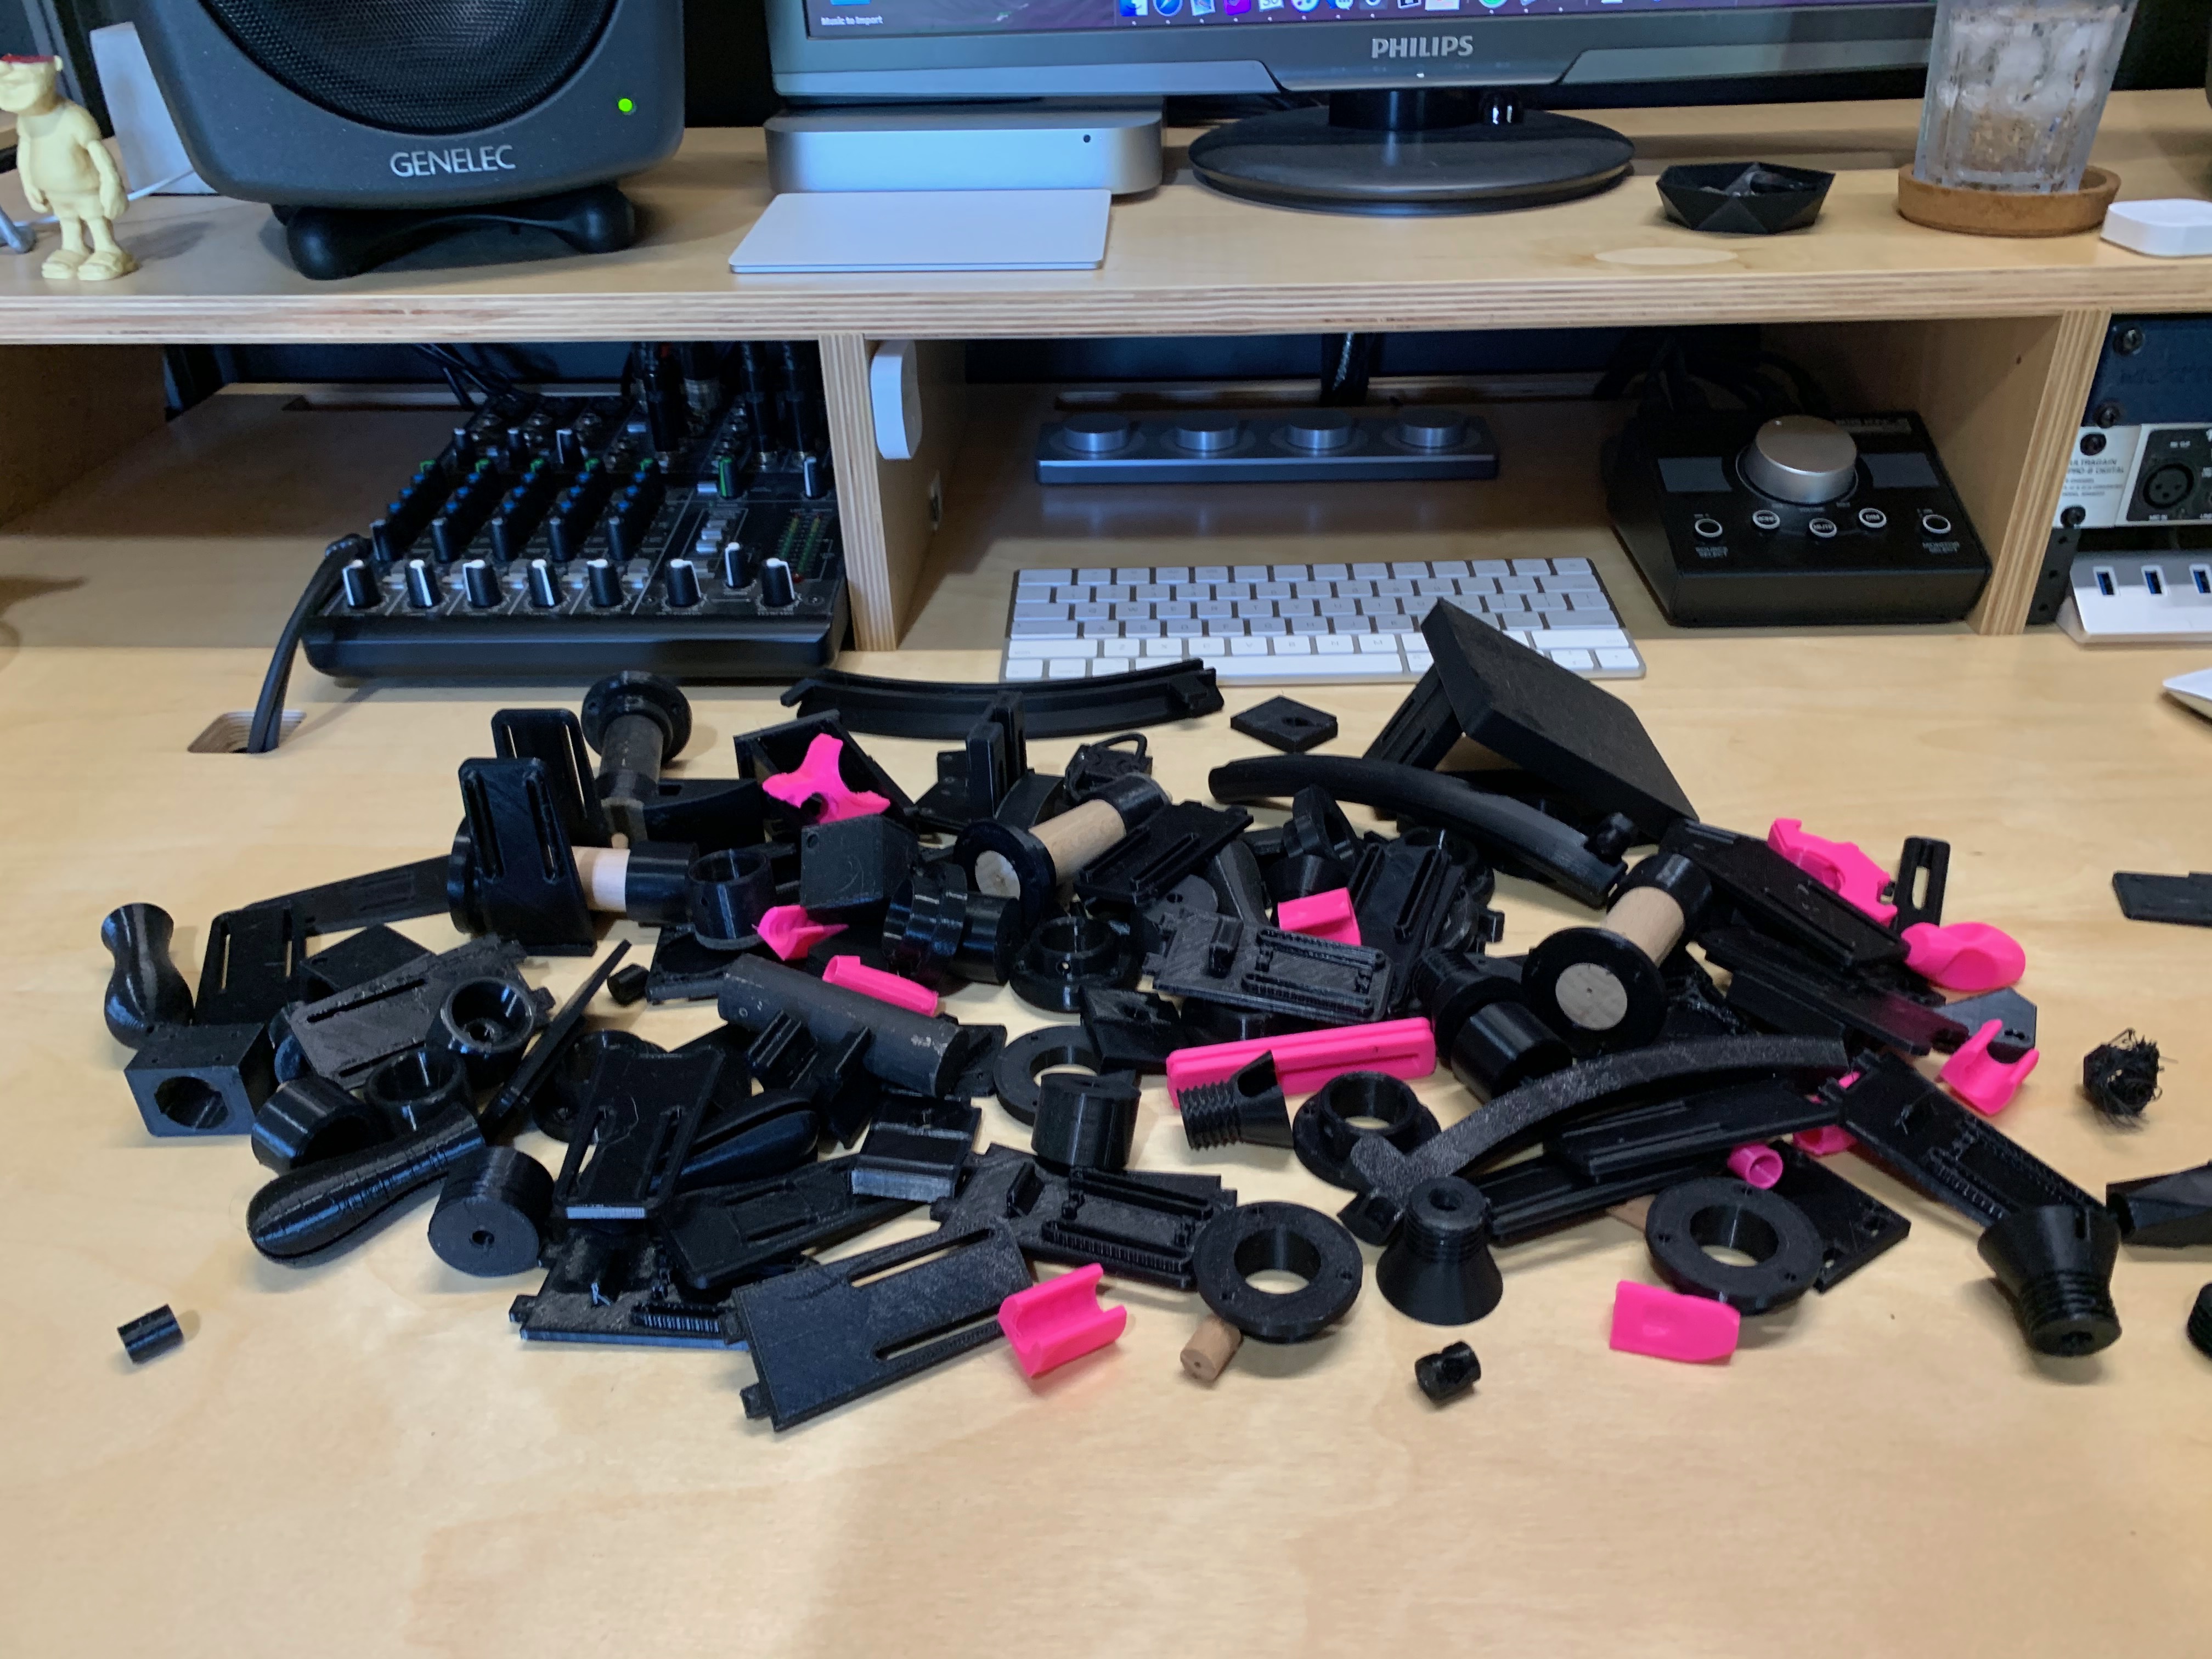
Now when I say I made a few iterations, by the end, I’d made a ton of iterations. I started keeping all the iterations that weren’t perfect in order to take a pic at the end. Keep in mind that this doesn’t include any prints that failed or were otherwise fucked up. These are all “good” prints, that just weren’t perfect for one reason or another…
Because the design was so compact, I thought that it would be a good idea to have them spread out in and around the audience, so when the crotales were being hit there would be these surprisingly plings and clangs coming from all around the audience.
One of the (semi-)unintended consequences of having the crotales triggered by audio analysis while they are spread around the performance space is that it produced a kind of “spatialization” based not (directly) on decisions I had to make about movement in space (yuck!) but rather on a decorrelated relationship between the descriptor analysis and where the crotales happened to be placed in the physical space. A classic win-win.
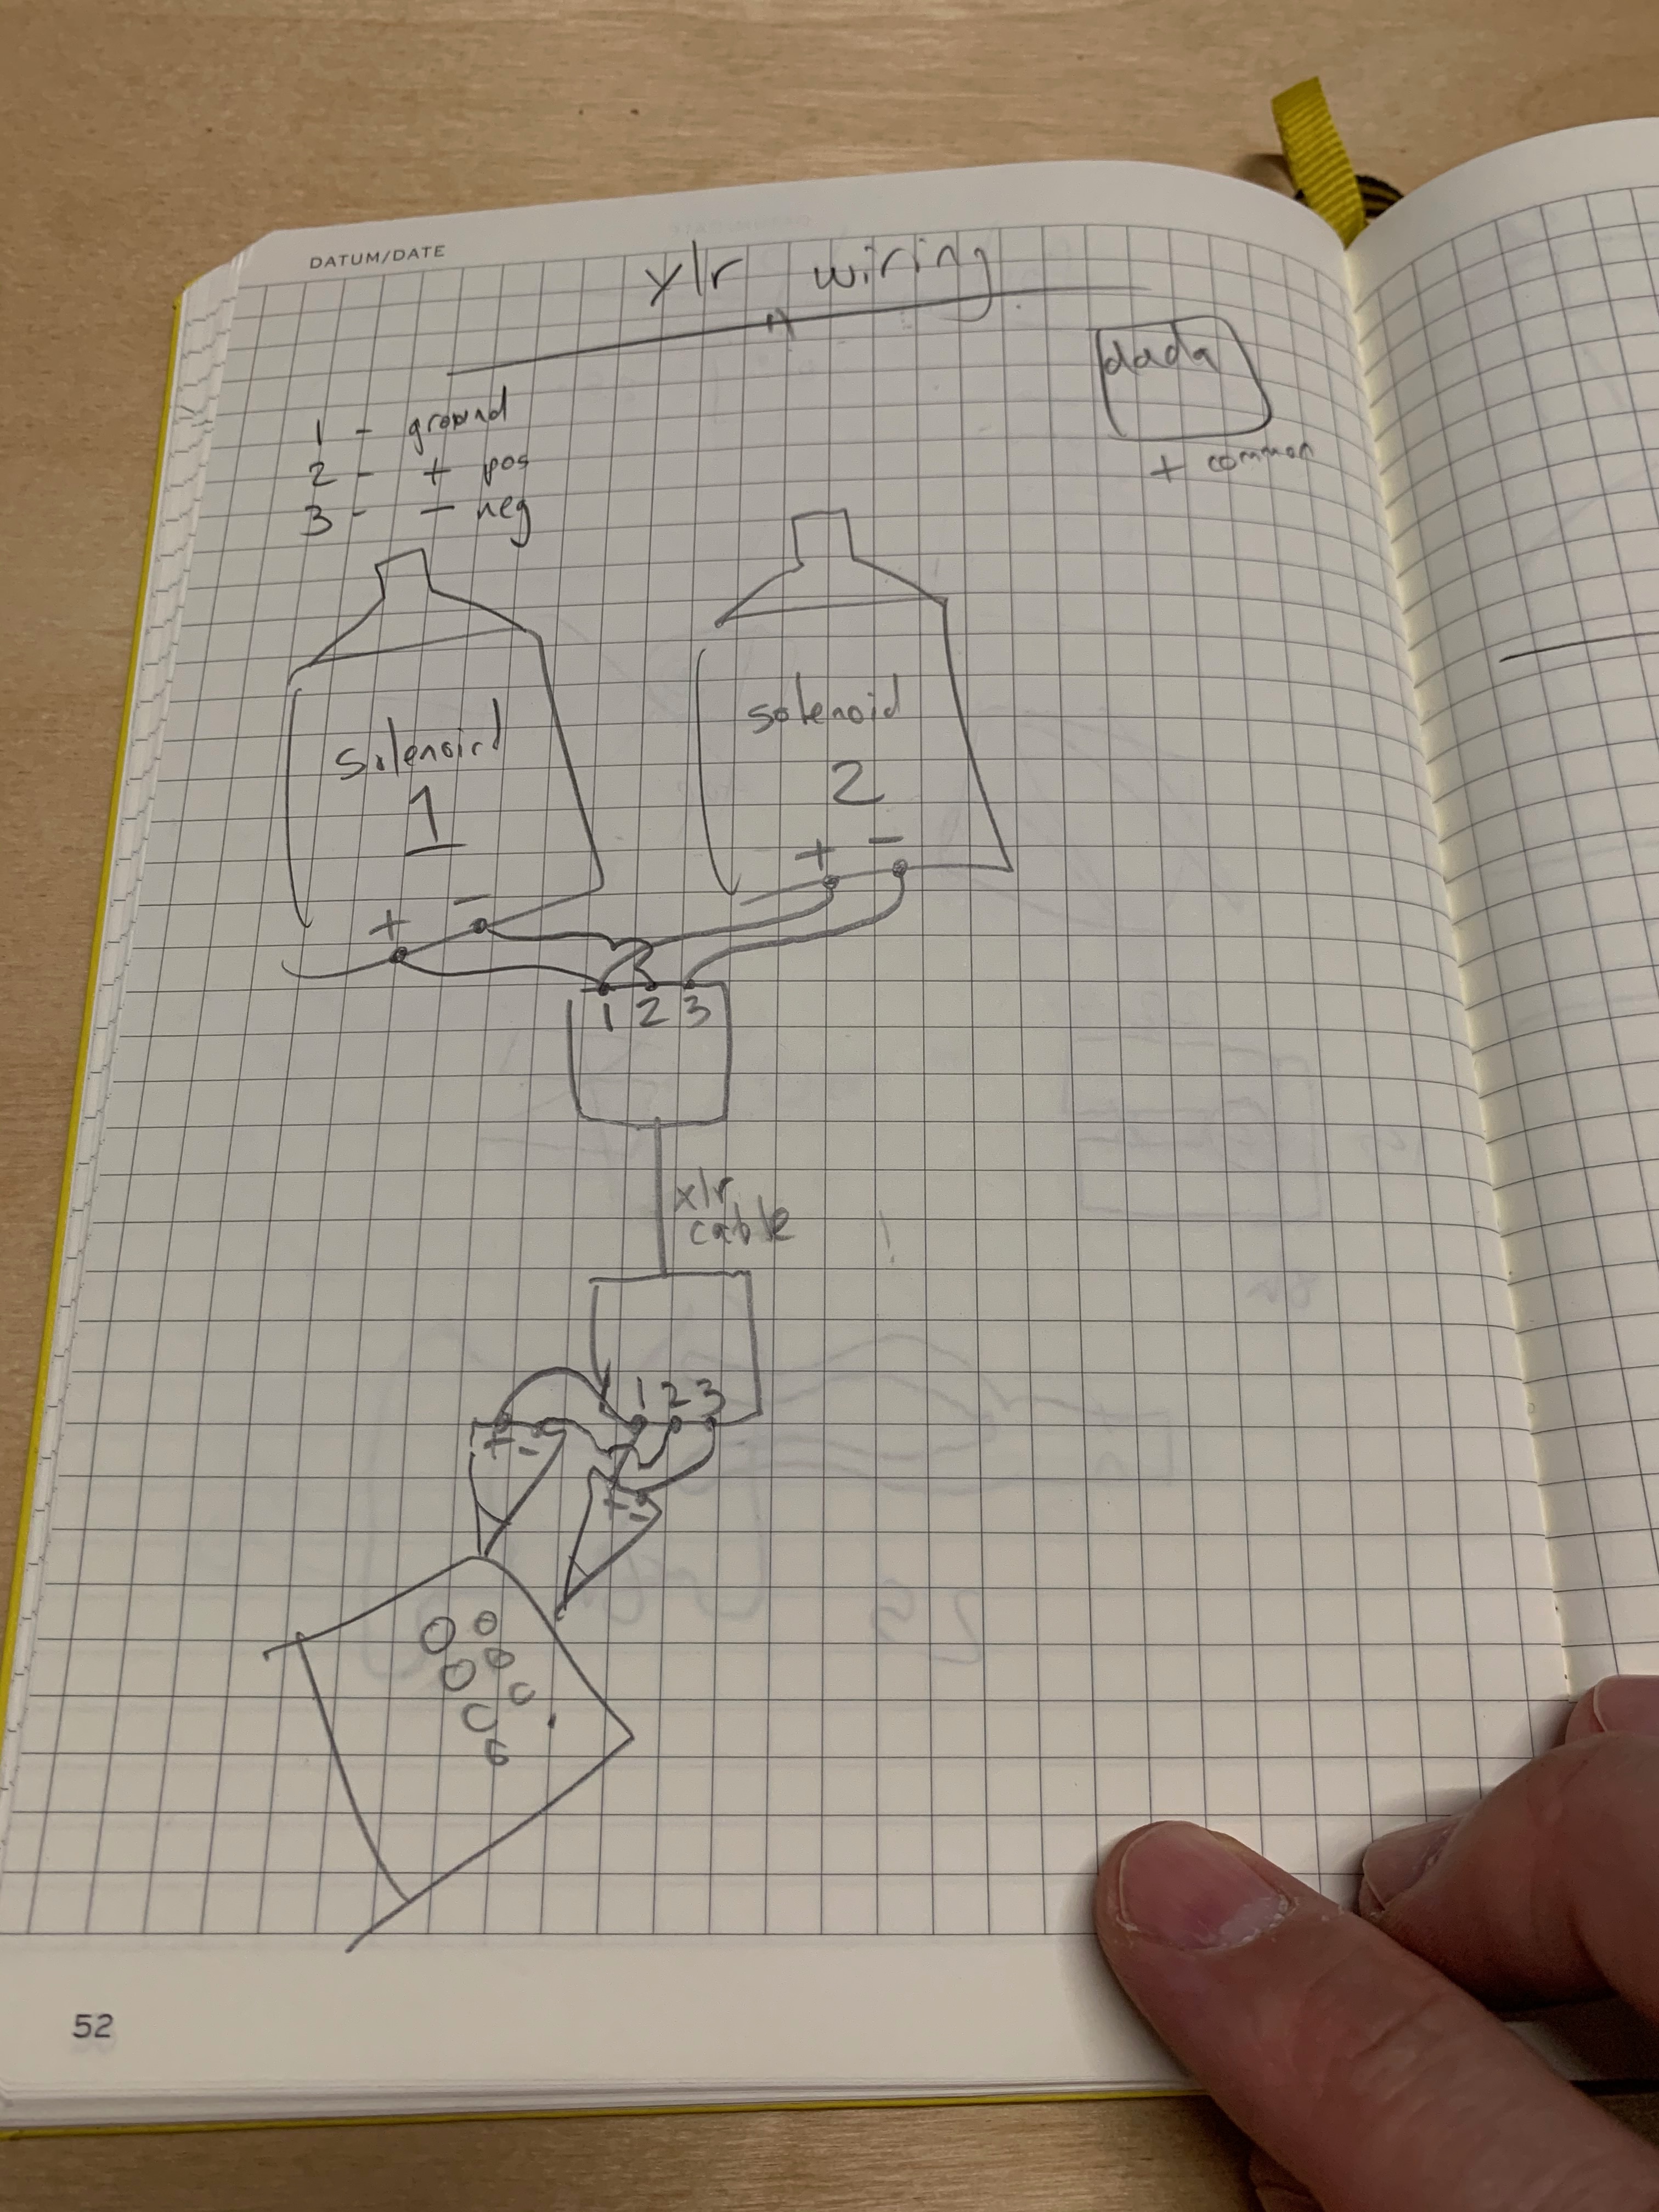
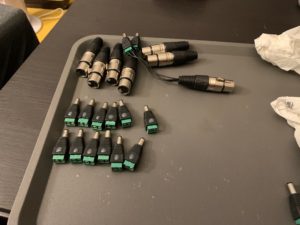
In order to achieve this effect in the (large) hall the performance was taking place in, I had to come up with a way to power and control them. I wanted each individual “unit” (two solenoids with a single crotale) to have only one cable running to it. My initial idea was to make some bespoke cables that were 10-20m long, with two separate connections for each solenoid. In the end, after a brilliant suggestion by PA Tremblay, I managed to come up with an approach that used a single, normal, XLR cable for each unit. Even though each solenoid needs two connections, the ground was shared between all the solenoids, so each three pin XLR cable carried a single ground, and two control signals.
This greatly simplified the setup, as XLR cables are pretty ubiquitous, and I could use however many XLR cables it would take to reach across the (large!) hall.
As I briefly mentioned above the reasons I went with only six “units” total, instead of having 12 separate crotales was twofold. The first reason was pitch-related. I did not want to have 12 different notes ringing out at once or have a collection of notes that implied a specific harmonic space or language. (The crotales I used were all the Cs and Es available, to keep things a bit harmonically ambiguous.) The second reason was that I wanted to have some variety with regard to the timbre of the crotales. The automat comes with metal strikers on the ends of the solenoids, and when striking a crotale these cut through anything pretty sharply. Almost brutally! So I wanted to have a softer tone on the second solenoid in order to get a bit more timbral variety from the crotales as a whole. Overall, I opted for a broader timbral palette instead of a harmonic one.
I set out to make some new beaters for the solenoids and I experimented with various woods and beater shapes, but surprisingly I got the best results from using 100% infill 3d printed beaters. The PLA plastic I was using gave the crotales a softer attack and still had enough mass to actuate the crotale so you get a clear tone out of it. I do want to revisit this in the future to see if I can find another type of material (or materials) that can work as the beaters, to get a wide range of options when using the solenoids, but plastic is what I went with for the purposes of this performance.
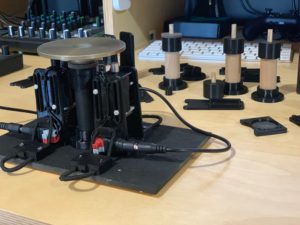
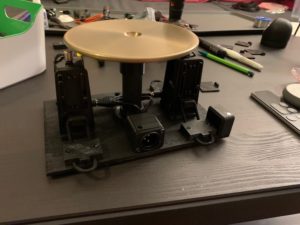
Here is the first fully assembled proof of concept, along with all the prototypes I had printed up to that point:
-

- All of the prototypes…
-
- Closer shot
-
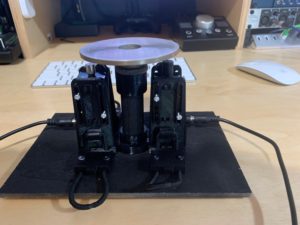
- Front of assembled prototype
-
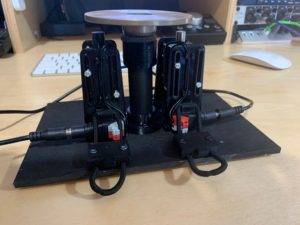
- Back of assembled prototype
Because I had come this far, I really obsessed over every detail of the designs here, trying to get something functional, elegant, minimal… and black. I wanted these to be as slick as I could make them (with the materials available to me), because that’s a fun thing to obsess about.
Since each individual unit was unique (size of crotales, where the wiring had to go, etc…) I even printed some (black) numbers on each so I would know which was which when setting them up.
-
- Assembled unit #1
-
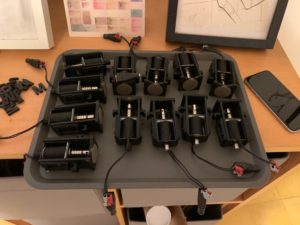
- Assembly line for solenoids
-
- The individual bases
-
- Wiring and labelling DC jacks
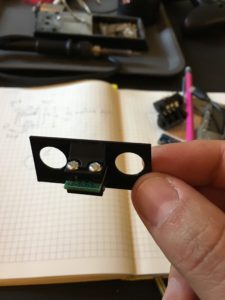
And here’s a closeup of #1 without the crotale so you can see the wiring and other details:
Although this was a late addition to the idea, I ended up incorporating a preparation of aluminum foil on the crotales. Towards the end of the performance I had some volunteers attach a sheet of crinkled aluminum foil (using a 3d printed magnetic clip of course) to each unit so the timbre you would get from the crotale would be sizzly and distorted, but in a very organic and “acoustic” way. This blended very well with the wavefolded metal samples which made up the sample playback during the same sections.
This is what one of the crotales sounds like on its own:
And here is the same crotale but with aluminum foil on it:
If you’re curious you can see the designs and print them yourself here.
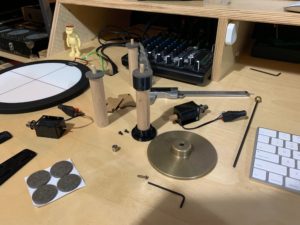
Although it wasn’t as central aspect of the performance as the crossfader was, I wanted to have a high-resolution but compact expression pedal that I can use with this setup. For years I’ve used a passive Ernie Ball VP JR which is a workhorse of a pedal, but it is mono and audio-based, so I would have to put it between my sound card and the PA, which isn’t ideal for a variety of reasons. I’ve looked for a while for something that could function as both a passive volume pedal (when I need one for guitar stuff) as well as a USB/expression pedal for other times, and it turns out nobody makes something like that. The closest you get is a combo of a volume pedal and an expression pedal, but that would then require some kind of converter to turn it into MIDI.
I decided I would try to make one, and after embarking on a really long, really boring, and ultimately unfruitful search for a dual-ganged pot that let me have an A250k half for the “volume pedal” part, as well as a B10k half for an “Arduino/expression pedal” part I pretty much gave up on the idea…
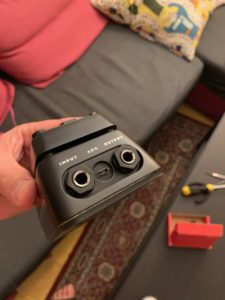
I remembered that a good friend of mine (Wade Matthews) had been using a pair of Dunlop X Minis for a few years and had been quite happy with them. In trying his pedals out out, the size didn’t feel great, but I loved that they were compact, and after doing a bit of research I found that internally it had exactly what I wanted… (A250k / B10k). The only issue was that it had it presented as an “aux” output, which you could then plug into an expression pedal control for whatever pedal/keyboard you want, which again would require some kind of converter before making its way into the computer.
Given what I had worked out for the Teensy Crossfader, I thought I could leverage the same codebase but apply it to an expression pedal. So I could have a fully passive volume pedal and a high-resolution expression pedal with a USB output, all in one! The code didn’t have to change very much, but I did need to find a way to physically mount a USB jack and guts inside the pretty tiny pedal.
In the end I worked out a fairly simple but sturdy mounting solution for a USB-micro jack which was mechanically supported by the other two 1/4″ jacks.
-
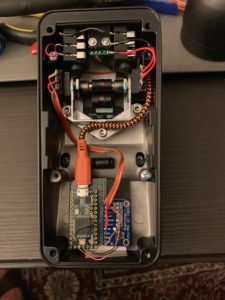
- Internal guts and wiring
-
- USB-micro support
-
- USB-micro jack external
-
- Completed pedal
Overall, having a 3d printer has really given me a lot to play and experiment with. There are so many possibilities with regards to sensors and mounts alone, not to mention enclosures or even compact instrument additions and preparations.
I’ve put a lot of my designs on Thingiverse and will keep adding more as I develop them, particularly now that I have a CNC machine as well.
///////////////////////////////////////////////////////////////////////////////////////////////////////////////////////////////////////////////////////////////////////
Cloud / confetti
Like many programmers, I often end up reusing bits of code I’ve used before. When I do this I tend to copy over all of the files and dependencies into the main project folder so everything stays together and includes versions that will definitely work with the project. Every time I do this, however, there’s always some file or subpatch that gets out, and I have to do the very unexciting task of file management to make sure that everything is where it needs to be (yesterday I woke up sucking a lemon).
This loses its charm very quickly, and even though the ‘projects’ feature that was introduced to Max a few years ago was supposed to mitigate this problem, I never found a good workflow for using projects in an exploratory and developmental way. Having spent a considerable amount of time making a Max for Live device (the refactor of C-C-Combine) I wanted to try wrapping up some of the common bits of code I often used as Max for Live devices, with the intention of using them in Max, rather than Live itself. That way, when I was exploring ideas or setting up a new patch for a performance, I could take the M4L devices I needed knowing that all dependencies would be include within the .amxd files.
As part of the refactoring of Cloud into a Max for Live device, I decided to give it a complete overhaul, and to incorporate some of the fancy-pants signal decomposition stuff I was using elsewhere in the performance (which I had access to as part of the FluCoMa project at large).
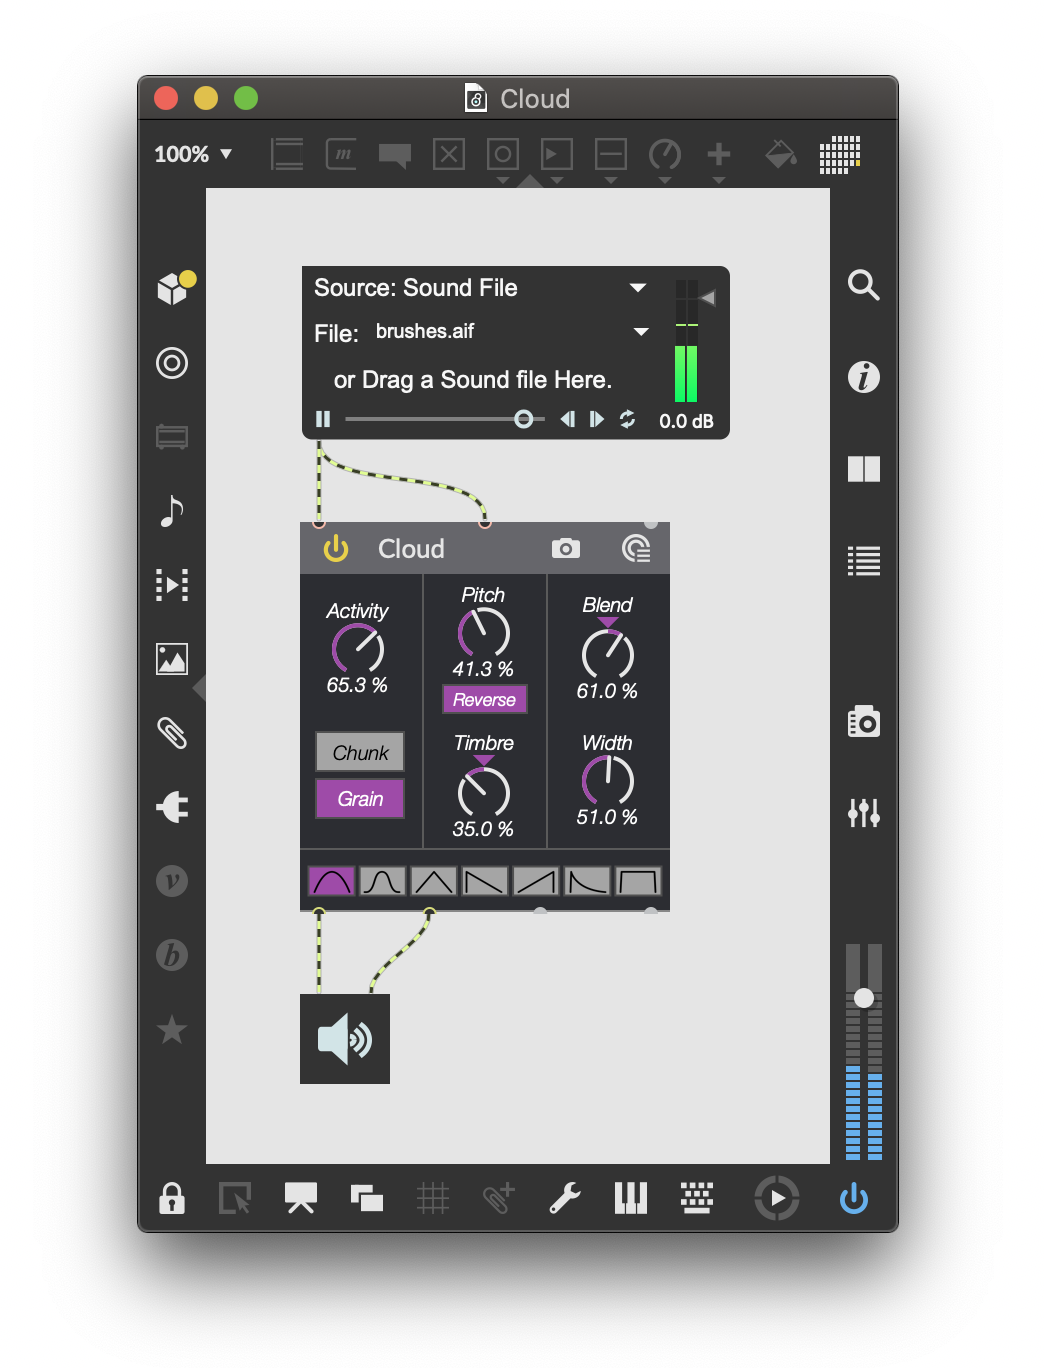
This is a completely revamped and reworked bit of code that has been present in my patching arsenal from when I first developed Cut Glove. As a quick summary, it is a real-time granulator that is triggered by onset detection(!) such that whenever an attack is detected a new bit of audio is written to a circular buffer and bits from that rotating pool of attacks are played back. So it’s kind of like separate record and play heads for a looping delay that only operate when an attack is detected.
Aside from a bunch of plumbing improvements and general code tidying, I revamped how the initial grains were written to the circular buffer. Previously, I used to write a random amount of audio to the rolling buffer every time an onset was detected. What I’m doing now is writing a (typically smaller) grain of audio to the buffer based on a bunch of audio analyses (loudness, and temporal shape mainly). I also incorporated some of the signal decomposition tools that were new to me as part of the FluCoMa toolbox.
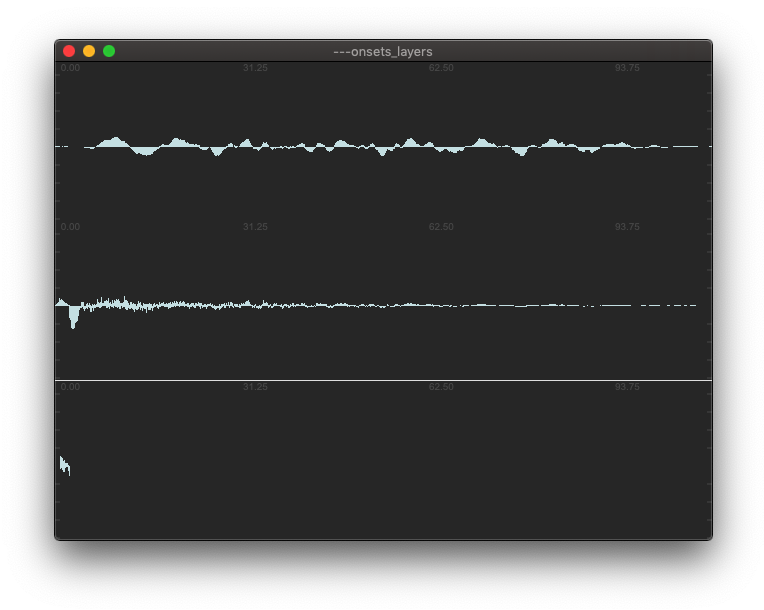
I thought it would be interesting to separate the audio that was being recorded into multiple layers, and then have a way to control the balance between these. So almost like a wet/dry control, but for different layers of that sound. Since I was familiar with the algorithm, I incorporated HPSS in a similar way to what I did with the gong samples I used for the drum triggers. That gave me a clear separation between harmonic (sustained/smooth sounds) and percussive (noisy/clacky sounds). But for this I wanted to go one step further and do a three-way split, so I further broke down the “percussive” component of the HPSS algorithm into a transient separation algorithm.
In effect that gives me three distinct layers: a transient (typically the sharp attack at the start of the sound), a harmonic component, and a percussive component.
Even though what’s going on under the hood is somewhat complex – three-way machine-learning-based signal decomposition – that isn’t terribly important or useful to know as a user. All that complexity can be abstracted into a metaphor, which in this case is “timbre”. In Cloud you have a single parameter called Timbre which crossfades between the different layers of signal decomposition, but in a way that I find makes sense musically. The complexity of the underlying code is abstracted via musical metaphor in a, hopefully, intuitive way that you can explore without needing to know the specifics about signal decomposition algorithms and settings.
In addition to the reworking of Cloud I was also working on a new Wavefolder, applying bits of ideas that I got from all over the place. This was actually one of the catalysts that started bringing all the various piece of Kaizo Snare together as the sound of the Wavefolder being applied to metallic samples sounded amazing!
Wavefolders and waveshapers were not something I used a lot prior to this, but like with many things, once you jump down a rabbit hole of exploring ideas, it’s hard to stop. So I explored various ways of doing this, and tried to combine them in a way that gave me tons of range and control while, as in Cloud, presenting them in a way that (hopefully) made sense as a user.
This had a knock on effect where I started converting more of my older modules from The Party Van, Cut Glove, and other bits and performances that I use quite often, turning them into confetti, a library of funky M4L devices.
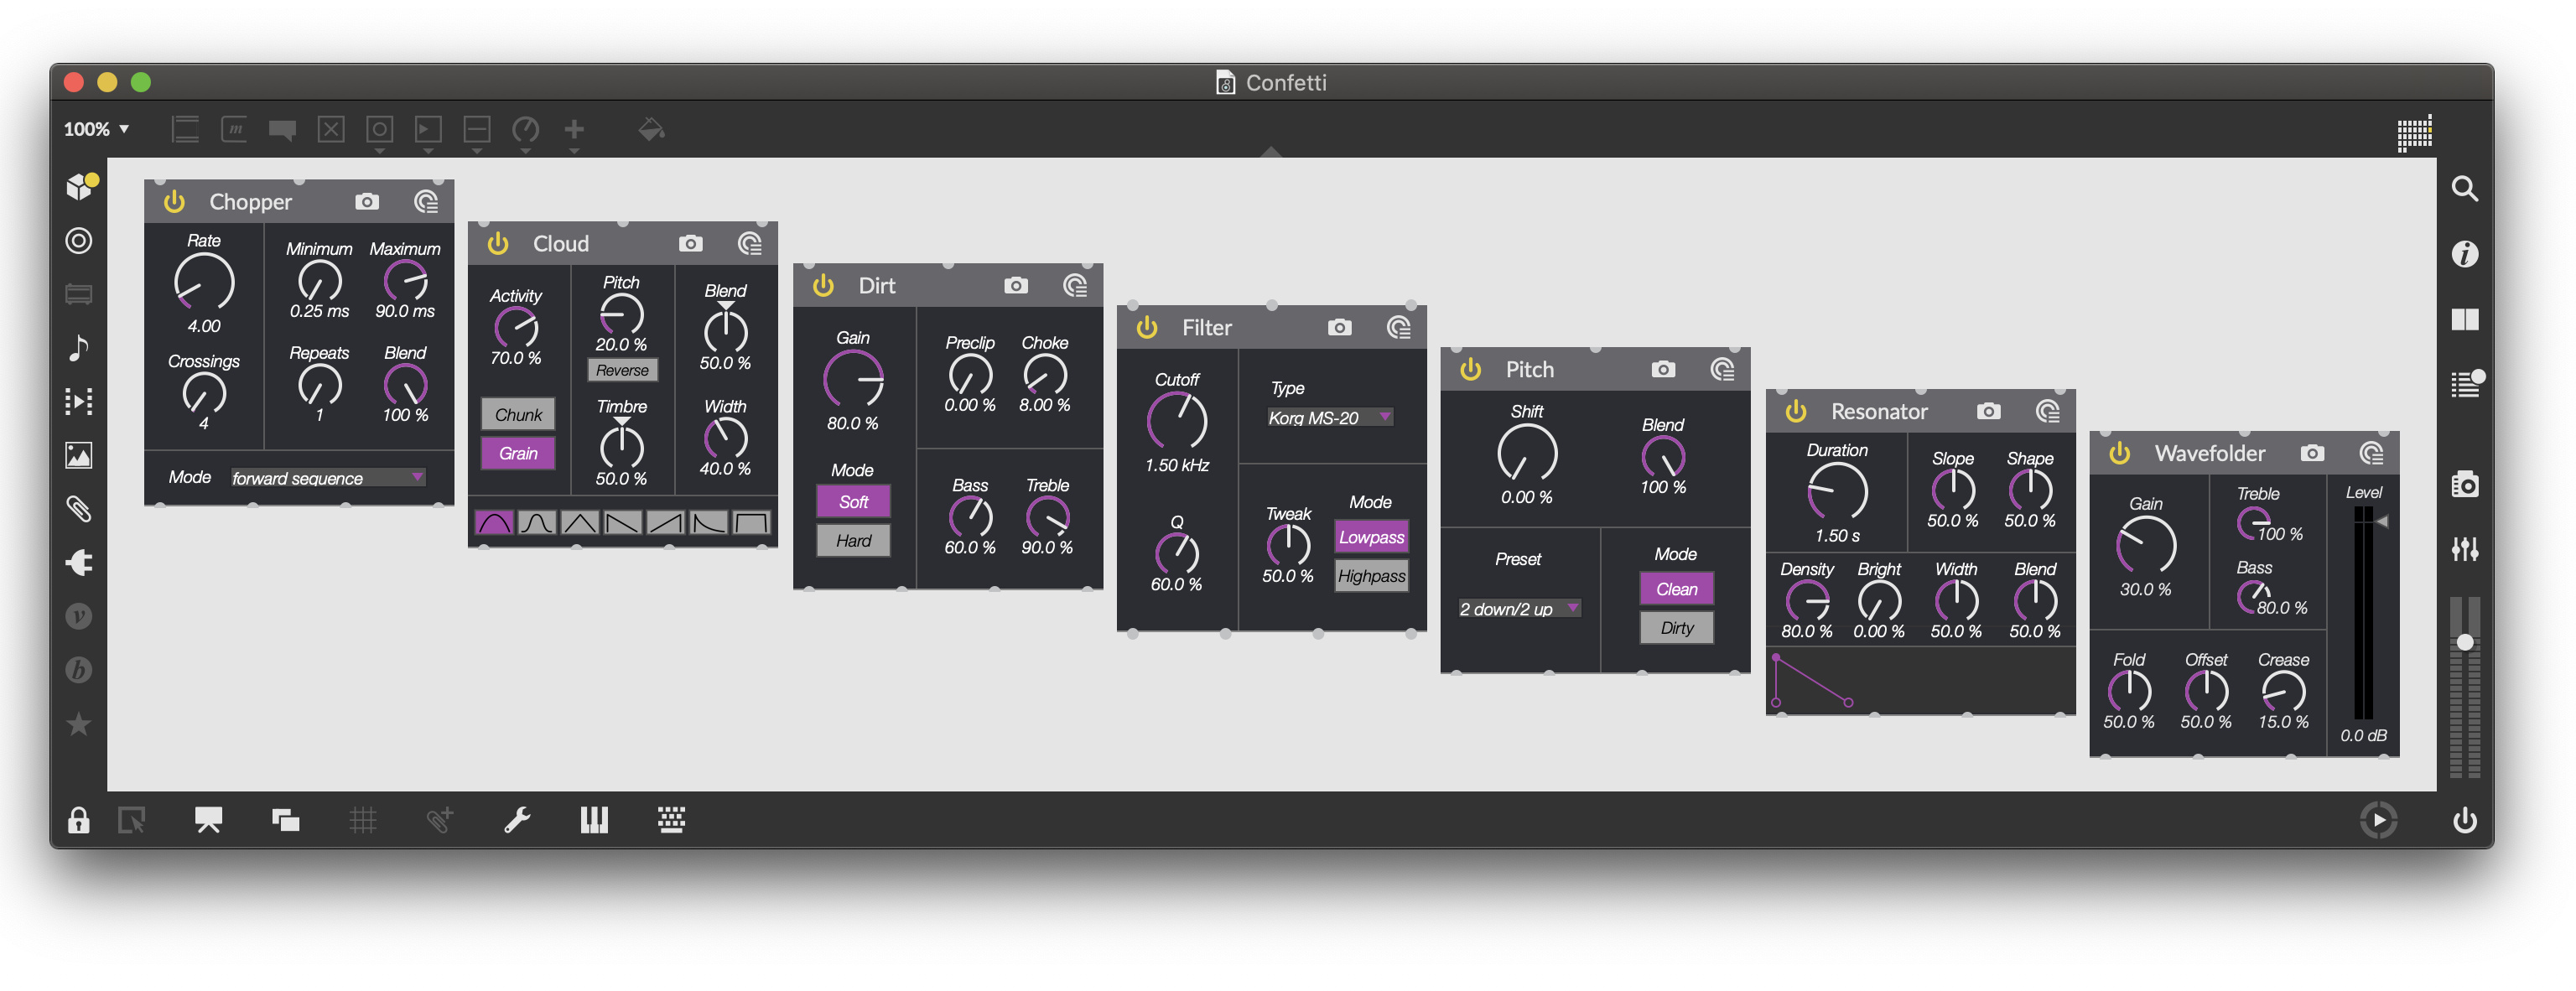
I am constantly added more modules to this, and you can find the current state of it on Github or the confetti page on my site.
Since making these I’ve used them for just about every video or project I’ve done. All I need to do is create a new patch, add the confetti devices I need, including some abstractions for my main controllers, and I’m good to go in no time. It’s so much easier.
///////////////////////////////////////////////////////////////////////////////////////////////////////////////////////////////////////////////////////////////////////
Failed Experiments (the road not travelled)
During the early stages of the creative process, I was exploring all sorts of ideas. You never know what is going to stick, so I would go into the studio with an idea and whip up some stuff to test it and see how it goes.
One of the first of these experiments that got abandoned was the use of an x-io NGIMU motion sensor in an effort to harvest some of the movement and gestural data from my left (“record”) hand. Since it is moving back-and-forth across the snare a lot during the performance I thought that I could draw from this in an interesting way. This echos some experiments from many years ago where I tried mounting a (DIY) motion sensor on Angie‘s wrist during a Takahashi’s Shellfish Concern video. My thinking for both of these was to find a way to extract interesting information from natural gestures, as opposed to mapping a motion controller’s XYZ directions to arbitrary parameters that have to be learned. This kind of artificial gesture was (and largely is) uninteresting to me.
So I tried a few experiments using the NGIMU, which although promising, particularly given the great resolution and low latency of the sensor, didn’t really gel with the rest of the stuff I was working on. Plus, sometimes too much is too much, and by this point Kaizo Snare had a ton of much.
Here is a video of where I’m “scrubbing” through a drum loop using the gyroscope in the NGIMU. (In this case it is the direction of my movement that determines the speed and direction of playback):
In this video I’m using the Euler output of the NGIMU so the absolute position of my hand determines what is being played back. This feels a bit better as I have a clearer idea of where the sample starts “on the record”:
In the end all of the NGIMU-based experiments, although interesting and worth unpacking in the future, did not fit with the direction the piece was going.
Even though most of the sonic material was built around the crossfader snare sounds and techniques, I initially planned on using more preparations and implements with the drums, specifically building on some of the things I’ve been doing with amplified metal rulers over the years.
I even went so far as to order a pretty offensive thing called a BWEE to misuse it as a gigantic ruler for bowing and amplifying. The BWEE actually sounds great on the snare when (mis)used this way, as did some of the ruler-based playing when combined with the crossfader, but in the end neither made the cut. (Though that being said, I did have the rulers with me on stage during the performance, they just weren’t required.)
I also explored some more riffy/rhythmic playing, specifically using the crossfader as a “hihat”, by feeding it the audio from the onset descriptors-based sampler and Waveshaper and then cutting it with the crossfader much in the same way that a hihat part might fit along with more conventional snare playing. The fast rhythmic gestures you can get with the crossfader lend themselves well to this kind of playing.
Even though, at this point, I knew this kind of groove playing wouldn’t make it into the final piece, I did capture a couple of videos along the way:
Here’s a more down-tempo example:
I definitely see myself revisiting this kind of approach when I have a more general purpose setup, where I can dip in and out of different kinds of extended snare playing.
Another avenue of exploration I was very excited about was the incorporation of ROLI Blocks as controllers on the snare instead of the Novation Dicer I normally use. Although I’m generally hesitant of touch/pressure/MPE-type control interfaces, I was attracted to the ROLI Blocks because they are fairly compact, now had a native Max package/interface, and could be purchased used quite cheaply.
I found a used Lightpad and Loop Block on eBay and started building some code to see how I could use these on my snare. Immediately I realized that both of them combined were too big for the amount space I had available. I then thought about using the smaller Loop Block on its own, as it is the more compact option, and would give me more than enough buttons and LEDs (even though the button labels were ridiculous…). Unbelievably, the amount of pressure needed to press these buttons is herculean! I have no idea what ROLI was thinking with these. AND you couldn’t use the Loop Block with a wired connection. So the Loop Block on its own was a non-starter. I then started building something for the Lightpad, and even 3d printed a mount to mount it on the snare, but the way the software is setup makes it difficult to decouple the button input from LED feedback, something that I’ve found massively important since starting to work with monome devices many years ago. So after some further frustrations, the Lightpad too went into its box and now sits in my “drawer of controllers”, where it will hopefully find a use one day, or not…
I’m still hunting for a good replacement for the Dicer, and short of doing something completely DIY (perhaps using BELA Trill sensors) there aren’t a lot of great options out there. I’ve recently backed a controller that looks kind of promising on Kickstarter (offGrid), so we’ll see where my controller odyssey takes me next…
The final major failed experiment, which is actually the most musically promising one, was creating an NMF-based “scrubbing” patch where I would constantly be recording and decomposing (via NMF) the input from the scratchy-sounding snare playing. The NMF algorithm is pretty interesting in that it finds features in the sounds without any kind of training or preconceived notion of what the sounds should be. It’s also a pretty expensive process which means it’s fairly slow. So what I ended up doing was building a pool of sounds that had been decomposed (like a macro-version of what happens in Cloud) and split these into “dark” and “bright” channels, which I could then “scrub” through based on the movements of my hand. This ends up creating a sound which isn’t terribly dissimilar from the normal angle-based changes in timbre I can get from the “scratching” techniques, but what you hear is a decomposed and frankenstein’d version of the recent past.
The reason this particular experiment failed was not because of the sounds or my interest diminishing. It was rather that in creating the patch for this I found a major bug that derailed my ability to finish the patch itself. The bug was fixed not long after I found it (thanks to the FluCoMa team!), but given that I was in the middle of putting things together, this got pushed to the back-burner long enough to no longer be a critical aspect of the performance. Quite sadly in fact.
///////////////////////////////////////////////////////////////////////////////////////////////////////////////////////////////////////////////////////////////////////
Putting It All Together
So how does this all come together? What was going on during the performance?
Like most (all) of my work, improvisation is at the center of the performance. Even though I spent a long time prior to the performance exploring and developing musical languages and specific playing techniques, controllers, and software parameters, I wanted to leave the material that happened during the performance open. That isn’t to say that absolutely anything can happen during the performance but rather that I’ve learned a new language and am about to start a story/conversation in that new language.
One of the things I find most exciting about performance, and music in general, is the unknown aspect to it. The surprise that comes from the linear passage of time, where each new moment has yet to be determined. The collapsing of all the future possibilities into an experiential now that is often shared with other humans. I like to swim in this space, that tiny moment between the past and the future.
For this piece, however, I did have a couple semi-predetermined anchor points. There is a type of material that happens “in the middle” and again “near the end” that is made up from percussive comb playing, combined with the crotales and later followed by bass drum triggers. Part of this was practical as I needed the comb-based playing to happen before bass drum triggers since the notes in the latter were determined by the former. I also knew that the long gongs would be dramatic and heavy if brought in only towards the end of the piece. The material within each of these sections was still improvised and would develop and follow on from what happened earlier in the performance, but these sections had a fairly concrete sonic identity that was superimposed on the improvised material.
I find this mixture of pre-determination and improvisational freedom strikes a balance between allowing my intuition and impulses to shape and drive the specific material which makes up any given performance, while still being able to draw upon my “out of time thinking”, or as I sometimes refer to it “myself from the past”, to create structures and behaviors that I would have not been able to do in real-time.
I’ve used an approach somewhat similar to this in previous performances (You & Me & Us & Me & You, Light Vomit) where rather than having more concretely defined structural anchors, I would pre-determine distinct modalities, behaviors, or “containers”. These containers would act as an overall “menu” of options which I would then navigate during a performance. You can see an example of this from the performance patch for You & Me & Us & Me & You:
 In the top left you can see a table which shows the containers for this particular performance. The red text on the right explains them in a bit more detail so I could remember what was what. Even though these are numbered or ordered, it doesn’t necessarily follow that I would navigate the performance in this way. These are just the behavioral options available for the performance.
For Kaizo Snare, however, I approached things somewhat differently. Rather than having a bunch of containers, I used a hybrid approach where I mixed modal containers with discrete control of individual effects and processes. So rather than moving from behavior or interaction type to behavior/interaction, I instead navigated the individual components of each behavior.
This is what the performance patch for Kaizo Snare looks like:
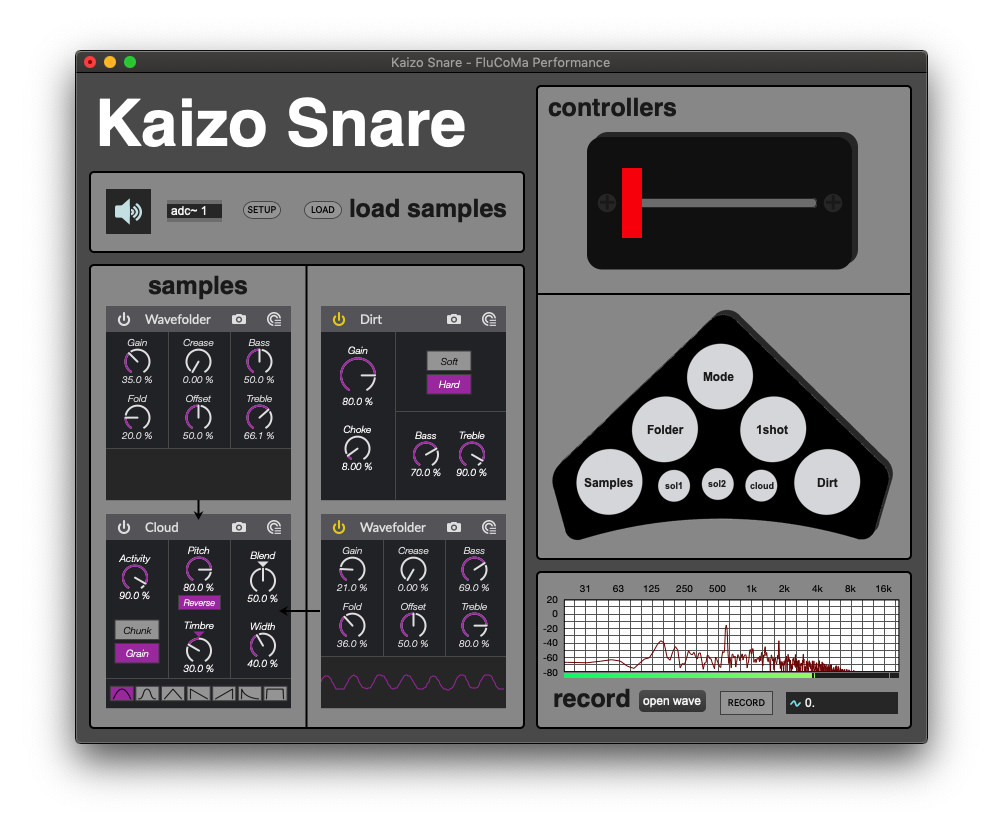 Rather than having modes or containers, I have a starker interface which focuses on the controllers I’m using. You can see the central button on the Dicer is a “Mode” control, which switches between the different crossfader modalities, but beyond that, the rest of the controller enables and disables individual processes and effects.
This may seem like a subtle distinction to make, between modal and discrete thinking and interfacing (and you’d be wrong) but in performing this feels quite different. There is less “scaffolding” holding things together. The overall arc and shape are more open (barring the anchors I made), which as a result moves the patch closer to a standalone instrument (with some bells and whistles) rather than a specific piece or idea.
I unpack some of this distinction in a play talk play with my good friend Wade Matthews which was filmed a couple of weeks after the Kaizo Snare performance. In this video I’m using the same exact patch (minus the literal bells (crotales)) and a lot of the discussion in the middle ends up in this territory of instrument vs piece, specifically in the context of Kaizo Snare.
As far as summing up some of the technical aspects I’ve discussed in the post up to this point, I made a video presentation just before the performance which unpacks a lot of the technical aspects of Kaizo Snare, with a heavy emphasis on the software side of things:
If you want to look at my presentation slides or example patches from this presentation you can download them here. And if you wanted to download the performance patch you can click here. The performance patch is heavily commented and annotated, but it does not come with “instructions” on use, nor does it include the gigantic sample library that it uses.
///////////////////////////////////////////////////////////////////////////////////////////////////////////////////////////////////////////////////////////////////////
The Future
Towards the end of the project I started imagining some other directions I could push these ideas. Obviously there were the failed experiments, but there were some things I wanted to try that I wasn’t able to do in time or thought would best fit in another project.
The first of the completely new ideas was the incorporation of transducers into my setup. Transducers are essentially speakers but without the cone. Whatever you mount them to, in effect, becomes the “cone” and acts as the resonant body of the speaker. My initial idea was to have a tiny transducer mounted in a 3d printed grip similar to the mic grip I used for my left hand “scratching”. Towards that end I ordered a ton of different transducers of various (small) sizes:
![]()
My plan was to build something that allowed for the same kind of expressiveness I can get with the microphone grip, but with “the other end” of the signal path: the speaker.
Well, I ordered these and they sat in a box for months while I was working on other projects.
I finally got around to testing these and the results are incredibly promising!
Here’s an explanation of what’s happening in the video:
In addition to having a small transducer (Dayton DAEX9CT (this one struck a good balance between size and sound in my testing)) mounted in a grip, I also have a larger (Dayton DAEX58FP) mounted on the body of the snare. As I explain in the video, these two transducers serve different functions. The larger one adds some “excitement” to the system (and was inspired by seeing a talk by fellow FluCoMa-related person Alice Eldridge‘s Feedback Cello) so that feedback that is already present, or about to be present gets nudged along, particularly when coupled with some descriptor-based ducking.
-
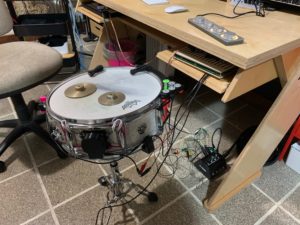
- Snare with Transducers
-
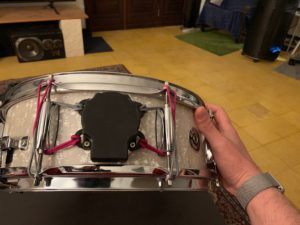
- Large Transducer Mount
-
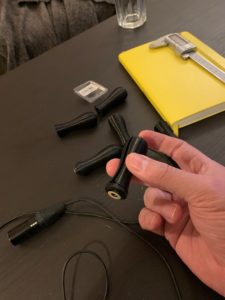
- Small Transducer Grip
-
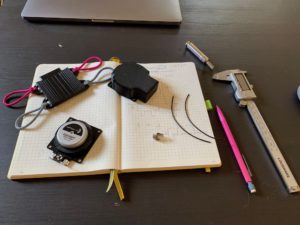
- Large Transducer Assembly
The smaller transducer has a more immediate, and even violent, impact on the feedback and kind of takes over anything that is happening. It’s also incredibly responsive to where it is placed on the drum and its relationship and distance to the microphone. Although this is still quite early days, I anticipate there being lots of room to explore here with regards to “dual wielding” the microphone and transducer.
Another aspect I will explore in more detail is the “super fader” idea, where I take a single/simple controller input, in this case the DIY high-resolution crossfader, and harvest the data from it into multiple musically-useful streams. I make some subtle use of this in Kaizo Snare, where the faster I am moving and cutting on the crossfader, the more active and intense sounding the Cloud effect becomes. These kinds of secondary controller streams can be quite interesting and useful as they are bound to the original controller gesture, but in an indirect way. So depending on how you implement these control streams, you can get a rich and complex set of controls all generated from a single input controller.
Towards that end, I’ve built a fader-to-modular synth Max for Live device which takes a single fader as input and spits out multiple streams of information:
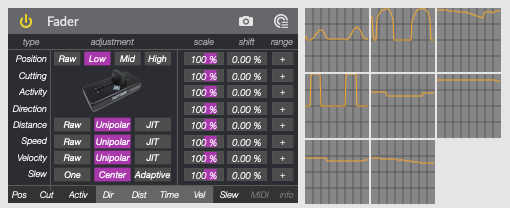
I will still refine the algorithms a bit more, and see if I can find some other useful bits of information to extract, but as it stands I can get a lot of rich expression with just a single fader.
Lastly, I have begun playing with some more machine learning in an effort to create a complex set of tools for a Sensory Percussion sensor. I’ve owned the sensor for a few years but was never happy with the results I was getting with the software that it is tied to. They have an “all-in-one” paradigm for the software, and as someone who has written a lot of his own software, and put a lot of time into creating interesting instruments and sample libraries, the prospect of trying to recreate a fraction of that inside of a proprietary bit of software was quite off-putting.
So my idea with this is to create a set of native tools for Max/M4L that will do some of what the existing Sensory Percussion software does (onset detection, machine learning-based training and matching). That on its own will be useful, as it will provide access to higher-resolution data and lower latency (in many cases), but my main focus will be on creating a few tools and patches that will allow for more complex ideas. One of these will be a descriptor-based corpus navigating sampler, very similar to what is being used in Kaizo Snare for sample playback, that will look and sound something like this:
Another one will be a variation on the confetti Analysis device, which will be fine-tuned to work with the Sensory Percussion pickup. This will give you high resolution control signals which can be fed into a modular system using something like an Expert Sleepers ES-8.
A bit of a tangent on the Sensory Percussion plans: I’ve been doing loads of work and improvements on the onset descriptors idea. I’m presently in the middle of this, so other than the corpus-based sampler video above, I don’t have much to show for it yet. The main improvements are much lower latency (5.8ms vs 11.6ms), spectral compensation (basically a “matching EQ” but happening per individual hit), and machine-learning-based time travel (using the first 5.8ms of an attack to predict what the first 100ms will sound like, from a pre-trained sample library, and then searching for the best matching sample based on that longer analysis window). Just about all of this is working at the moment. I’m just doing many refinements and improvements before putting it all together.
///////////////////////////////////////////////////////////////////////////////////////////////////////////////////////////////////////////////////////////////////////
So there it is. Kaizo Snare. A huge mishmash of ideas that all came together into a singular idea in a way I could have never dreamed up.
Don’t let your dreams be dreams.
Yesterday you said tomorrow.
So just do it.
Make your dreams come true.
Just do it.
[…] Kaizo Snare […]